


TFT Shield para Arduino Nano - Iniciar
Componentes e suprimentos
 |
| × | 1 | |||
| × | 1 | ||||
| × | 1 |
Sobre este projeto
A história
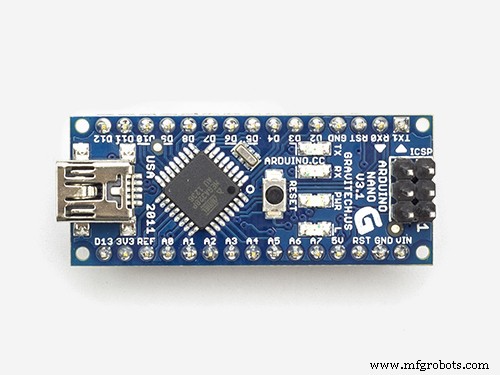
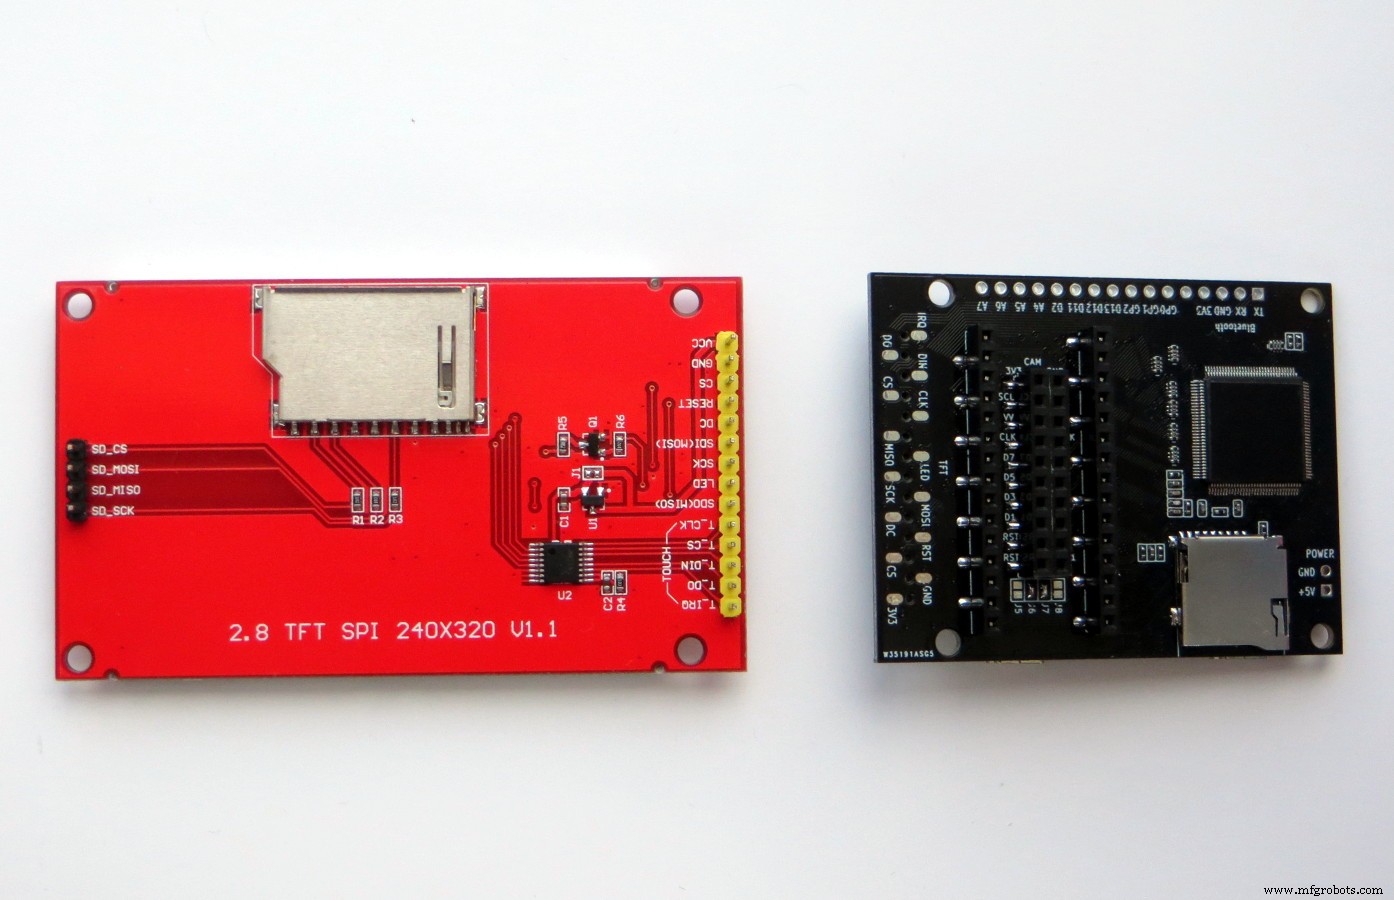
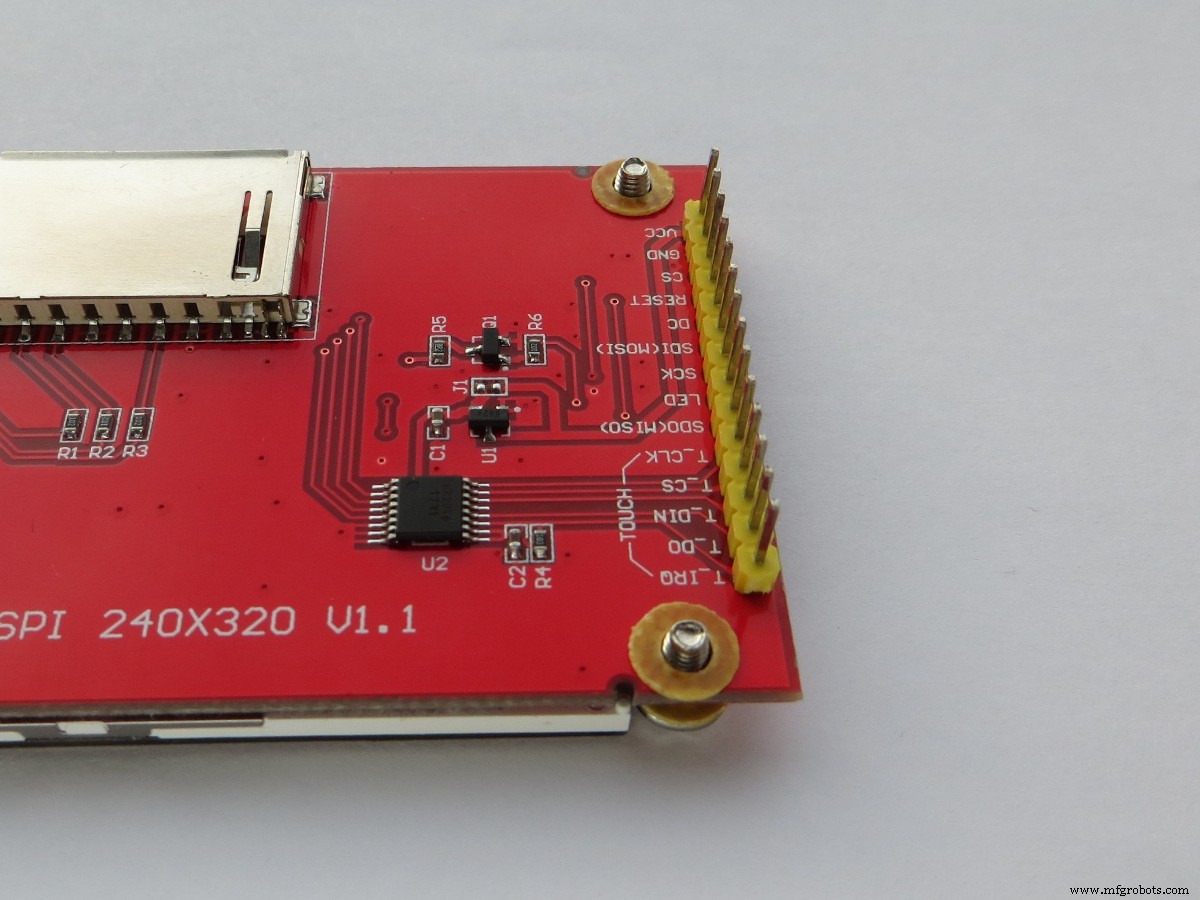
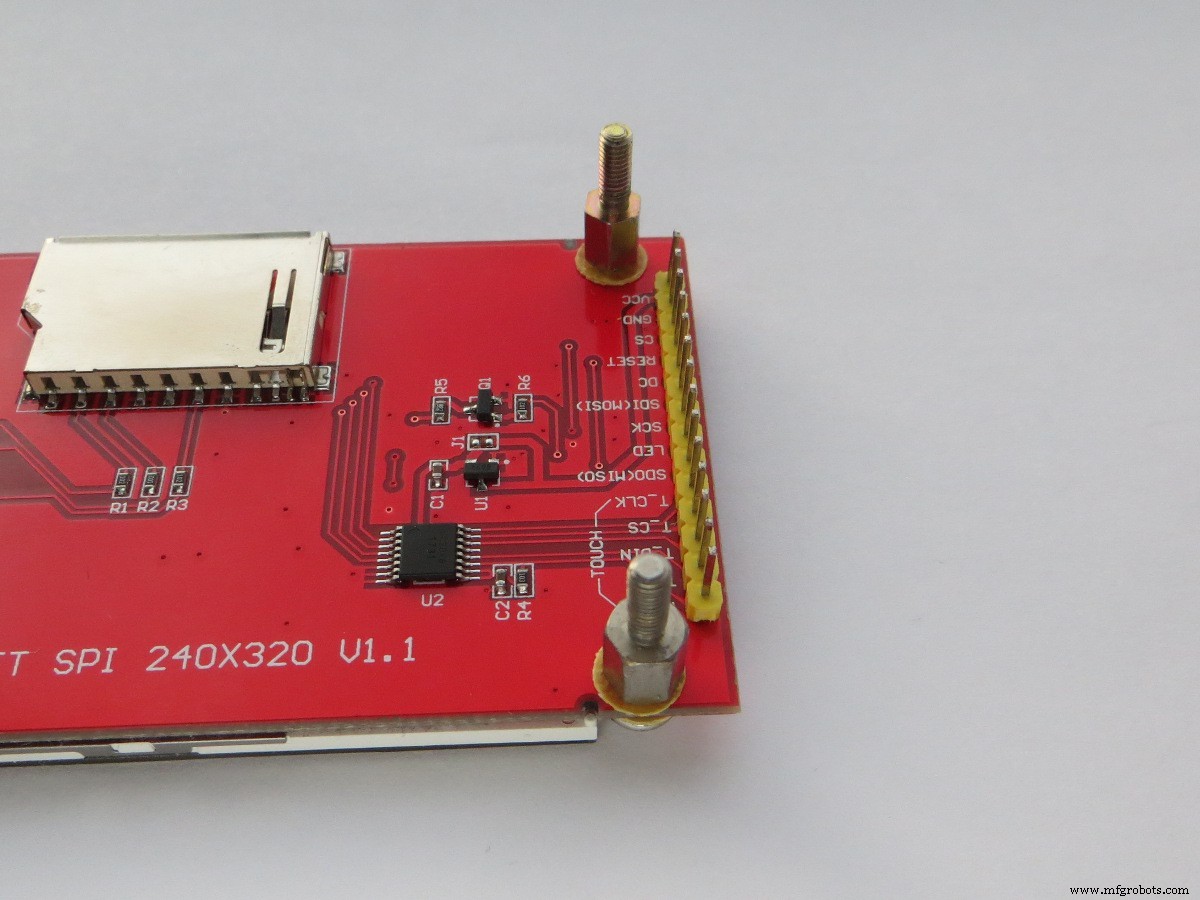
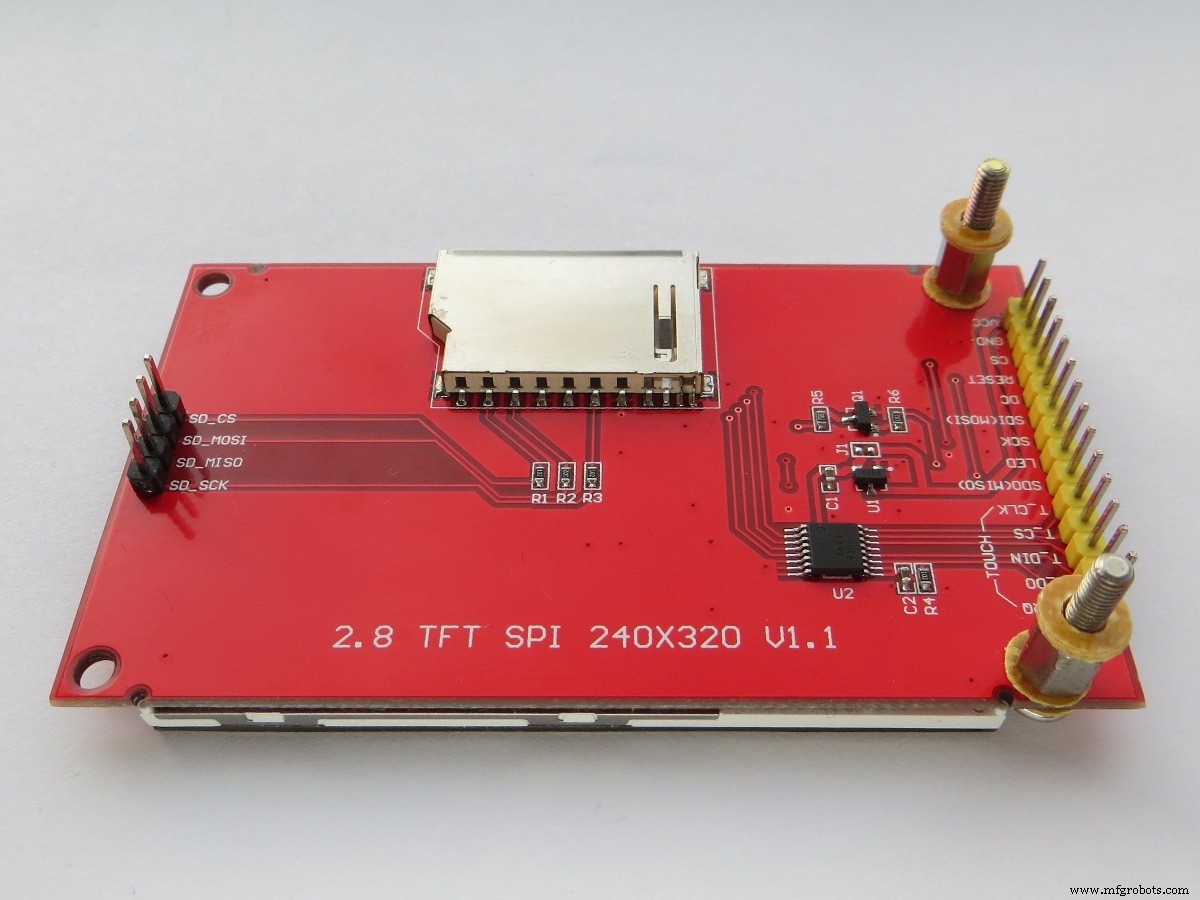
Dificilmente há uma pessoa que não tenha visto e não saiba o que é um display colorido. E, provavelmente, muitos fizeram (ou gostariam de fazer) algum projeto no Arduino usando uma tela colorida. Além disso, esses monitores hoje são muito comuns e acessíveis. Existem muitos monitores que diferem em resolução, tamanho de tela e interface. Eu gostaria de me deter em um desses monitores. Estaremos interessados em um display com uma interface SPI, uma resolução de 320x240 pixels e uma diagonal de tela de 2,8 "(bem como 2,4" e 3,2 "). A interface SPI é muito conveniente para conectar a um microcontrolador, uma vez que tem um número pequeno de linhas de sinal. E a velocidade do SPI permite que você atualize rapidamente o conteúdo da tela. Em geral, muitas vantagens. Mas há momentos incômodos. Por exemplo, é necessário coordenar ainda mais os níveis lógicos no caso de conectar o display às placas Arduino com alimentação de 5 V. Para conexão rápida e fácil de um desses displays (com interface SPI) ao Arduino Nano, usaremos uma pequena taxa - escudo TFT.
Este escudo é a segunda versão (leve, para Arduino Nano) do TFT Shield para Arduino Uno, sobre a qual você pode ler aqui, aqui e aqui.
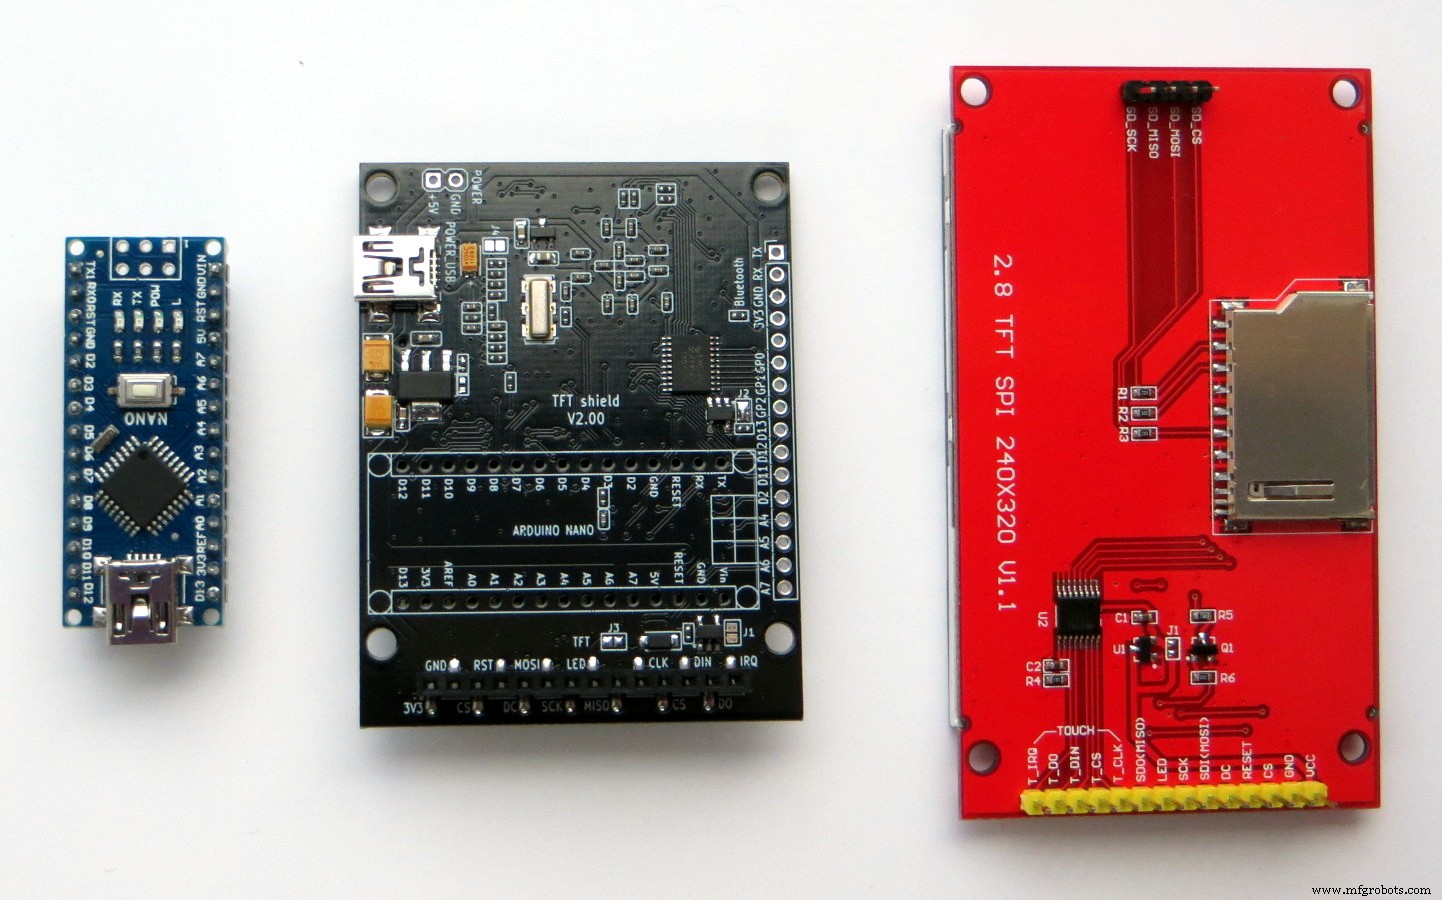
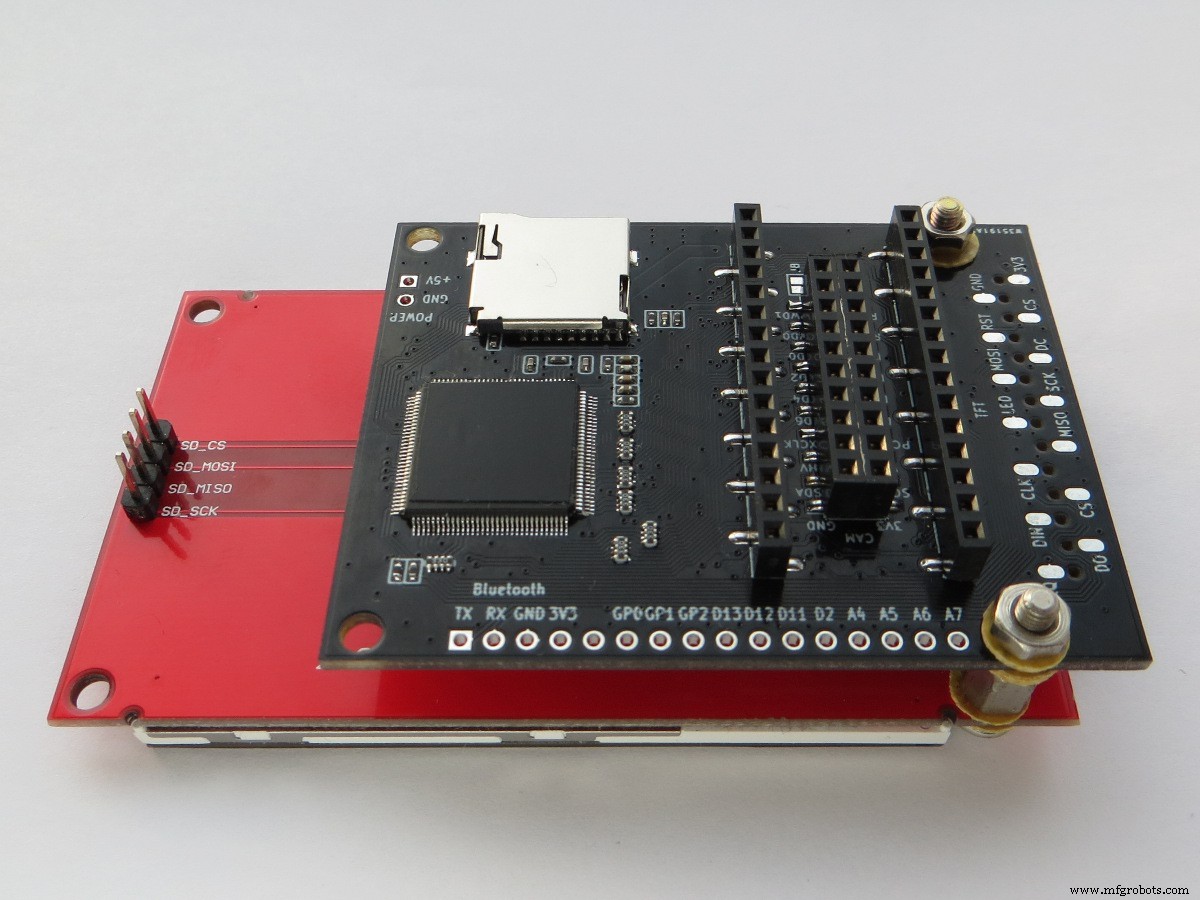
Breve descrição do escudo TFT:
- O tamanho da placa é 64x49 mm,
- Conector de 30 pinos para conectar o Arduino Nano,
- Conector de 14 pinos para conectar um monitor TFT 320x240 com uma interface SPI (incluindo uma tela de toque),
- Conector para cartão microSD,
- Conector para o módulo Bluetooth (HC-06),
- Conector de 20 pinos para câmera OV7670 (bem como outros),
- Mini conector USB, bem como um conector separado de 2 pinos para fonte de alimentação 5V.
Então, vamos começar.
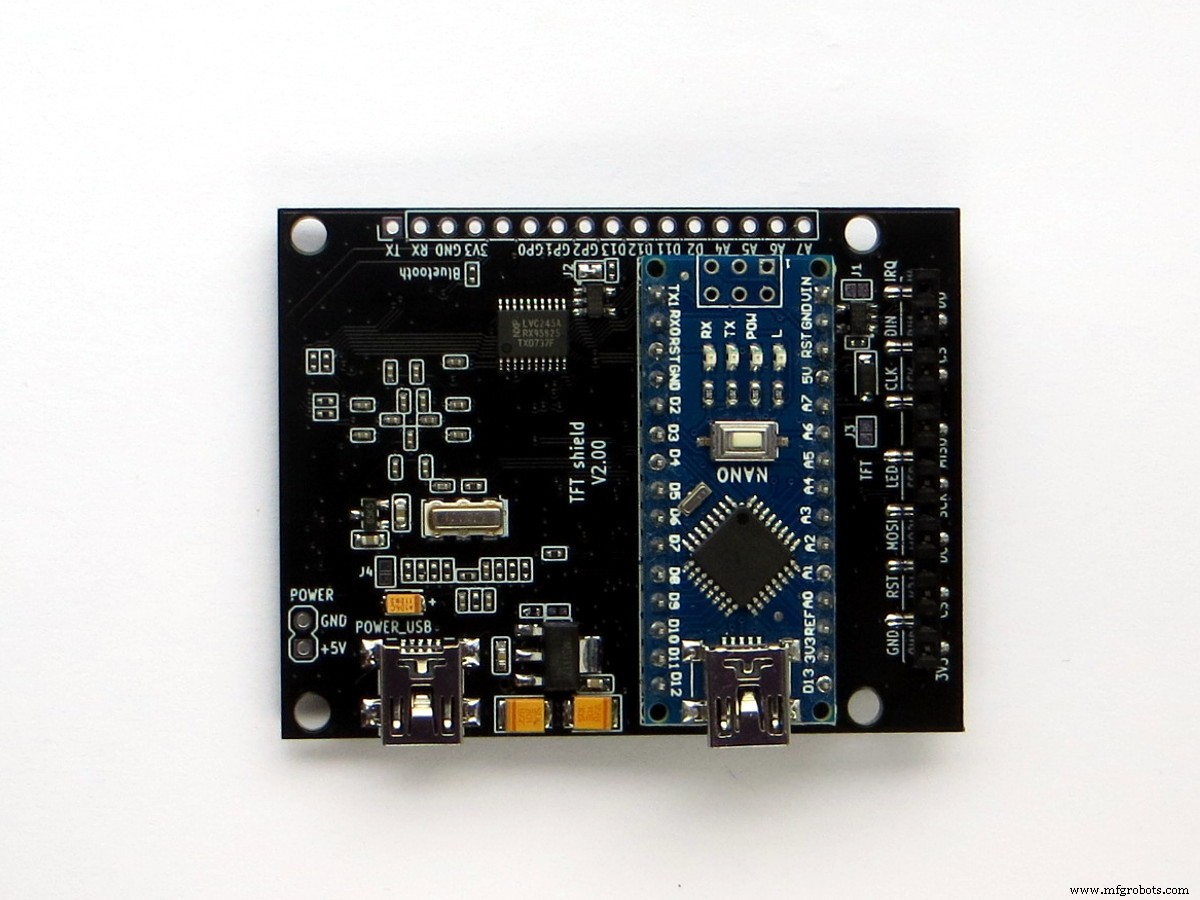
Montagem
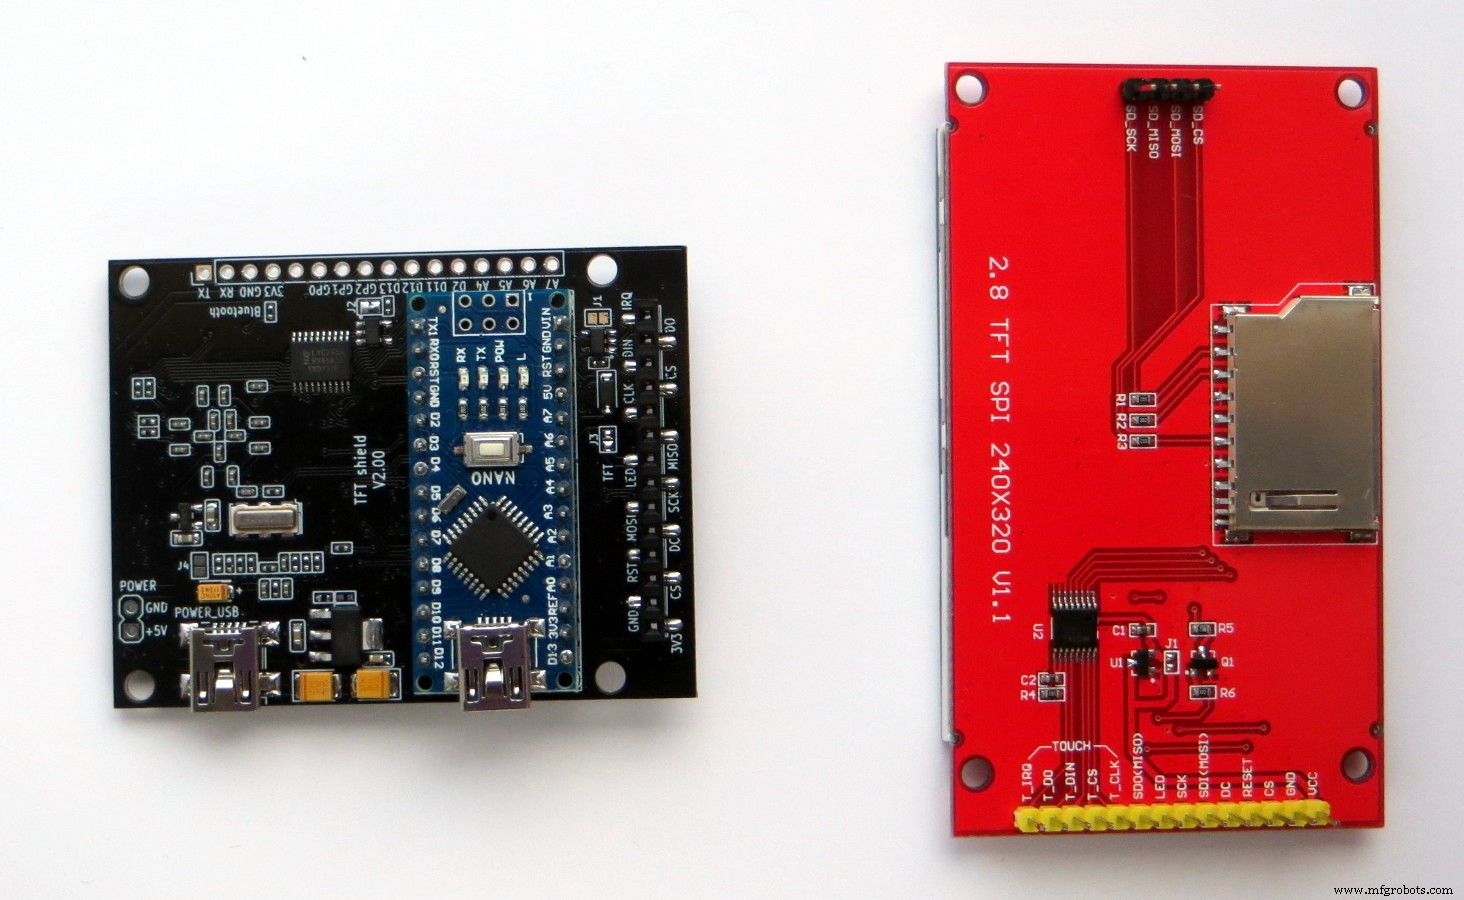
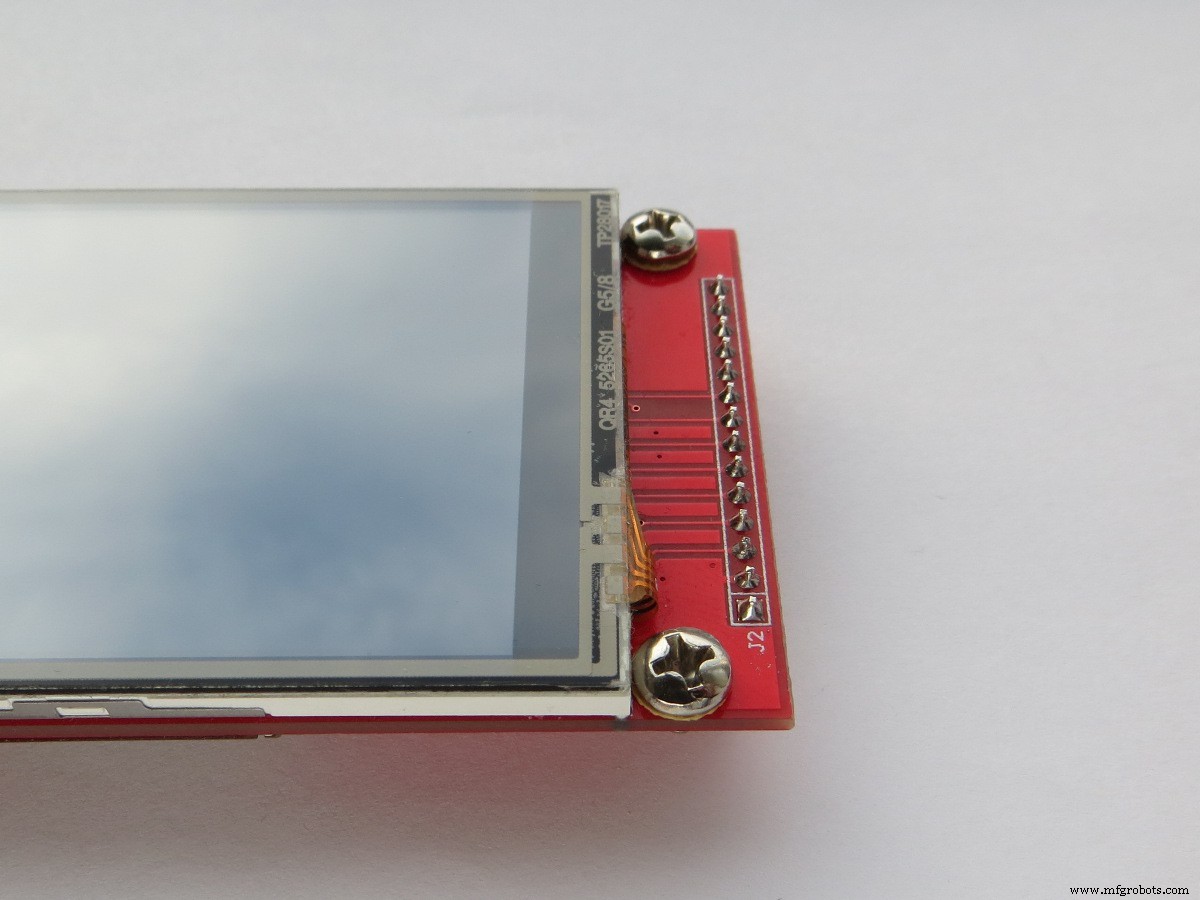
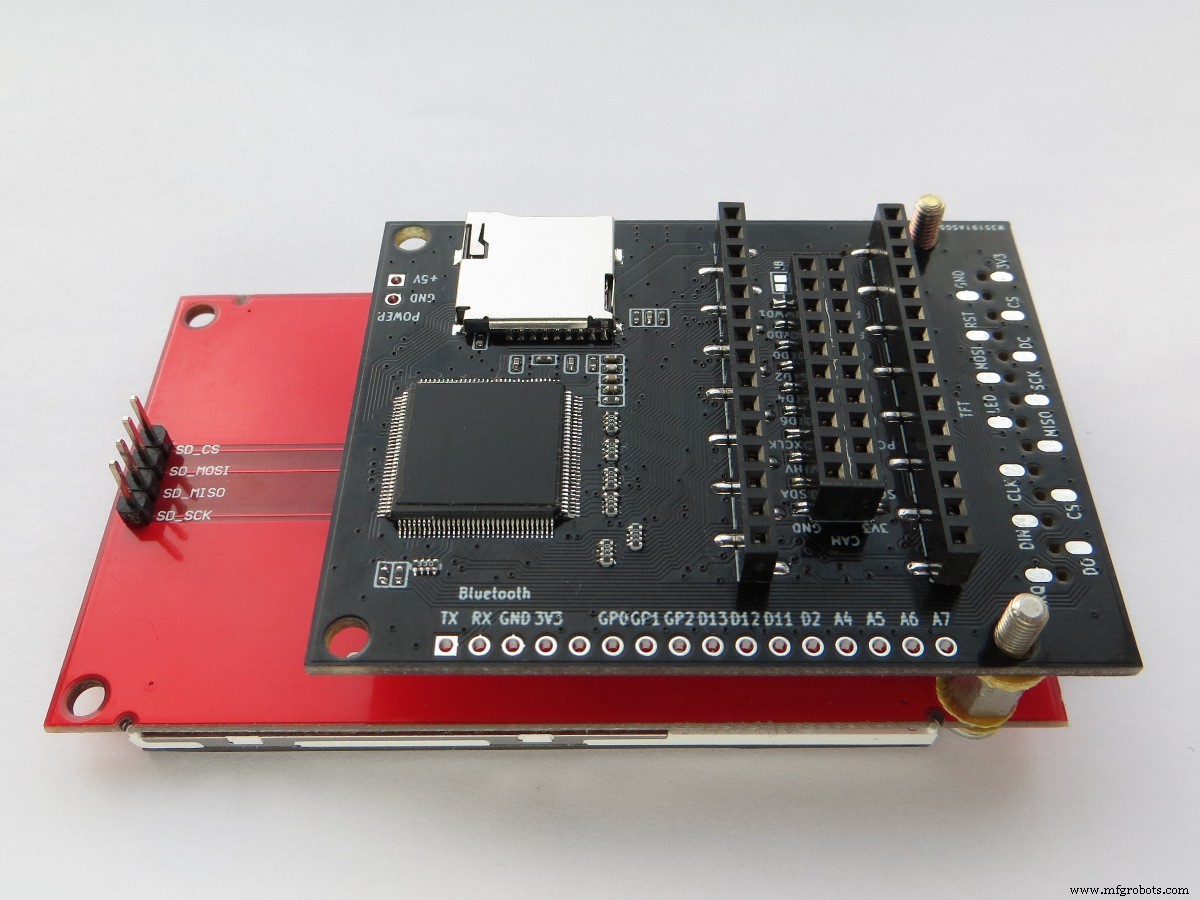
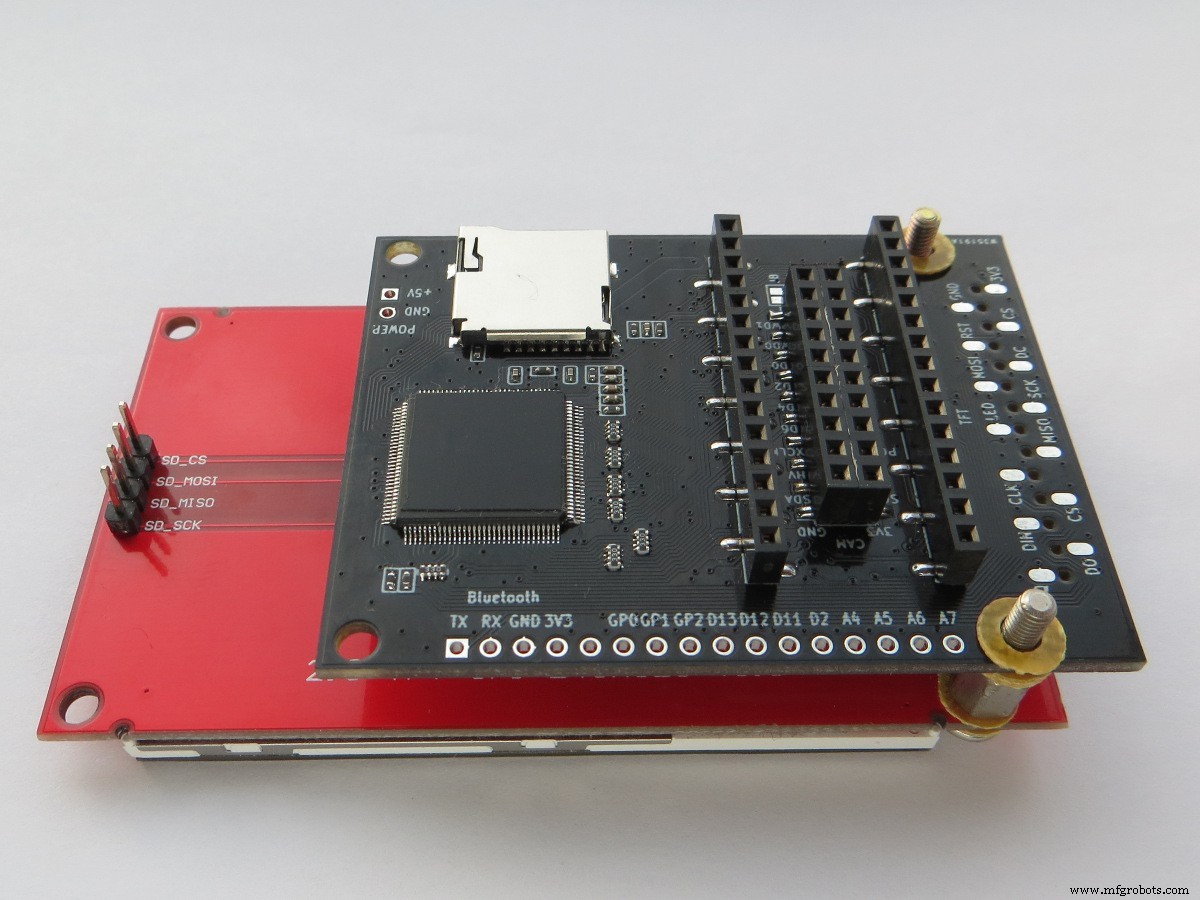
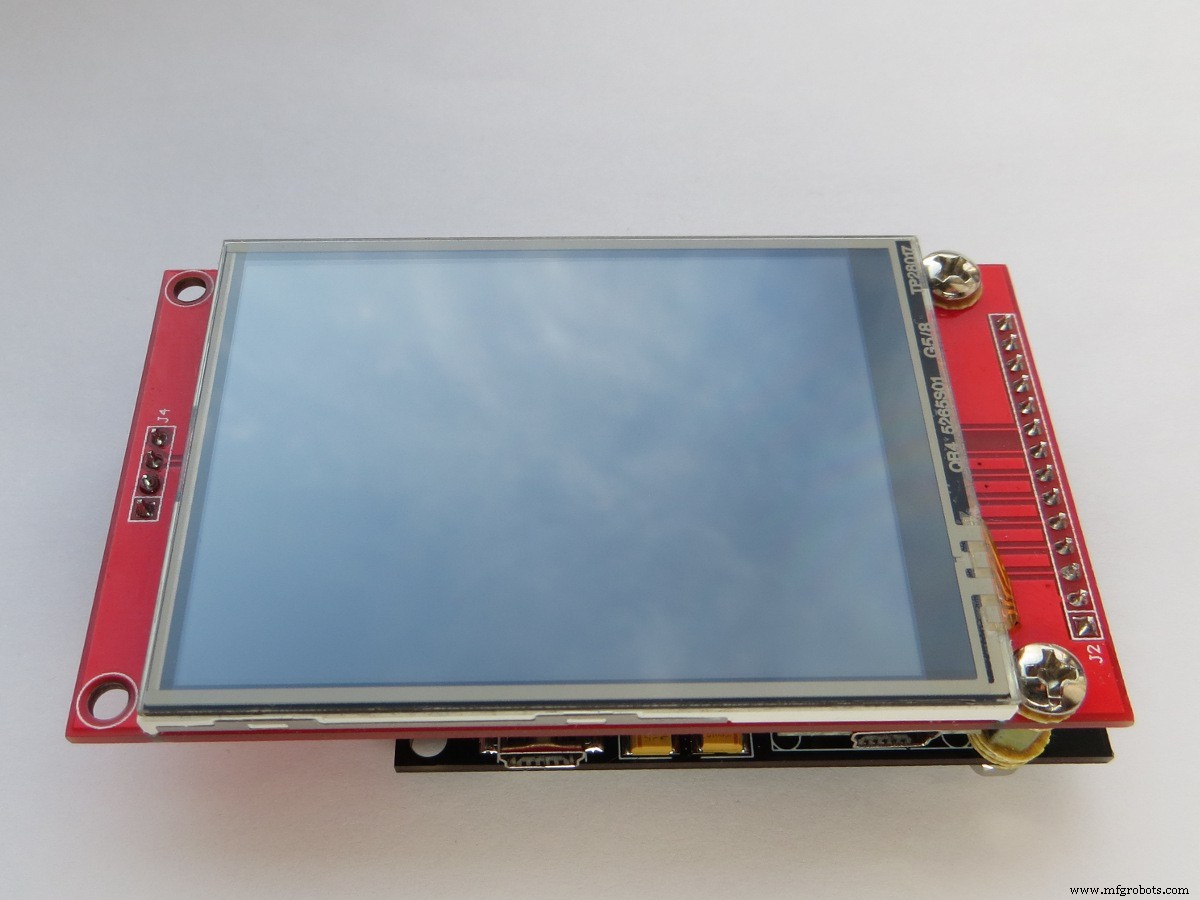
A montagem das pranchas é muito simples. Mas deve-se ter cuidado ao ler as designações de contato antes da instalação. Primeiro, você precisa instalar a placa Arduino Nano conforme mostrado na foto. Depois disso, um display é conectado, que pode ser conectado em ambos os lados da placa ( método 1 ) e por outro ( método 2 ) Depois disso, você pode conectar a energia com um cabo mini USB. A seguir estão as fotos.
Método 1:
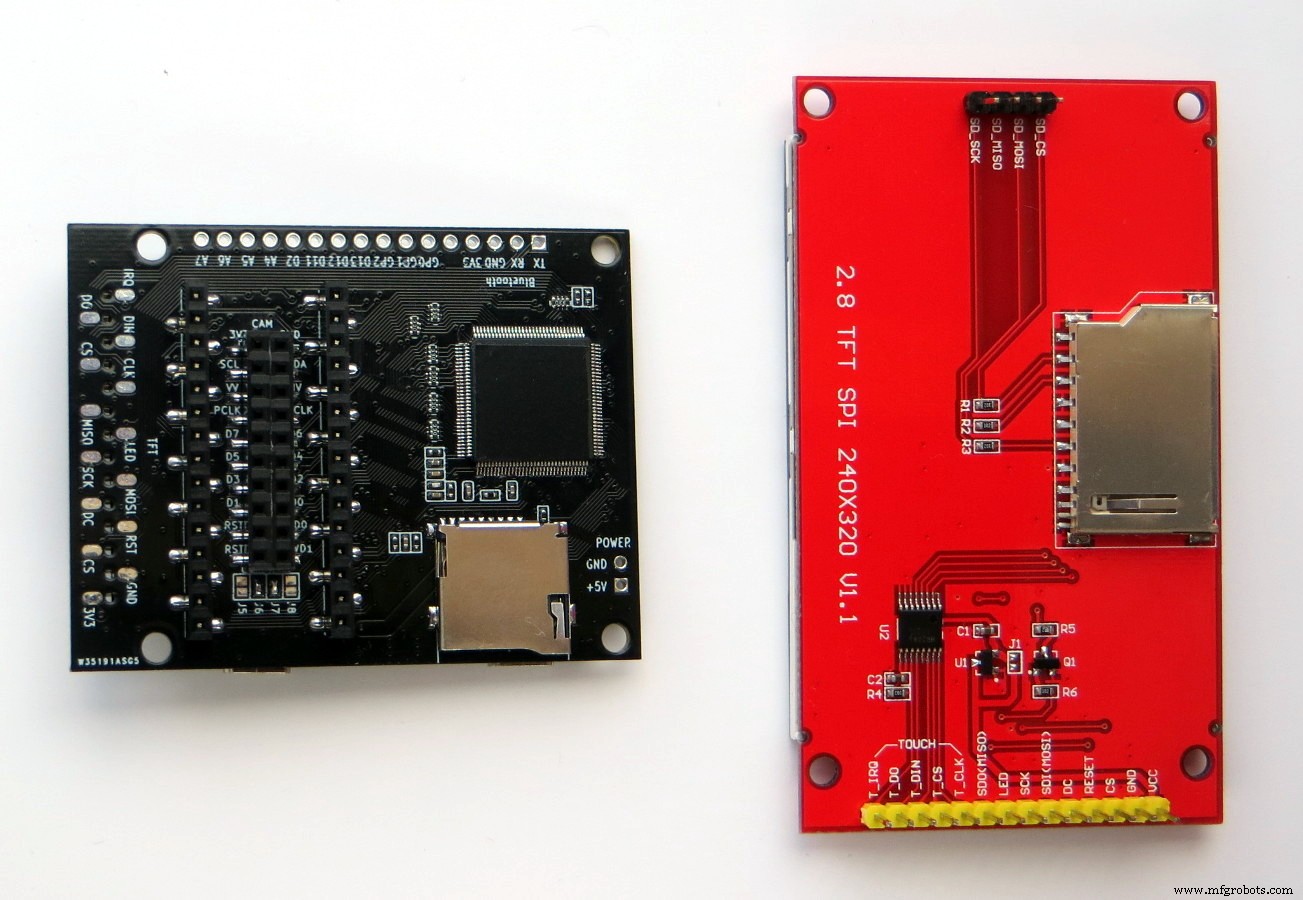


Método 2:

Após a montagem, pode-se proceder ao download dos esboços, mas antes destes não se esqueça de instalar a biblioteca necessária para trabalhar com o escudo TFT. A biblioteca está localizada no link:https://github.com/YATFT/YATFT.
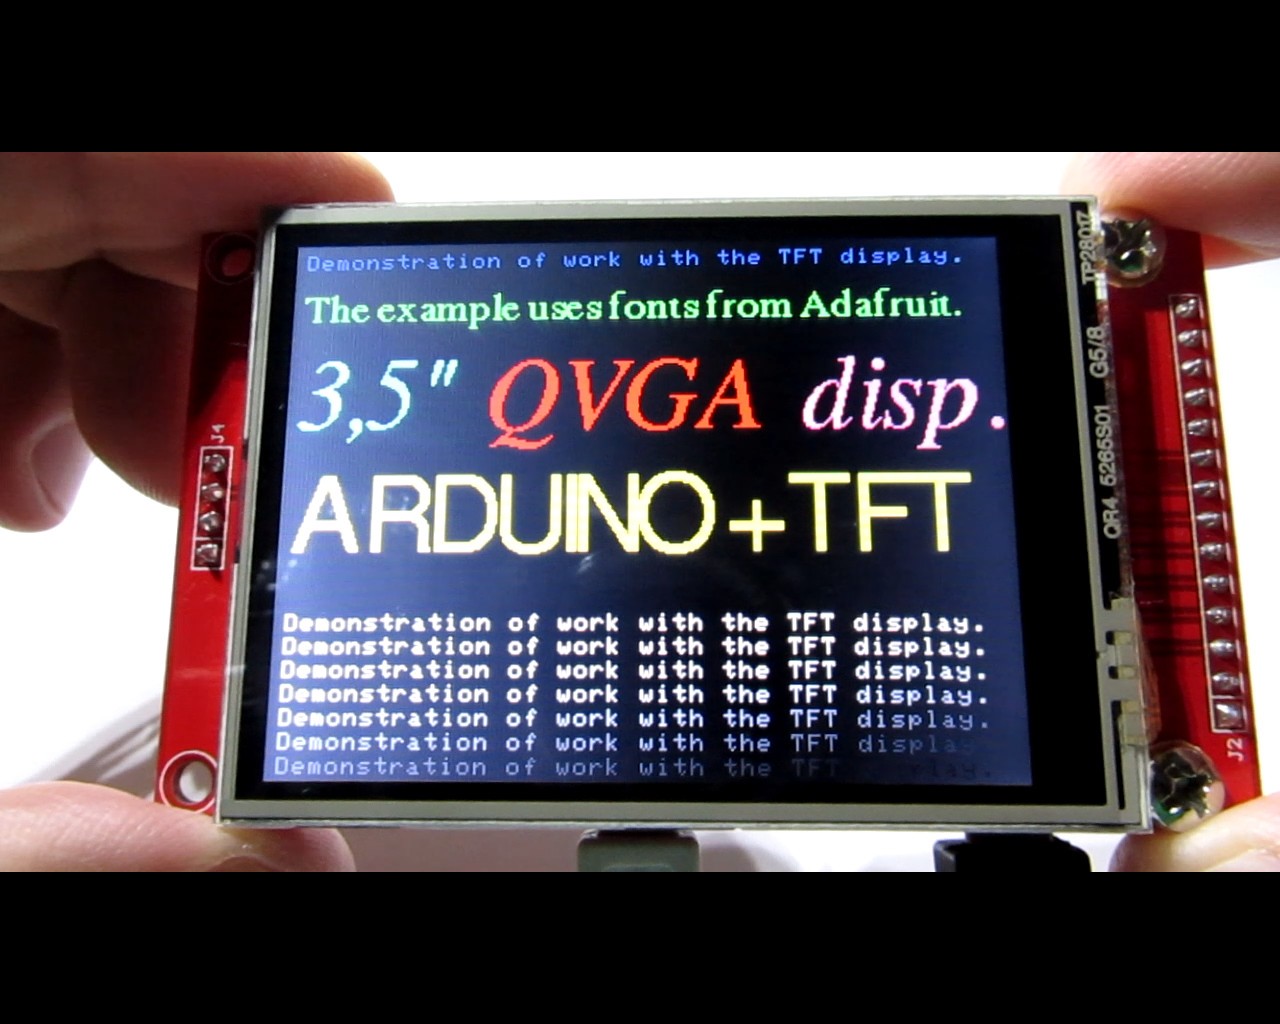
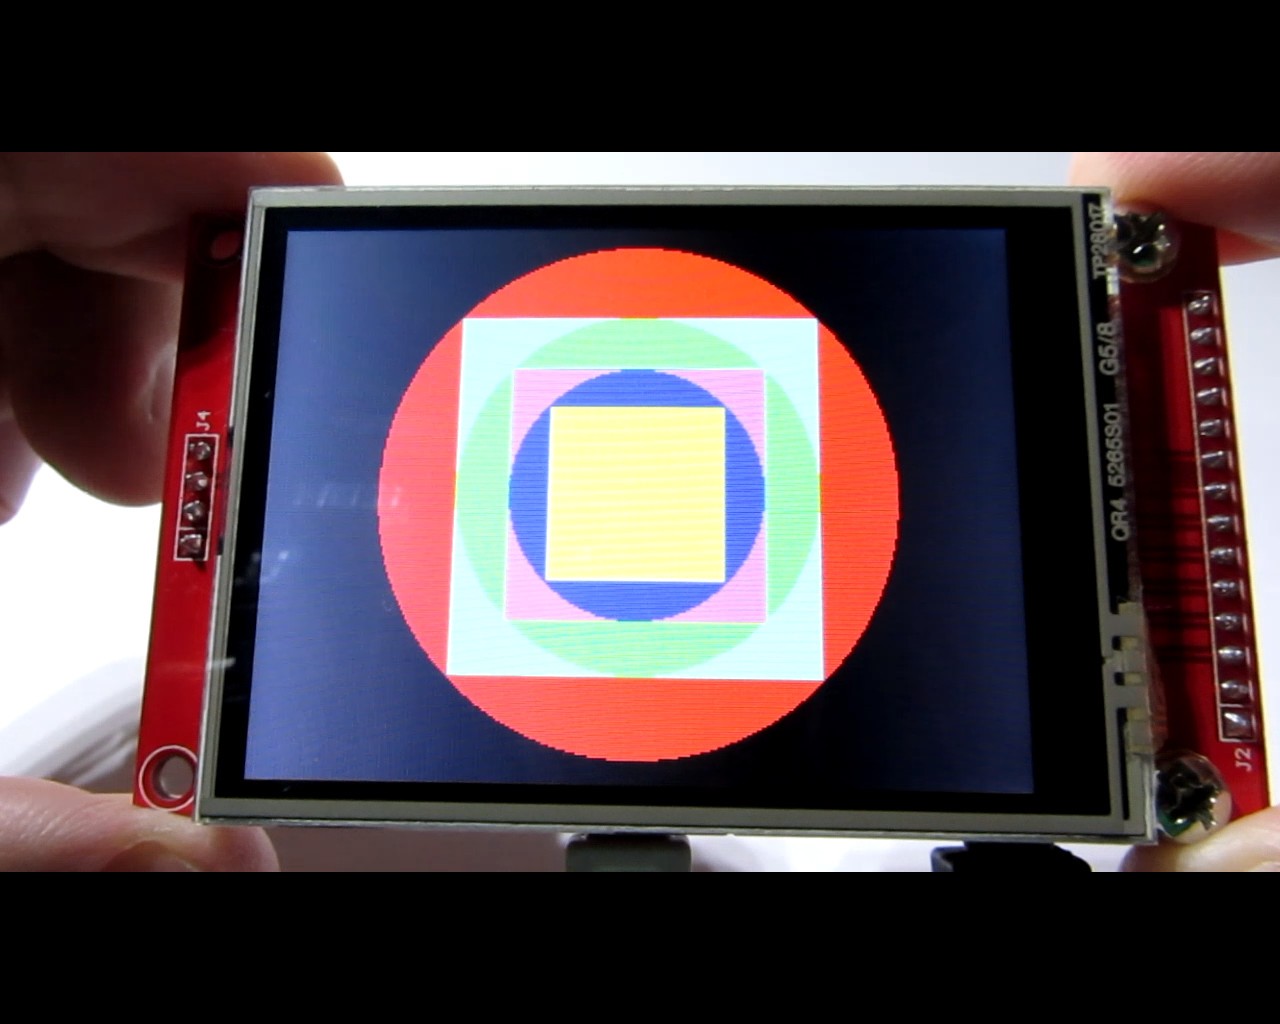
Demonstração 1. Gráficos e texto.
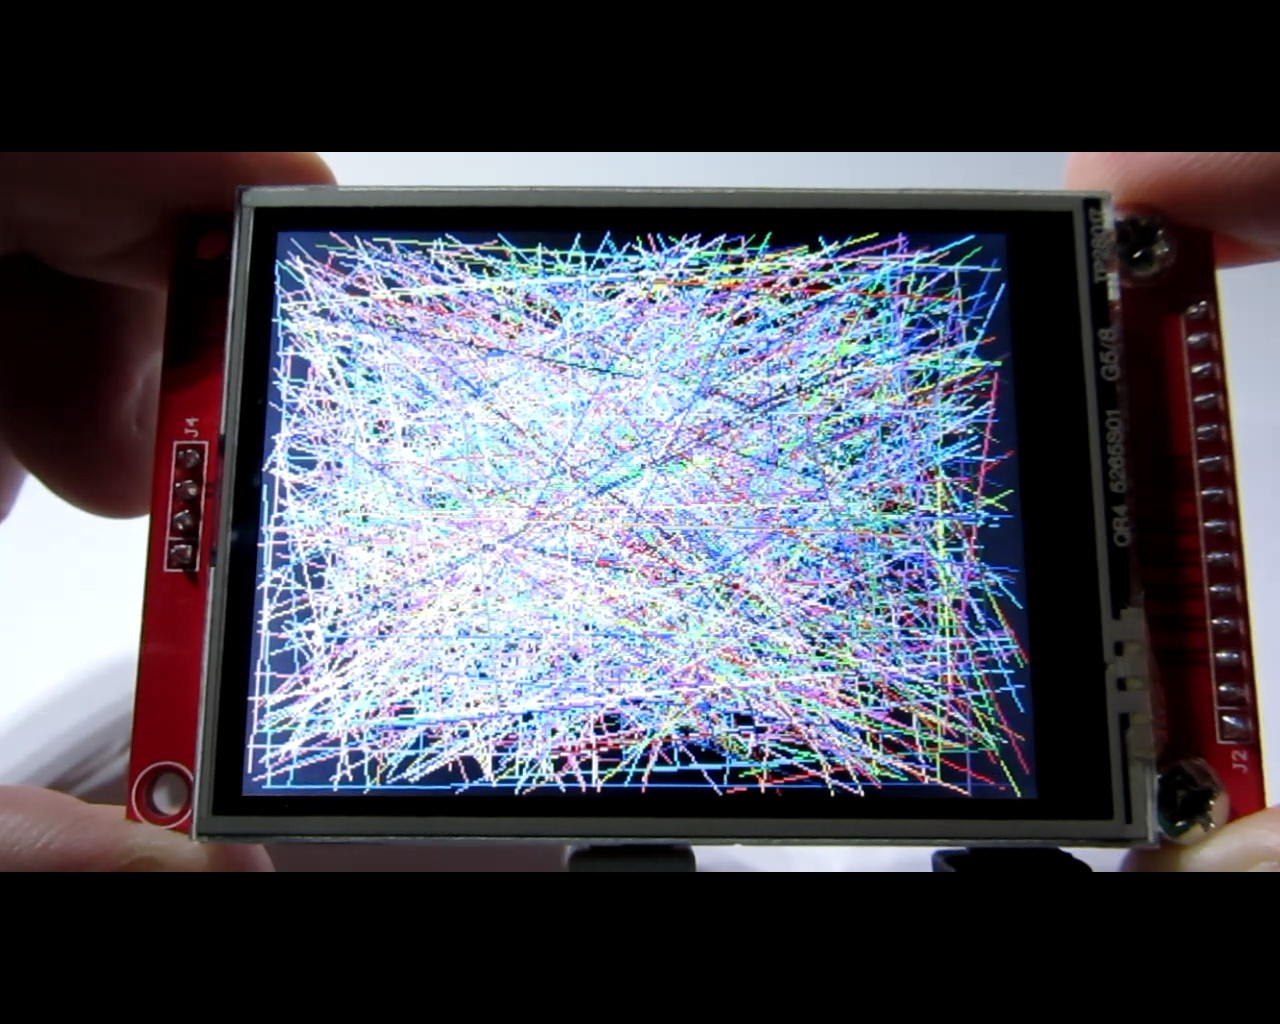
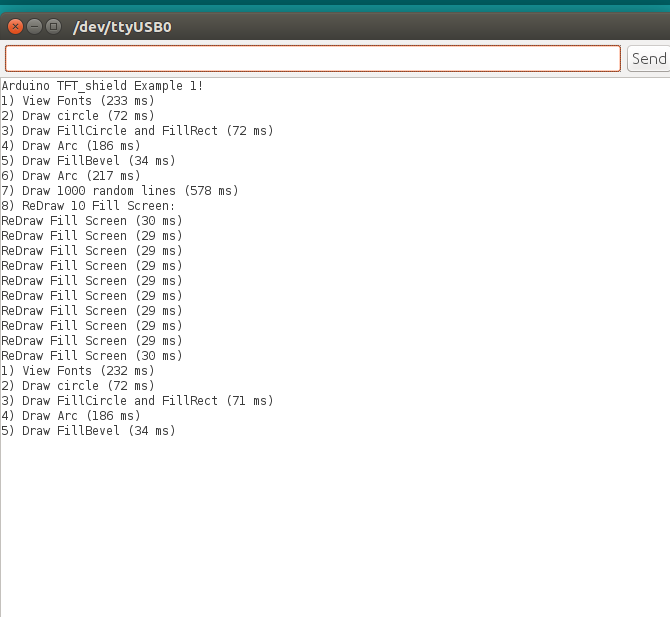
Este capítulo fornece um exemplo de trabalho com texto, gráficos e uma tela de toque. É recomendado para conveniência que você primeiro programe a placa Arduino Nano separadamente e, em seguida, monte o dispositivo (mas você também pode programar a placa como parte do dispositivo). Esboço para trabalhar com texto e gráficos:
/ ******************************************* ************************************* O SOFTWARE E A DOCUMENTAÇÃO SÃO FORNECIDOS "COMO ESTÃO" SEM GARANTIA DE NENHUMA * TIPO, EXPRESSA OU IMPLÍCITA, INCLUINDO, SEM LIMITAÇÃO, QUALQUER GARANTIA * DE COMERCIALIZAÇÃO, TÍTULO, NÃO VIOLAÇÃO E ADEQUAÇÃO A UM DETERMINADO * FIM. EM NENHUMA HIPÓTESE O AUTOR OU SEUS LICENCIANTES SERÃO RESPONSÁVEIS OU * OBRIGADOS SOB CONTRATO, NEGLIGÊNCIA, RESPONSABILIDADE ESTRITA, CONTRIBUIÇÃO, * QUEBRA DE GARANTIA OU OUTRA TEORIA LEGAL EQUITATIVA QUALQUER DIRETO OU INDIRETO * DANOS OU DESPESAS ESPECIAIS, INCLUINDO QUALQUER COMPRIMENTO ESPECIAL, INCLUÍDO , * DANOS INDIRETOS, PUNITIVOS OU CONSEQÜENCIAIS, PERDA DE LUCROS OU DADOS PERDIDOS, * CUSTO DE AQUISIÇÃO DE BENS DE SUBSTITUIÇÃO, TECNOLOGIA, SERVIÇOS OU QUALQUER * RECLAMAÇÕES DE TERCEIROS (INCLUINDO, MAS NÃO SE LIMITANDO A QUALQUER DEFESA DE OUTROS CUSTOS, * . ************************************************* ******************************** / # include // Biblioteca específica de hardware # include // Incluir biblioteca Adafruit-GFX # include // Incluir fontes Adafruit # include #include YATFT tft (0); uint32_t total_time; uint16_t Cor [4] ={BRIGHTBLUE, BRIGHTGREEN, BRIGHTRED, BRIGHTYELLOW}; uint16_t Gray [7] ={GREY0, GREY1, GREY2, GREY3, GREY4, GR AY5, GREY6}; / ********************************************** *********************************** / void ClearScreen (void) {tft.SetColor (BLACK); // Definir a cor do fone tft.ClearDevice (); // Preencher toda a tela} void setup () {Serial.begin (115200); // inicializa a porta serial Serial.println ("Arduino TFT_shield Exemplo 1!"); tft.begin (); // inicializa o display} void loop () {uint16_t x, y, x2, y2, mask_gray; uint16_t i; Limpar tela(); // Fontes Serial.print ("1) Exibir fontes ("); total_time =millis (); tft.SetColor (BRIGHTBLUE); tft.SetFont (NULL); tft.OutTextXY (5, 5, "Demonstração de trabalho com o display TFT."); tft.SetColor (BRIGHTGREEN); tft.SetFont (&FreeSerif9pt7b); tft.OutTextXY (5, 20, "O exemplo usa fontes da Adafruit."); tft.SetFont (&FreeSerifItalic24pt7b); tft.SetColor (BRIGHTCYAN); tft.OutTextXY (5, 45, "3,5 ''"); tft.SetColor (BRIGHTRED); tft.OutTextXY (90, 45, "QVGA"); tft.SetColor (BRIGHTMAGENTA); tft.OutTextXY (230, 45, "disp."); tft.SetColor (BRIGHTYELLOW); tft.SetFont (&FreeSans24pt7b); tft.OutTextXY (5, 100, "A R D U I N O + T F T"); tft.SetFont (NULL); para (i =0; i <7; i ++) {tft.SetColor (Gray [i]); tft.OutTextXY (5, 170 + 10 * i, "Demonstração de trabalho com o display TFT."); } PrintTotalTime (); atraso (3000); Limpar tela(); // Circle Serial.print ("2) Desenhar circle ("); total_time =millis (); tft.SetColor (BRIGHTRED); para (i =10; i > 1; i + =10) {tft.DrawCirc (GetMaxX ()>> 1, GetMaxY ()>> 1, i); } PrintTotalTime (); atraso (1000); // DrawFillCircle &DrawFillRect Serial.print ("3) Draw FillCircle and FillRect ("); total_time =millis (); tft.SetColor (BRIGHTRED); tft.DrawFillCirc (GetMaxX ()>> 1, GetMaxY ()>> 1,110); tft.SetColor (BRIGHTCYAN); tft.DrawFillRect (GetMaxX () / 2-77, GetMaxY () / 2-77, GetMaxX () / 2 + 77, GetMaxY () / 2 + 77); tft.SetColor (BRIGHTGREEN); tft.DrawFillCirc (GetMaxX ()>> 1, GetMaxY ()>> 1,77); tft.SetColor (BRIGHTMAGENTA); tft.DrawFillRect (GetMaxX () / 2-54, GetMaxY () / 2-54, GetMaxX () / 2 + 54, GetMaxY () / 2 + 54); tft.SetColor (BRIGHTBLUE); tft.DrawFillCirc (GetMaxX ()>> 1, GetMaxY ()>> 1,54); tft.SetColor (BRIGHTYELLOW); tft.DrawFillRect (GetMaxX () / 2-37, GetMaxY () / 2-37, GetMaxX () / 2 + 37, GetMaxY () / 2 + 37); PrintTotalTime (); atraso (1000); Limpar tela(); // Arc Serial.print ("4) Draw Arc ("); total_time =millis (); Limpar tela(); tft.SetColor (BRIGHTBLUE); tft.DrawArc ((GetMaxX ()>> 1) -60, (GetMaxY ()>> 1) -60, (GetMaxX ()>> 1) +60, (GetMaxY ()>> 1) +60,20, 30,0xFF); tft.SetColor (BRIGHTGREEN); tft.DrawArc ((GetMaxX ()>> 1) -40, (GetMaxY ()>> 1) -40, (GetMaxX ()>> 1) +40, (GetMaxY ()>> 1) +40,20, 30,0xFF); tft.SetColor (BRIGHTRED); tft.DrawArc ((GetMaxX ()>> 1) -20, (GetMaxY ()>> 1) -20, (GetMaxX ()>> 1) +20, (GetMaxY ()>> 1) +20,20, 30,0xFF); PrintTotalTime (); atraso (1000); Serial.print ("5) Draw FillBevel ("); total_time =millis (); tft.SetColor (BRIGHTBLUE); tft.DrawFillBevel ((GetMaxX ()>> 1) -60, (GetMaxY ()>> 1) -60, (GetMaxX ()>> 1) +60, (GetMaxY ()>> 1) +60,30); tft.SetColor (BRIGHTGREEN); tft.DrawFillBevel ((GetMaxX ()>> 1) -40, (GetMaxY ()>> 1) -40, (GetMaxX ()>> 1) +40, (GetMaxY ()>> 1) +40,30); tft.SetColor (BRIGHTRED); tft.DrawFillBevel ((GetMaxX ()>> 1) -20, (GetMaxY ()>> 1) -20, (GetMaxX ()>> 1) +20, (GetMaxY ()>> 1) +20,30); PrintTotalTime (); atraso (1000); Limpar tela(); Serial.print ("6) Desenhar Arco ("); total_time =millis (); para (i =0; i <4; i ++) {tft.SetColor (Color [i]); tft.DrawArc ((GetMaxX ()>> 1), (GetMaxY ()>> 1) -50, (GetMaxX ()>> 1), (GetMaxY ()>> 1) + 50,50,60,0x11 <> 1), (GetMaxY ()>> 1) -30, (GetMaxX ()>> 1), (GetMaxY ()>> 1) + 30,35,45,0x11 <> 1), (GetMaxY ()>> 1), (GetMaxX ()>> 1), (GetMaxY ()>> 1), 20,30,0x11 < Algumas capturas de tela:

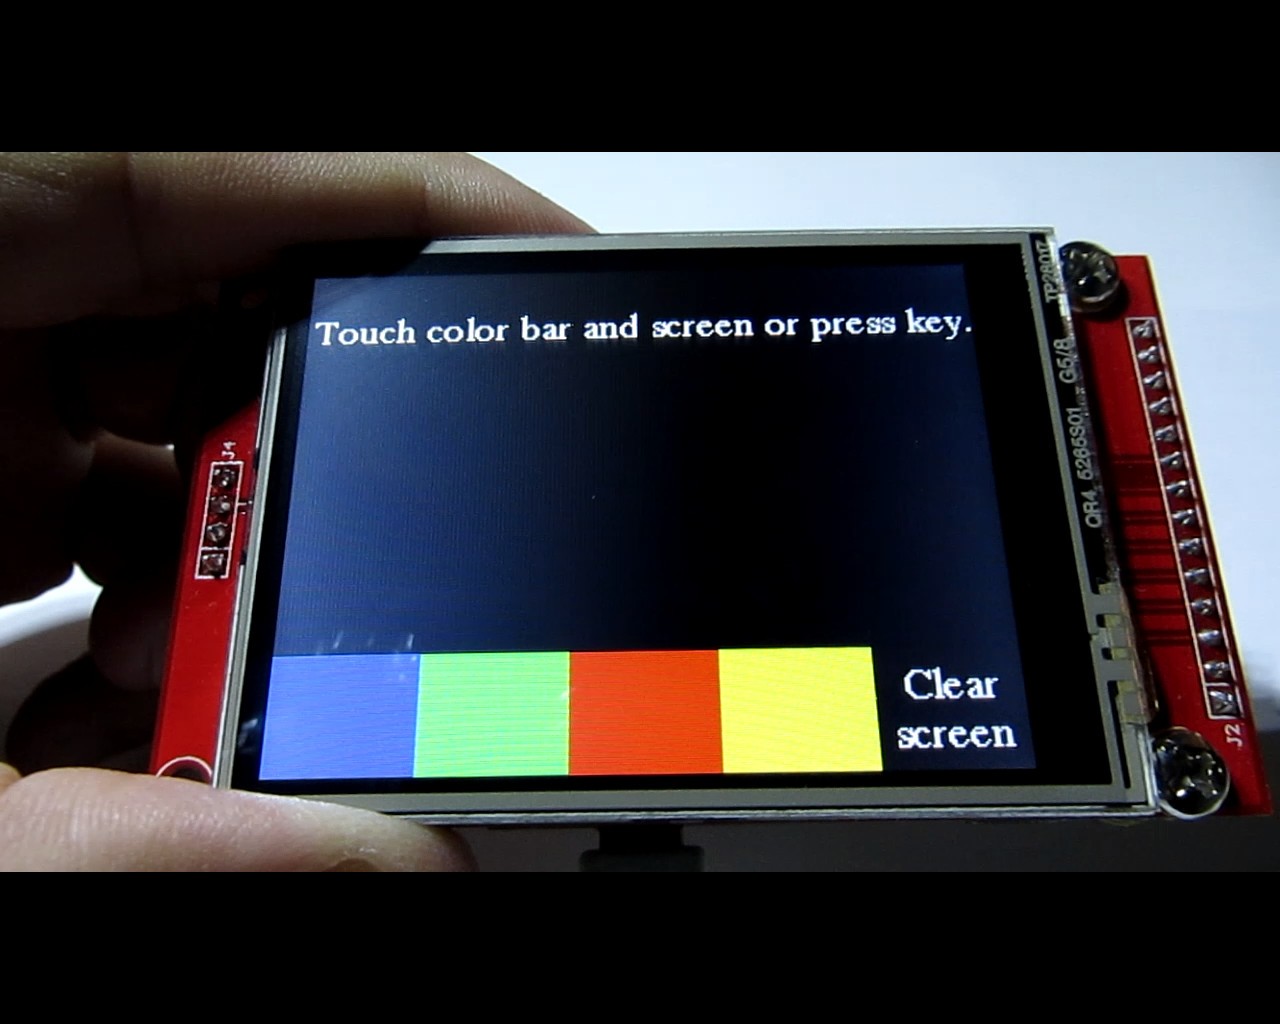
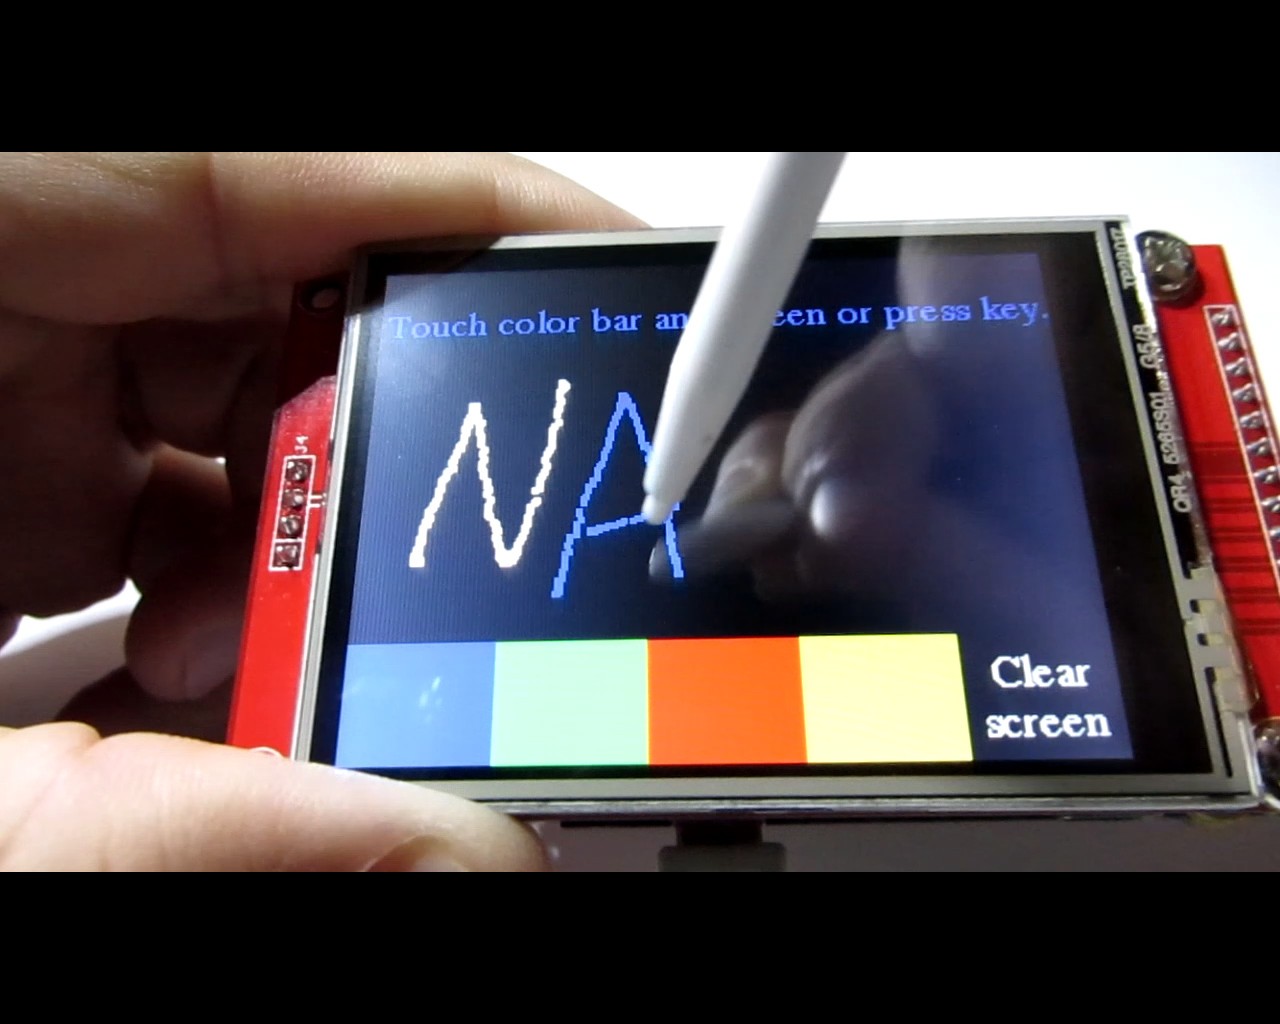
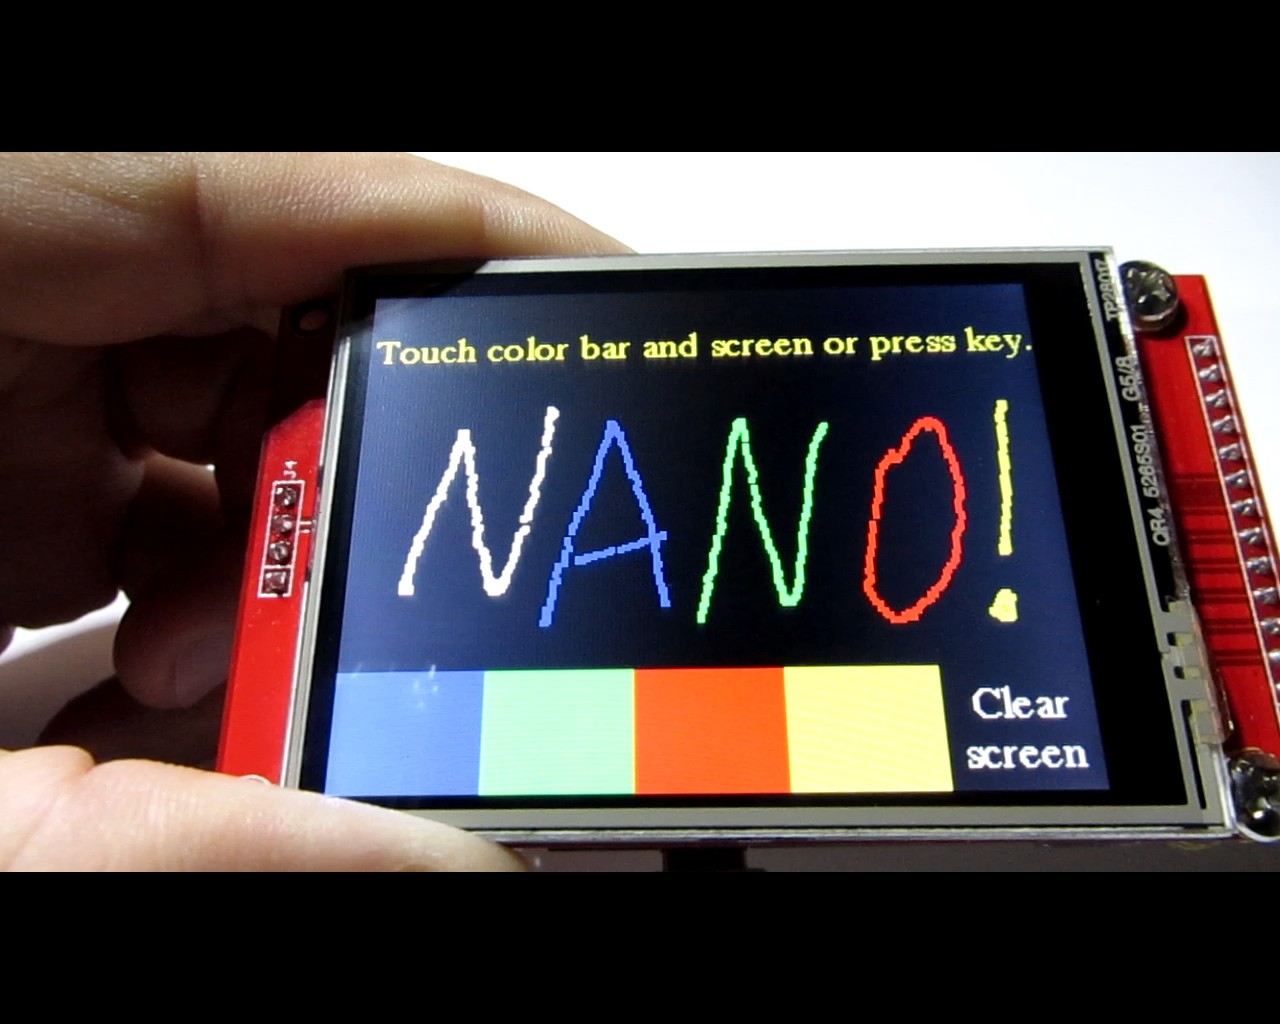
Demonstração 2. Tela sensível ao toque.
/ ******************************************* ************************************* O SOFTWARE E A DOCUMENTAÇÃO SÃO FORNECIDOS "COMO ESTÃO" SEM GARANTIA DE NENHUMA * TIPO, EXPRESSA OU IMPLÍCITA, INCLUINDO, SEM LIMITAÇÃO, QUALQUER GARANTIA * DE COMERCIALIZAÇÃO, TÍTULO, NÃO VIOLAÇÃO E ADEQUAÇÃO A UM DETERMINADO * FIM. EM NENHUMA HIPÓTESE O AUTOR OU SEUS LICENCIANTES SERÃO RESPONSÁVEIS OU * OBRIGADOS SOB CONTRATO, NEGLIGÊNCIA, RESPONSABILIDADE ESTRITA, CONTRIBUIÇÃO, * QUEBRA DE GARANTIA OU OUTRA TEORIA LEGAL EQUITATIVA QUALQUER DIRETO OU INDIRETO * DANOS OU DESPESAS ESPECIAIS, INCLUINDO QUALQUER COMPRIMENTO ESPECIAL, INCLUÍDO , * DANOS INDIRETOS, PUNITIVOS OU CONSEQÜENCIAIS, PERDA DE LUCROS OU DADOS PERDIDOS, * CUSTO DE AQUISIÇÃO DE BENS DE SUBSTITUIÇÃO, TECNOLOGIA, SERVIÇOS OU QUALQUER * RECLAMAÇÕES DE TERCEIROS (INCLUINDO, MAS NÃO SE LIMITANDO A QUALQUER DEFESA DE OUTROS CUSTOS, * . ************************************************* ******************************** / # include // Biblioteca específica de hardware # include // Incluir biblioteca SPI # include // Incluir biblioteca Touchscreen # include // Incluir biblioteca Adafruit-GFX # include // Incluir fontes Adafruit # include #include // Touchscreen:MOSI =11, MISO =12, SCK =13, CS =2 # define CS_PI N A0XPT2046_Touchscreen ts (CS_PIN, 255); YATFT tft (0); # define Y_BAR_TOP (GetMaxY () - 50) #define Y_BAR_BOT GetMaxY () / * Se estiver usando o escudo, todas as linhas de controle e dados são fixas e uma declaração mais simples pode ser usado opcionalmente:* / uint16_t pos_x [] ={0,0,0,0}; uint16_t pos_y [] ={0,0,0,0}; uint8_t pos_x_cnt =0; uint8_t pos_y_cnt =0; uint16_t pos_x_mid =0; uint16_t pos_y_mid =0; uint16_t color_paint =WHITE; uint8_t buttons =0; uint16_t Color [4] ={BRIGHTBLUE, BRIGHTGREEN, BRIGHTRED, BRIGHTYELLOW}; uint16_t Gray [7] ={GREY0, GREY4, GREY3 GRAY5, GREY6}; / ********************************************* *************************************************** *** / void ClearScreen (void) {tft.SetColor (BLACK); // Definir a cor do fone tft.ClearDevice (); // Preencher toda a tela} void setup () {Serial.begin (115200); // inicializa a porta serial Serial.println ("Arduino TFT_shield Exemplo1!"); ts.begin (); // Init Touchscreen SPI.end (); // Desativa o SPI para um trabalho correto DB2 (SS) pin tft.begin (); // inicializa o display RefreshWindow ();} void loop () {uint16_t x, y; // Touch // Quando o pino SS é definido como OUTPUT, ele pode ser usado como // uma porta de saída de propósito geral (não influencia // as operações SPI). SPI.begin (); if (ts.touched ()) {TS_Point p =ts.getPoint (); Serial.print (F ("Pressão =")); Serial.print (p.z); Serial.print (F (", x =")); Serial.print (p.x); Serial.print (F (", y =")); Serial.print (p.y); Serial.println (); atraso (3); // Atraso para filtrar SPI.end (); // Desabilita o SPI para o trabalho correto do pino do DB2 (SS) // Calcula as coordenadas x, y do código ADC Serial.print (F ("Pressure =")); Serial.print (p.z); Serial.print (F (", x =")); Serial.print (p.x); Serial.print (F (",")); Serial.print (x); Serial.print (F (", y =")); Serial.print (p.y); Serial.print (F (",")); Serial.print (y); Serial.println (); se (p.x <350) p.x =350; se (p.x> 3850) p.x =3850; se (p.y <250) p.y =250; se (p.y> 3850) p.y =3850; x =(uint16_t) (320L - ((uint32_t) p.x - 350L) * 100L / 1094L); y =(uint16_t) (240L - ((uint32_t) p.y - 250L) * 100L / 1510L); // Filtrando pos_x_mid =(pos_x [0] + pos_x [1] + pos_x [2] + pos_x [3]) / 4; pos_y_mid =(pos_y [0] + pos_y [1] + pos_y [2] + pos_y [3]) / 4; pos_x [pos_x_cnt ++] =x; pos_y [pos_y_cnt ++] =y; pos_x_cnt &=0x03; pos_y_cnt &=0x03; if (x> (pos_x_mid - 10) &&x <(pos_x_mid + 10) &&y> (pos_y_mid - 10) &&y <(pos_y_mid + 10)) {if (y> Y_BAR_TOP &&y Algumas capturas de tela:
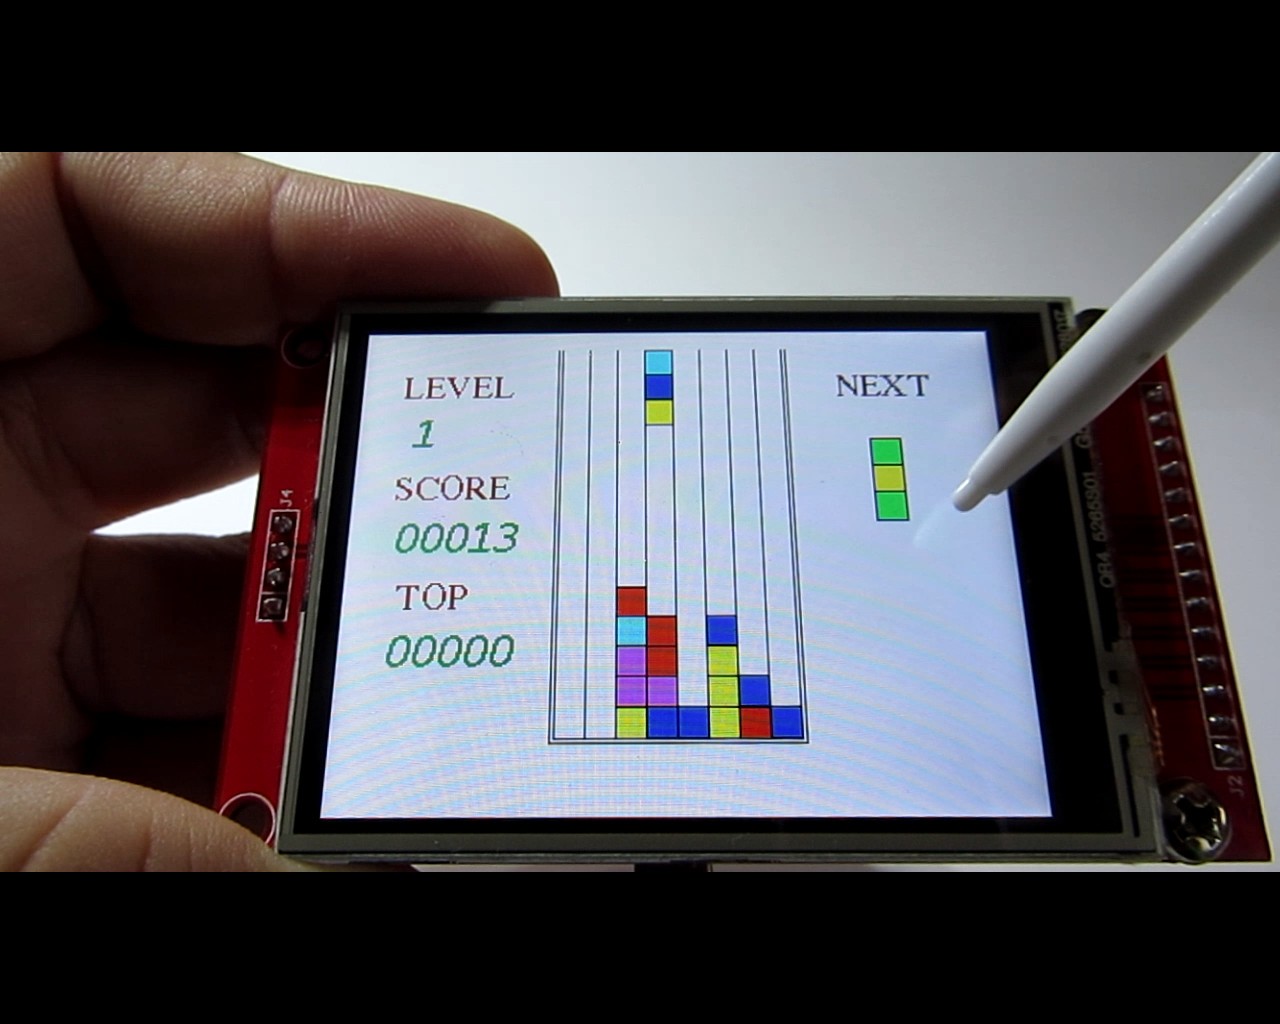
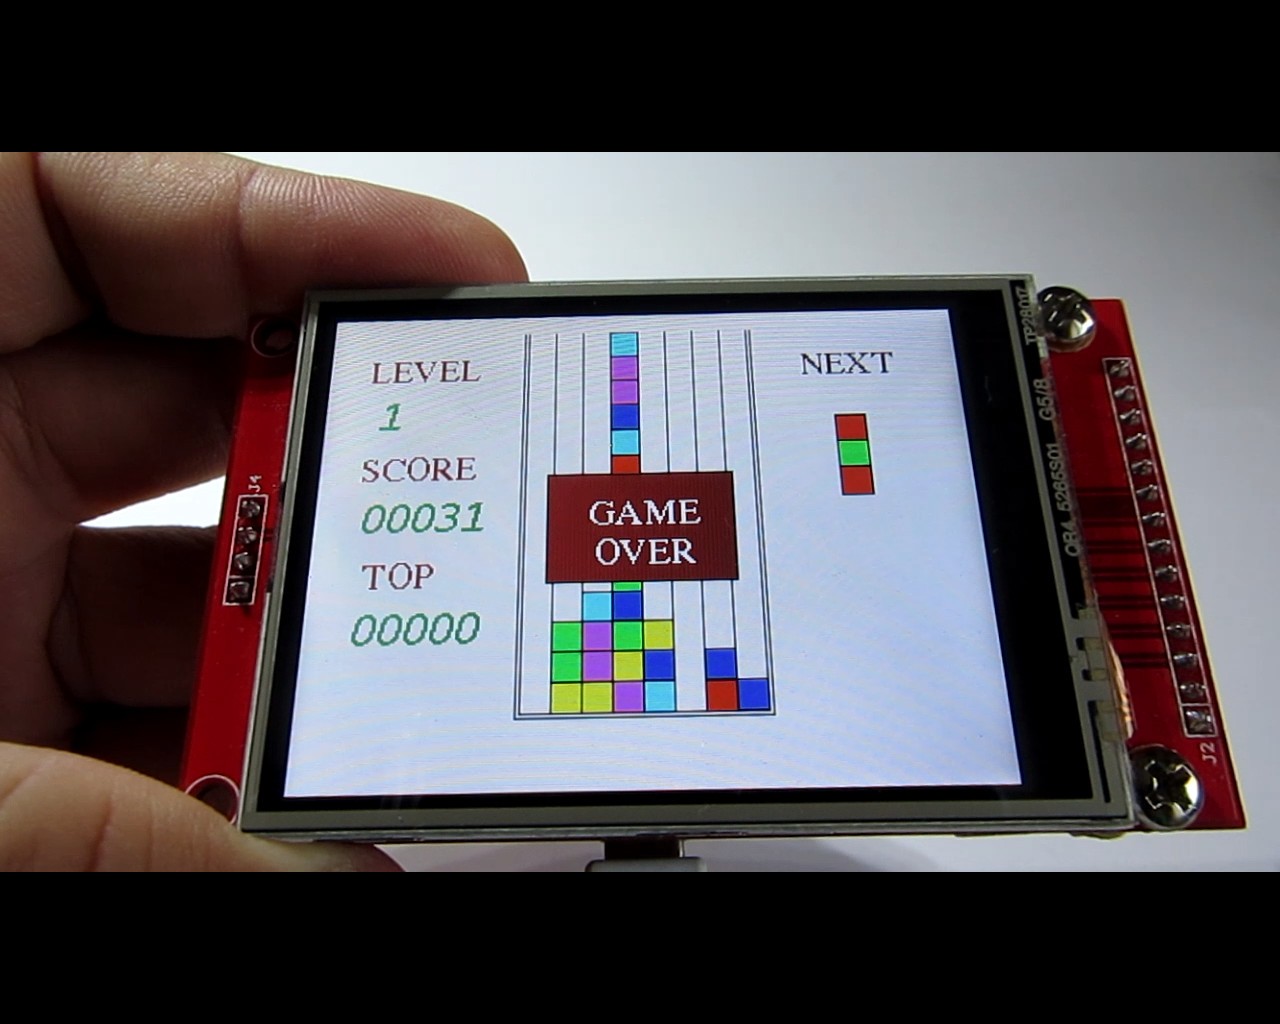
Demo 3. Jogo de lógica "Colunas".
/ ******************************************* ************************************* O SOFTWARE E A DOCUMENTAÇÃO SÃO FORNECIDOS "COMO ESTÃO" SEM GARANTIA DE NENHUMA * TIPO, EXPRESSA OU IMPLÍCITA, INCLUINDO, SEM LIMITAÇÃO, QUALQUER GARANTIA * DE COMERCIALIZAÇÃO, TÍTULO, NÃO VIOLAÇÃO E ADEQUAÇÃO A UM DETERMINADO * FIM. EM NENHUMA HIPÓTESE O AUTOR OU SEUS LICENCIANTES SERÃO RESPONSÁVEIS OU * OBRIGADOS SOB CONTRATO, NEGLIGÊNCIA, RESPONSABILIDADE ESTRITA, CONTRIBUIÇÃO, * QUEBRA DE GARANTIA OU OUTRA TEORIA LEGAL EQUITATIVA QUALQUER DIRETO OU INDIRETO * DANOS OU DESPESAS ESPECIAIS, INCLUINDO QUALQUER COMPRIMENTO ESPECIAL, INCLUÍDO , * DANOS INDIRETOS, PUNITIVOS OU CONSEQÜENCIAIS, PERDA DE LUCROS OU DADOS PERDIDOS, * CUSTO DE AQUISIÇÃO DE BENS DE SUBSTITUIÇÃO, TECNOLOGIA, SERVIÇOS OU QUALQUER * RECLAMAÇÕES DE TERCEIROS (INCLUINDO, MAS NÃO SE LIMITANDO A QUALQUER DEFESA DE OUTROS CUSTOS, * . ************************************************* ********************************* / # include #include #include #include // Biblioteca gráfica do núcleo # include #include #define CS_PIN A0 // MOSI =11, MISO =12, SCK =13XPT2046_Touch ts (CS_PIN, 255); YATFT tft (0); / * Se estiver usando o escudo, todas as linhas de controle e dados são fixas, e uma declaração mais simples pode ser usada opcionalmente :* / long randNumber; # define KEY_EMPTY 0 # define KEY_SWAP 1 # define KEY_FALL 2 # define KEY_LEFT 3 # define KEY_RIGHT 4 # define DISPLAY_MAX_X 320 # define DISPLAY_MAX_Y 240 # define MaxCol 8 # define MaxRow 17 # define SmeX 3 # define SmeY 3 #define razmer 15 # define LL 250 # define NumCol 6 # define MaxLevel 8 # define PeriodLevel 80 # define DISP_LEFT ((DISPLAY_MAX_X - MaxCol * razmer) / 2 - 2) #define DISP_RIGHT ((DISPLAY_MAX_X + MaxCol * razmer) / 2 + 2) #define DISP_TOP ((DISPLAY_MAX_Y - (MaxRow-4) * razmer) / 2 - 2 - 10) #define DISP_BOT ((DISPLAY_MAX_Y + (MaxRow-4) * razmer) / 2 + 2 - 10) uint8_t MasSt [MaxCol ] [MaxRow], MasTmp [MaxCol] [MaxRow], MasOld [MaxCol] [MaxRow], fignext [3]; uint8_t Level =1, OldLevel, tr, flfirst =1; uint16_t MasCol [] ={WHITE, BLACK, BRIGHTRED , BRIGHTBLUE, BRIGHTGREEN, BRIGHTYELLOW, BRIGHTMAGENTA, BRIGHTCYAN}; Contador longo sem sinal, Score =0, TScore =0, Record =0, OldRecord, OldScore, myrecord; uint16_t tempspeed; bool fl, Demo =true, myfl =false, Arbeiten =falso, FlNew, FlZ =falso; int8_t VAL, Mp, x, y; int8_t mmm [4] [2] ={ {-1,0}, {0, -1}, {1,0}, {0,1}}; uint16_t MasSpeed [MaxLevel] ={500.450.400.350.300.250.200,100}; / ************ *************************************************** **** / void setup (void) {// inicializa a porta serial Serial.begin (115200); Serial.println ("exemplo TFT_shield_Game1!"); ts.begin (); // Init Touchscreen SPI.end (); tft.begin (); // inicializa o display randomSeed (analogRead (5)); tft.SetColor (WHITE); tft.ClearDevice (); tft.SetColor (RED); tft.SetFont (&FreeSerif9pt7b); tft.OutTextXY (20, 20, "LEVEL"); tft.OutTextXY (240, 20, "NEXT"); tft.OutTextXY (20, 75, "PONTUAÇÃO"); tft.OutTextXY (25, 130, "TOP"); FlNew =verdadeiro; ViewStacan (); GetNext (); atraso (100); tft.SetColor (BLACK); tft.DrawLine (DISP_LEFT + 1, DISP_TOP + 0, DISP_LEFT + 1, DISP_BOT - 1); tft.DrawLine (DISP_LEFT + razmer * MaxCol + 5-MaxCol, DISP_TOP + 0, DISP_LEFT + razmer * MaxCol + 5-MaxCol, DISP_BOT - 1); tft.DrawLine (DISP_LEFT + 1, DISP_BOT - 1, DISP_LEFT + 1 + razmer * MaxCol + 5-MaxCol-1, DISP_BOT - 1);} loop vazio (vazio) {if (Demo) ProcDemo (); else {if (Arbeiten) {mydelay (tempspeed); figmove (0,1); } else if (mypush () ==KEY_SWAP) NewGame (); }} uint8_t mypush (void) {unsigned long tpr =millis (); uint8_t res =KEY_EMPTY; botão uint8_t =0; static uint8_t button_old; estático uint8_t cnt =0; botão =Toque (); if (botão) {cnt =5; Serial.print ("Botão de digitalização:"); Serial.print (botão, HEX); Serial.println (); if (botão! =botão_old) {if (botão &0x01) res =KEY_SWAP; if (botão &0x02) res =KEY_FALL; if (botão &0x04) {}; if (botão &0x08) res =KEY_LEFT; if (botão &0x10) res =KEY_RIGHT; button_old =botão; }} if (! cnt) {button_old =button; } else {cnt--; } retorno (res); } void ViewQuad (uint8_t i, uint8_t j, uint8_t minha cor) {if (j <3) return; uint16_t wy =DISP_TOP + SmeY + (j-3) * razmer - j; uint16_t wx =DISP_LEFT + SmeX + i * razmer - i; if (minhacor! =0) {tft.SetColor (PRETO); tft.DrawRect (wx, wy, wx + razmer-1, wy + razmer-1); tft.SetColor (MasCol [minha cor]); tft.DrawFillRect (wx + 1, wy + 1, wx + 1 + razmer-3, wy + 1 + razmer-3); } else {tft.SetColor (BRANCO); tft.DrawFillRect (wx + 1, wy + 0, wx + 1 + razmer-3, wy + 1 + razmer-3); }} void ViewStacan (void) {char myStr2 [5]; uint8_t h =tft.GetTextHeight (&FreeMonoBoldOblique12pt7b); tft.SetFont (&FreeMonoBoldOblique12pt7b); if (OldScore! =Score || FlNew) {sprintf (myStr2, "% 05d", Score); int16_t w =tft.GetTextWidth (myStr2, &FreeMonoBoldOblique12pt7b); tft.SetColor (WHITE); tft.DrawFillRect (20.100,20 + w + 5.100 + h); tft.SetColor (VERDE); tft.OutTextXY (20,100, myStr2); OldScore =Score; } if (OldRecord! =Registro || FlNew) {sprintf (myStr2, "% 05d", Registro); int16_t w =tft.GetTextWidth (myStr2, &FreeMonoBoldOblique12pt7b); tft.SetColor (WHITE); tft.DrawFillRect (20.155,20 + w + 5.155 + h); tft.SetColor (VERDE); tft.OutTextXY (20,155, myStr2); OldRecord =Registro; } if (OldLevel! =Level || FlNew) {sprintf (myStr2, "% 01d", Level); int16_t w =tft.GetTextWidth (myStr2, &FreeMonoBoldOblique12pt7b); tft.SetColor (WHITE); tft.DrawFillRect (25,45,25 + w + 5,45 + h); tft.SetColor (VERDE); tft.OutTextXY (25,45, myStr2); OldLevel =Level; } FlNew =false; for (byte j =3; j =0 &&ny> =0 &&nx 1 || MasTmp [i] [j]> 2)) {MasTmp [nx] [ny] =3; MasTmp [i] [j] =3; } else if (mode ==3 &&MasTmp [nx] [ny] ==3) {if (MasTmp [i] [j]! =3) {MasTmp [i] [j] =3; fl =verdadeiro; }}}} void Sos (int i, int j, modo de byte) {for (byte k =0; k <4; k ++) Sosed (i, j, mmm [k] [0], mmm [k] [1 ],modo); } bool FindFull (void) {byte i, j, k; bool res; res =falso; para (byte k =2; k <8; k ++) {ClearMas (MasTmp); para (j =3; j 1) Sos (i, j, 2); faça {fl =falso; para (j =3; j 0) Sos (i, j, 3); } enquanto (fl); para (j =3; j 0) {ViewStacan (); FlZ =verdadeiro; mydelay (500); } para (j =0; j MaxLevel) Level =MaxLevel; } tempspeed =MasSpeed [Nível-1]; }} void MyScore (void) {TScore =0; while (FindFull ()) {if (TScore> 7) Score =Score + TScore + (TScore-8) * 2; senão Pontuação =Pontuação + TScore; ViewStacan (); FlZ =verdadeiro; mydelay (1000); } FlZ =falso;} void ProcDemo (void) {Pontuação =0; GetNext (); para (byte j =3; j MaxCol-1) return (false); if (dx! =0) if (MasSt [x + dx] [y + dy + 2] ==0) return (true); senão return (false); if (dy> 0) {if (y + dy + 2> MaxRow-1 || MasSt [x + dx] [y + dy + 2]> 0) {if (y <3) gameover (); senão fff =verdadeiro; } else {for (byte i =0; i <3; i ++) MasSt [x] [y + 2-i + dy] =MasSt [x] [y + 2-i]; MasSt [x] [y] =0; y =y + dy; } if (fff) {MyScore (); GetNext (); } ViewStacan (); } return (true);} uint8_t Touch (void) {uint16_t x, y; botão uint8_t =0; // Touch // Quando o pino SS é definido como OUTPUT, ele pode ser usado como // uma porta de saída de propósito geral (não influencia // as operações SPI). SPI.begin (); if (ts.touched ()) {TS_Point p =ts.getPoint (); atraso (3); // Atraso para filtrar SPI.end (); // Calcula as coordenadas x, y do código ADC if (p.x <450) p.x =450; se (p.y <500) p.y =500; x =(uint16_t) (320L - ((uint32_t) p.x - 450L) * 10L / 106L); y =(uint16_t) (240L - ((uint32_t) p.y - 500L) * 10L / 140L); if (x <80) {// Botão esquerdo =0x08; } else if (x> 240) {// Botão direito =0x10; } else if (y <120) {// Botão de troca =0x01; } botão else =0x02; // Outono} SPI.end (); botão de retorno;} Algumas capturas de tela:
Vídeo de demonstração
Continua.
Obrigado pela atenção!
Artigos anteriores:
1) Escudo TFT exclusivo para Arduino Uno - Iniciar,
2) Escudo TFT exclusivo para Arduino Uno - OV7670 Cam Live View,
3) Escudo TFT exclusivo para Arduino Uno - Câmera Arduino Bluetooth (ABC).
Próximos artigos:
4) Fotos e vídeo RGB em exibição TFT SPI.
Atualização 01.04.2021:
Olá de novo! Há uma biblioteca atualizada para uma série de telas, que atualmente consiste em dois escudos e duas placas de quebra. O esboço é compilado dependendo da versão selecionada (de 1 a 4) e do tipo de microcontrolador (MegaAVR ou ESP-32). Adicionadas fotos, exemplos. Mais informações podem ser encontradas em https://github.com/Ekaburg/EkaTFT.
Código
Biblioteca
https://github.com/YATFT/YATFTProcesso de manufatura
- Animação de bitmap em ILI9341 TFT Touchscreen Display Shield
- Controlador DMX operado pela web
- Arduino Spybot
- Flores - Arduino Nano, CrazyCircuits, DFRobot
- Arduino Nano:Controle 2 motores de passo com joystick
- INICIAR:Um Terminal STandalone ARduino
- Contador Geiger portátil com Arduino Nano
- Monitoramento de temperatura SMART para escolas
- Biblioteca de portas IO de 8 bits para Arduino
- BLUE_P:Wireless Arduino Programming Shield