


Tutorial da tela de toque do Arduino | LCD TFT
Neste tutorial da tela de toque do Arduino, aprenderemos como usar a tela de toque TFT LCD com o Arduino. Você pode assistir ao vídeo a seguir ou ler o tutorial escrito abaixo.
Visão geral
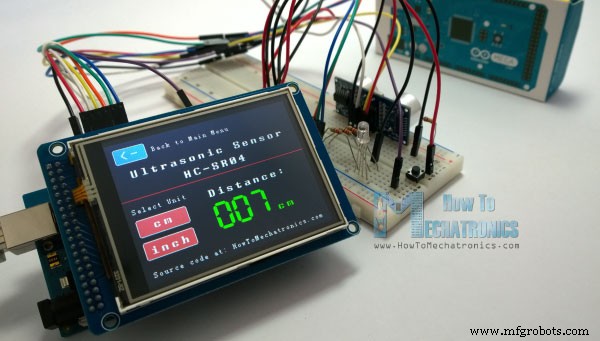
Para este tutorial eu compus três exemplos. O primeiro exemplo é a medição de distância usando sensor ultrassônico. A saída do sensor, ou a distância, é impressa na tela e usando a tela sensível ao toque podemos selecionar as unidades, sejam centímetros ou polegadas.
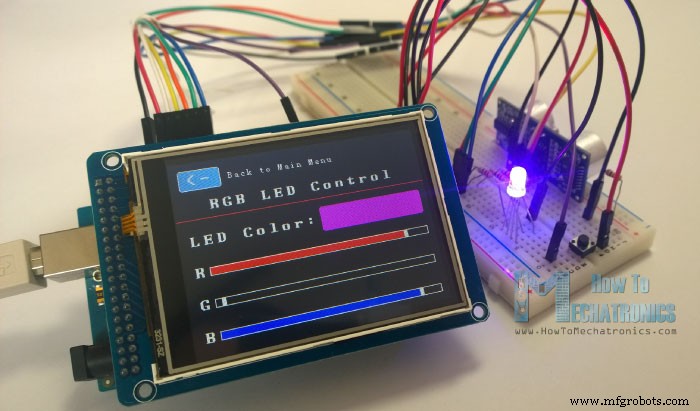
O próximo exemplo é controlar um LED RGB usando esses três controles deslizantes RGB. Por exemplo, se começarmos a deslizar o controle deslizante azul, o LED acenderá em azul e aumentará a luz à medida que formos para o valor máximo. Assim, os controles deslizantes podem se mover de 0 a 255 e, com sua combinação, podemos definir qualquer cor para o LED RGB, mas lembre-se de que o LED não pode representar as cores com tanta precisão.
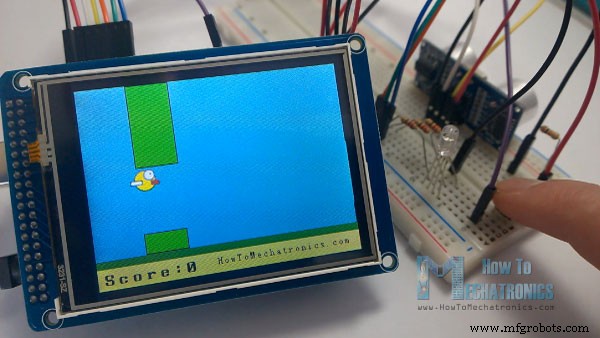
O terceiro exemplo é um jogo. Na verdade é uma réplica do popular jogo Flappy Bird para smartphones. Podemos jogar o jogo usando o botão ou até mesmo usando a própria tela sensível ao toque.
Agora vamos passar por cada um desses exemplos e explicar passo a passo os códigos por trás deles.
Peças necessárias para esta tela de toque do Arduino
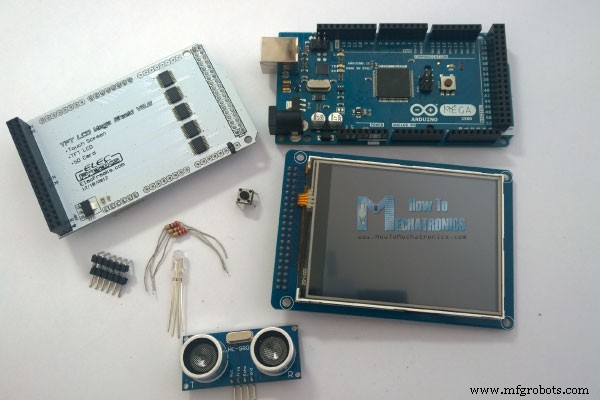
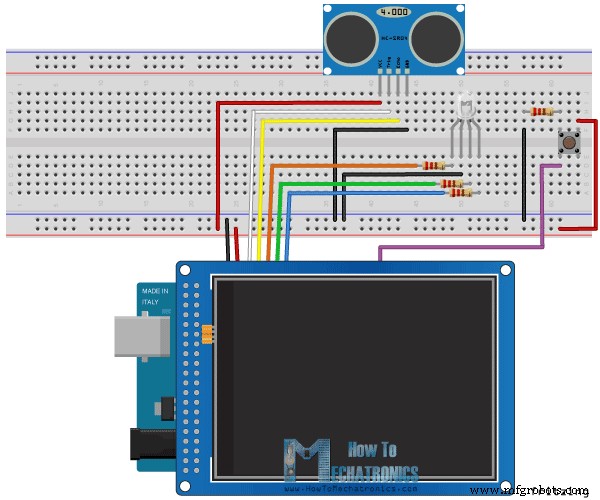
Como exemplo estou usando um TFT Touch Screen de 3,2” em combinação com um TFT LCD Arduino Mega Shield. Precisamos de um shield porque a tela TFT Touch funciona em 3.3V e as saídas do Arduino Mega são 5V. Para o primeiro exemplo eu tenho o sensor ultrassônico HC-SR04, então para o segundo exemplo um LED RGB com três resistores e um botão de pressão para o exemplo do jogo. Também tive que fazer um pino personalizado como este, soldando os pinos e dobrando-os para que eu pudesse inseri-los entre a placa Arduino e o TFT Shield.
Você pode obter esses componentes em qualquer um dos sites abaixo:
- Tela de toque TFT de 3,2″………………..
- TFT Display Mega Shield………………
- Placa Arduino ………………………………
- Módulo ultrassônico HC-SR04………..
Aqui está o esquema do circuito. Usaremos o pino GND, os pinos digitais de 8 a 13, assim como o pino número 14. Como os pinos de 5V já são usados pela Tela TFT, usarei o pino número 13 como VCC, configurando-o imediatamente alto na seção de configuração do código.
Código da tela de toque do Arduino
Como o código é um pouco mais longo e para melhor entendimento vou postar o código fonte do programa em seções com descrição para cada seção. E no final deste artigo postarei o código-fonte completo.
Usarei as bibliotecas UTFT e URTouch feitas por Henning Karlsen. Aqui eu gostaria de agradecer a ele pelo trabalho incrível que ele fez. As bibliotecas permitem o uso realmente fácil das telas TFT e funcionam com vários tamanhos, blindagens e controladores de telas TFT diferentes. Você pode baixar essas bibliotecas de seu site, RinkyDinkElectronics.com e também encontrar muitos exemplos de demonstração e documentação detalhada de como usá-los.
Depois de incluir as bibliotecas, precisamos criar objetos UTFT e URTouch. Os parâmetros desses objetos dependem do modelo do TFT Screen and Shield e esses detalhes também podem ser encontrados na documentação das bibliotecas.
Em seguida precisamos definir as fontes que vêm com as bibliotecas e também definir algumas variáveis necessárias para o programa. Na seção de configuração precisamos iniciar a tela e o toque, definir os modos de pinos para o sensor conectado, o led e o botão, e inicialmente chamar a função custom drawHomeSreen(), que desenhará a tela inicial do programa.
#include <UTFT.h>
#include <URTouch.h>

//==== Creating Objects
UTFT    myGLCD(SSD1289,38,39,40,41); //Parameters should be adjusted to your Display/Schield model
URTouch  myTouch( 6, 5, 4, 3, 2);

//==== Defining Variables
extern uint8_t SmallFont[];
extern uint8_t BigFont[];
extern uint8_t SevenSegNumFont[];

extern unsigned int bird01[0x41A];

int x, y;

char currentPage, selectedUnit;

//Ultrasonic Sensor
const int VCC = 13;
const int trigPin = 11;
const int echoPin = 12;

long duration;
int distanceInch, distanceCm;

// RGB LEDs
const int redLed = 10;
const int greenLed = 9;
const int blueLed = 8;
int xR=38;
int xG=38;
int xB=38;

// Floppy Bird
int xP = 319;
int yP = 100;
int yB = 30;
int fallRateInt = 0;
float fallRate =0;
int score=0;
const int button = 14;
int buttonState = 0;

void setup() {
// Initial setup
  myGLCD.InitLCD();
  myGLCD.clrScr();
  myTouch.InitTouch();
  myTouch.setPrecision(PREC_MEDIUM);

  // Defining Pin Modes
  pinMode(VCC, OUTPUT); // VCC
  pinMode(trigPin, OUTPUT); // Sets the trigPin as an Output
  pinMode(echoPin, INPUT); // Sets the echoPin as an Input
  pinMode(redLed, OUTPUT);
  pinMode(greenLed, OUTPUT);
  pinMode(blueLed, OUTPUT);
  pinMode(button, INPUT);
  digitalWrite(VCC, HIGH); // +5V - Pin 13 as VCC

  drawHomeScreen();  // Draws the Home Screen
  currentPage = '0'; // Indicates that we are at Home Screen
  selectedUnit = '0'; // Indicates the selected unit for the first example, cms or inches
}Code language: Arduino (arduino)
Então agora vou explicar como podemos fazer a tela inicial do programa. Com a função setBackColor() precisamos definir a cor de fundo do texto, preto no nosso caso. Em seguida, precisamos definir a cor para branco, definir a fonte grande e usando a função print(), imprimiremos a string “Arduino TFT Tutorial” no centro da tela e 10 pixels abaixo do eixo Y da tela. Em seguida, vamos definir a cor para vermelho e desenhar a linha vermelha abaixo do texto. Depois disso, precisamos definir a cor de volta para branco e imprimir as duas outras strings, “by HowToMechatronics.com” usando a fonte pequena e “Select Example” usando a fonte grande.
Em seguida é o botão do sensor de distância. Primeiro precisamos definir a cor e então usando a função fillRoundRect() vamos desenhar o retângulo arredondado. Em seguida, definiremos a cor de volta para branco e, usando a função drawRoundRect(), desenharemos outro retângulo arredondado em cima do anterior, mas este não terá preenchimento para que a aparência geral do botão pareça ter um quadro . Em cima do botão, imprimiremos o texto usando a fonte grande e a mesma cor de fundo do preenchimento do botão. O mesmo procedimento vale para os outros dois botões.
// drawHomeScreen - Custom Function
void drawHomeScreen() {
  // Title
  myGLCD.setBackColor(0,0,0); // Sets the background color of the area where the text will be printed to black
  myGLCD.setColor(255, 255, 255); // Sets color to white
  myGLCD.setFont(BigFont); // Sets font to big
  myGLCD.print("Arduino TFT Tutorial", CENTER, 10); // Prints the string on the screen
  myGLCD.setColor(255, 0, 0); // Sets color to red
  myGLCD.drawLine(0,32,319,32); // Draws the red line
  myGLCD.setColor(255, 255, 255); // Sets color to white
  myGLCD.setFont(SmallFont); // Sets the font to small
  myGLCD.print("by HowToMechatronics.com", CENTER, 41); // Prints the string
  myGLCD.setFont(BigFont);
  myGLCD.print("Select Example", CENTER, 64);

  // Button - Distance Sensor
  myGLCD.setColor(16, 167, 103); // Sets green color
  myGLCD.fillRoundRect (35, 90, 285, 130); // Draws filled rounded rectangle
  myGLCD.setColor(255, 255, 255); // Sets color to white
  myGLCD.drawRoundRect (35, 90, 285, 130); // Draws rounded rectangle without a fill, so the overall appearance of the button looks like it has a frame
  myGLCD.setFont(BigFont); // Sets the font to big
  myGLCD.setBackColor(16, 167, 103); // Sets the background color of the area where the text will be printed to green, same as the button
  myGLCD.print("DISTANCE SENSOR", CENTER, 102); // Prints the string

  // Button - RGB LED Control
  myGLCD.setColor(16, 167, 103);
  myGLCD.fillRoundRect (35, 140, 285, 180);
  myGLCD.setColor(255, 255, 255);
  myGLCD.drawRoundRect (35, 140, 285, 180);
  myGLCD.setFont(BigFont);
  myGLCD.setBackColor(16, 167, 103);
  myGLCD.print("RGB LED CONTROL", CENTER, 152);

  // Button - Birduino
  myGLCD.setColor(16, 167, 103);
  myGLCD.fillRoundRect (35, 190, 285, 230);
  myGLCD.setColor(255, 255, 255);
  myGLCD.drawRoundRect (35, 190, 285, 230);
  myGLCD.setFont(BigFont);
  myGLCD.setBackColor(16, 167, 103);
  myGLCD.print("BIRDUINO GAME", CENTER, 202);
}Code language: Arduino (arduino)
Agora precisamos tornar os botões funcionais para que, ao pressioná-los, eles nos enviem para o exemplo apropriado. Na seção de configuração, definimos o caractere '0' para a variável currentPage, que indicará que estamos na tela inicial. Então, se isso for verdade, e se pressionarmos na tela esta declaração if se tornaria verdadeira e usando essas linhas aqui, obteremos as coordenadas X e Y onde a tela foi pressionada. Se essa for a área que cobre o primeiro botão, chamaremos a função personalizada drawDistanceSensor() que ativará o exemplo do sensor de distância. Também vamos definir o caractere '1' para a variável currentPage que indicará que estamos no primeiro exemplo. A função personalizada drawFrame() é usada para destacar o botão quando ele é pressionado. O mesmo procedimento vale para os outros dois botões.
//========== The loop section ========
void loop() {
  // Home Screen
  if (currentPage == '0') {
    if (myTouch.dataAvailable()) {
      myTouch.read();
      x=myTouch.getX(); // X coordinate where the screen has been pressed
      y=myTouch.getY(); // Y coordinates where the screen has been pressed
      // If we press the Distance Sensor Button
      if ((x>=35) && (x<=285) && (y>=90) && (y<=130)) {
        drawFrame(35, 90, 285, 130); // Custom Function -Highlighs the buttons when it's pressed
        currentPage = '1'; // Indicates that we are the first example
        myGLCD.clrScr(); // Clears the screen
        drawDistanceSensor(); // It is called only once, because in the next iteration of the loop, this above if statement will be false so this funtion won't be called. This function will draw the graphics of the first example.
      }
      // If we press the RGB LED Control Button
      if ((x>=35) && (x<=285) && (y>=140) && (y<=180)) {
        drawFrame(35, 140, 285, 180);
        currentPage = '2';
        myGLCD.clrScr();
        drawLedControl();
      }
      // If we press the Birduino Game Button
      if ((x>=35) && (x<=285) && (y>=190) && (y<=230)) {
        drawFrame(35, 190, 285, 230);
        currentPage = '3';
        myGLCD.clrScr();
        myGLCD.setColor(114, 198, 206);
        myGLCD.fillRect(0,0,319,239);
        drawGround();
        drawPilars(xP,yP);
        drawBird(30);
        delay(1000);
      }
    }
  }
  // Distance Sensor Example
  if (currentPage == '1') {
      getDistance(); // Gets distance from the sensor and this function is repeatedly called while we are at the first example in order to print the lasest results from the distance sensor
      if (myTouch.dataAvailable()) {
        myTouch.read();
        x=myTouch.getX();
        y=myTouch.getY();

        // If we press the Centimeters Button
        if ((x>=10) && (x<=135) &&(y>=90) && (y<=163)) {
          selectedUnit = '0';
        }
        // If we press the Inches Button
        if ((x>=10) && (x<=135) &&(y>=173) && (y<=201)) {
          selectedUnit = '1';
        }
        // If we press the Back Button
        if ((x>=10) && (x<=60) &&(y>=10) && (y<=36)) {
          drawFrame(10, 10, 60, 36);
          currentPage = '0'; // Indicates we are at home screen
          myGLCD.clrScr();
          drawHomeScreen(); // Draws the home screen
        }
      }
  }

  // RGB LED Control
  if (currentPage == '2') {
    setLedColor();
    if (myTouch.dataAvailable()) {
        myTouch.read();
        x=myTouch.getX();
        y=myTouch.getY();

        //Back button
        if ((x>=10) && (x<=60) &&(y>=10) && (y<=36)) {
          drawFrame(10, 10, 60, 36);
          currentPage = '0';
          myGLCD.clrScr();
          drawHomeScreen();
          // Turns the LED off
          analogWrite(redLed, 0);
          analogWrite(greenLed, 0);
          analogWrite(blueLed, 0);
        }
    }
  }
//==== This section of the code, for the game example, is explained in my next tutorial
  // Birduino Game
  if (currentPage == '3') {
    //delay(1);
    xP=xP-3;
    drawPilars(xP, yP);

    yB+=fallRateInt;
    fallRate=fallRate+0.4;
    fallRateInt= int(fallRate);
    if (yB>=220) {
      yB=220;
    }
    if(yB>=180 || yB<=0){
      restartGame();
    }
    if((xP<=85) && (xP>=30) && (yB<=yP-2)){
      restartGame();
    }
    if((xP<=85) && (xP>=30) && (yB>=yP+60)){
      restartGame();
    }
    drawBird(yB);

    if (xP<=-51){
      xP=319;
      yP = rand() % 100+20;
      score++;
    }
    if (myTouch.dataAvailable()) {
        myTouch.read();
        x=myTouch.getX();
        y=myTouch.getY();
        if ((x>=0) && (x<=319) &&(y>=50) && (y<=239)) {
          fallRate=-5;
        }
    }
    buttonState = digitalRead(button);
    if (buttonState == HIGH) {
      fallRate=-5;
      }
  }
    if (myTouch.dataAvailable()) {
        myTouch.read();
        x=myTouch.getX();
        y=myTouch.getY();
        if ((x>=10) && (x<=60) &&(y>=10) && (y<=36)) {
          drawFrame(10, 10, 60, 36);
          currentPage = '0';
          myGLCD.clrScr();
          drawHomeScreen();
          analogWrite(redLed, 0);
          analogWrite(greenLed, 0);
          analogWrite(blueLed, 0);
        }
    }
}Code language: Arduino (arduino)
Portanto, a função personalizada drawDistanceSensor() precisa ser chamada apenas uma vez quando o botão é pressionado para desenhar todos os gráficos deste exemplo de maneira semelhante à descrita para a tela inicial. No entanto, a função personalizada getDistance() precisa ser chamada repetidamente para imprimir os resultados mais recentes da distância medida pelo sensor.
Aqui está aquela função que usa o sensor ultrassônico para calcular a distância e imprimir os valores com a fonte SevenSegNum na cor verde, seja em centímetros ou polegadas. Se você precisar de mais detalhes sobre como o sensor ultrassônico funciona, você pode verificar meu tutorial específico para isso. De volta à seção de loop, podemos ver o que acontece quando pressionamos os botões de seleção da unidade, bem como o botão de volta.
//===== getDistance() - Custom Function
void getDistance() {
  // Clears the trigPin
  digitalWrite(trigPin, LOW);
  delayMicroseconds(2);
  // Sets the trigPin on HIGH state for 10 micro seconds
  digitalWrite(trigPin, HIGH);
  delayMicroseconds(10);
  digitalWrite(trigPin, LOW);
  // Reads the echoPin, returns the sound wave travel time in microseconds
  duration = pulseIn(echoPin, HIGH);
  // Calculating the distance
  distanceCm= duration*0.034/2;
  distanceInch= distanceCm/2.53;
  // Prints the distance in centimeters
  if (selectedUnit == '0' && distanceCm <=400) {
    myGLCD.setFont(SevenSegNumFont);
    myGLCD.setColor(0, 255, 0);
    myGLCD.setBackColor(0, 0, 0);
    myGLCD.printNumI(distanceCm,130, 145, 3,'0');
    myGLCD.setFont(BigFont);
    myGLCD.print("cm  ", 235, 178);

  }
  // Prints the distance in inches
  if (selectedUnit == '1' && distanceCm <=160) {
    myGLCD.setFont(SevenSegNumFont);
    myGLCD.setColor(0, 255, 0);
    myGLCD.setBackColor(0, 0, 0);
    myGLCD.printNumI(distanceInch,130, 145, 3,'0');
    myGLCD.setFont(BigFont);
    myGLCD.print("inch", 235, 178);
  }
  delay(10);
}Code language: Arduino (arduino)
Ok, a seguir é o exemplo RGB LED Control. Se pressionarmos o segundo botão, a função personalizada drawLedControl() será chamada apenas uma vez para desenhar o gráfico desse exemplo e a função personalizada setLedColor() será chamada repetidamente. Nesta função, usamos a tela sensível ao toque para definir os valores dos 3 controles deslizantes de 0 a 255. Com as instruções if, limitamos a área de cada controle deslizante e obtemos o valor X do controle deslizante. Então os valores da coordenada X de cada slider são de 38 a 310 pixels e precisamos mapear esses valores em valores de 0 a 255 que serão usados como sinal PWM para acender o LED. Se você precisar de mais detalhes sobre como o LED RGB funciona, você pode verificar meu tutorial específico para isso. O restante do código nesta função personalizada é para desenhar os controles deslizantes. De volta à seção de loop, temos apenas o botão Voltar que também desliga o LED quando pressionado.
//============= setLedColor() - Custom Funtion
void setLedColor() {
  if (myTouch.dataAvailable()) {
    myTouch.read();
    x=myTouch.getX();
    y=myTouch.getY();
    // Area of the Red color slider
    if( (y>=130) && (y<=156)) {
      xR=x; // Stores the X value where the screen has been pressed in to variable xR
      if (xR<=38) { // Confines the area of the slider to be above 38 pixels
        xR=38;
      }
      if (xR>=303){ /// Confines the area of the slider to be under 310 pixels
        xR=303;
      }
    }
    // Area of the Green color slider
    if( (y>=170) && (y<=196)) {
      xG=x;
      if (xG<=38) {
        xG=38;
      }
      if (xG>=303){
        xG=303;
      }
    }
    // Area of the Blue color slider
    if( (y>=210) && (y<=236)) {
      xB=x;
      if (xB<=38) {
        xB=38;
      }
      if (xB>=303){
        xB=303;
      }
    }
  }
  // Maps the values of the X - Axis from 38 to 0 and 310 to 255, because we need values from 0 to 255 for turning on the led
  int xRC = map(xR,38,310,0,255);
  int xGC = map(xG,38,310,0,255);
  int xBC = map(xB,38,310,0,255);

  // Sends PWM signal to the pins of the led
  analogWrite(redLed, xRC);
  analogWrite(greenLed, xGC);
  analogWrite(blueLed, xBC);

  // Draws a rectangle with the latest color combination
  myGLCD.setColor(xRC, xGC, xBC);
  myGLCD.fillRoundRect(175, 87, 310, 119);

  // Draws the positioners
  myGLCD.setColor(255, 255, 255);
  myGLCD.fillRect(xR,139,(xR+4),147); // Positioner
  myGLCD.setColor(xRC, 0, 0);
  myGLCD.fillRect(31, 139, (xR-1), 147);
  myGLCD.setColor(0, 0, 0);
  myGLCD.fillRect((xR+5), 139, 309, 147);

  myGLCD.setColor(255, 255, 255);
  myGLCD.fillRect(xG,179,(xG+4),187);
  myGLCD.setColor(0, xGC, 0);
  myGLCD.fillRect(31, 179, (xG-1), 187);
  myGLCD.setColor(0, 0, 0);
  myGLCD.fillRect((xG+5), 179, 309, 187);


  myGLCD.setColor(255, 255, 255);
  myGLCD.fillRect(xB,219,(xB+4),227);
  myGLCD.setColor(0, 0, xBC);
  myGLCD.fillRect(31, 219, (xB-1), 227);
  myGLCD.setColor(0, 0, 0);
  myGLCD.fillRect((xB+5), 219, 309, 227);
}Code language: Arduino (arduino)
A seguir está o exemplo de jogo do Arduino, mas vou deixar esse para o meu próximo tutorial para que possamos entendê-lo melhor, pois é um pouco mais complexo.
Código-fonte completo do programa
Para que o código funcione e compile você terá que incluir um arquivo adicional “.c” no mesmo diretório com o sketch do Arduino. Este arquivo é para o terceiro exemplo de jogo e é um bitmap do pássaro. Para mais detalhes sobre como essa parte do código funciona, você pode conferir meu tutorial específico. Aqui você pode baixar esse arquivo:
Arquivos do tutorial TFT do Arduino
1 arquivo(s) Download de 6,07 KBAqui está o código-fonte completo do programa:
/*  Arduino TFT Tutorial
 *  Program made by Dejan Nedelkovski,
 *  www.HowToMechatronics.com
 */

/*  This program uses the UTFT and URTouch libraries
 *  made by Henning Karlsen.
 *  You can find and download them at:
 *  www.RinkyDinkElectronics.com
 */

#include <UTFT.h>
#include <URTouch.h>

//==== Creating Objects
UTFT    myGLCD(SSD1289,38,39,40,41); //Parameters should be adjusted to your Display/Schield model
URTouch  myTouch( 6, 5, 4, 3, 2);

//==== Defining Variables
extern uint8_t SmallFont[];
extern uint8_t BigFont[];
extern uint8_t SevenSegNumFont[];

extern unsigned int bird01[0x41A];

int x, y;

char currentPage, selectedUnit;

//Ultrasonic Sensor
const int VCC = 13;
const int trigPin = 11;
const int echoPin = 12;

long duration;
int distanceInch, distanceCm;

// RGB LEDs
const int redLed = 10;
const int greenLed = 9;
const int blueLed = 8;
int xR=38;
int xG=38;
int xB=38;

// Floppy Bird
int xP = 319;
int yP = 100;
int yB = 30;
int fallRateInt = 0;
float fallRate =0;
int score=0;
const int button = 14;
int buttonState = 0;

void setup() {
// Initial setup
  myGLCD.InitLCD();
  myGLCD.clrScr();
  myTouch.InitTouch();
  myTouch.setPrecision(PREC_MEDIUM);

  // Defining Pin Modes
  pinMode(VCC, OUTPUT); // VCC
  pinMode(trigPin, OUTPUT); // Sets the trigPin as an Output
  pinMode(echoPin, INPUT); // Sets the echoPin as an Input
  pinMode(redLed, OUTPUT);
  pinMode(greenLed, OUTPUT);
  pinMode(blueLed, OUTPUT);
  pinMode(button, INPUT);
  digitalWrite(VCC, HIGH); // +5V - Pin 13 as VCC

  drawHomeScreen();  // Draws the Home Screen
  currentPage = '0'; // Indicates that we are at Home Screen
  selectedUnit = '0'; // Indicates the selected unit for the first example, cms or inches
}

void loop() {
  // Home Screen
  if (currentPage == '0') {
    if (myTouch.dataAvailable()) {
      myTouch.read();
      x=myTouch.getX(); // X coordinate where the screen has been pressed
      y=myTouch.getY(); // Y coordinates where the screen has been pressed
      // If we press the Distance Sensor Button
      if ((x>=35) && (x<=285) && (y>=90) && (y<=130)) {
        drawFrame(35, 90, 285, 130); // Custom Function -Highlighs the buttons when it's pressed
        currentPage = '1'; // Indicates that we are the first example
        myGLCD.clrScr(); // Clears the screen
        drawDistanceSensor(); // It is called only once, because in the next iteration of the loop, this above if statement will be false so this funtion won't be called. This function will draw the graphics of the first example.
      }
      // If we press the RGB LED Control Button
      if ((x>=35) && (x<=285) && (y>=140) && (y<=180)) {
        drawFrame(35, 140, 285, 180);
        currentPage = '2';
        myGLCD.clrScr();
        drawLedControl();
      }
      // If we press the Birduino Game Button
      if ((x>=35) && (x<=285) && (y>=190) && (y<=230)) {
        drawFrame(35, 190, 285, 230);
        currentPage = '3';
        myGLCD.clrScr();
        myGLCD.setColor(114, 198, 206);
        myGLCD.fillRect(0,0,319,239);
        drawGround();
        drawPilars(xP,yP);
        drawBird(30);
        delay(1000);
      }
    }
  }
  // Distance Sensor Example
  if (currentPage == '1') {
      getDistance(); // Gets distance from the sensor and this function is repeatedly called while we are at the first example in order to print the lasest results from the distance sensor
      if (myTouch.dataAvailable()) {
        myTouch.read();
        x=myTouch.getX();
        y=myTouch.getY();

        // If we press the Centimeters Button
        if ((x>=10) && (x<=135) &&(y>=90) && (y<=163)) {
          selectedUnit = '0';
        }
        // If we press the Inches Button
        if ((x>=10) && (x<=135) &&(y>=173) && (y<=201)) {
          selectedUnit = '1';
        }
        // If we press the Back Button
        if ((x>=10) && (x<=60) &&(y>=10) && (y<=36)) {
          drawFrame(10, 10, 60, 36);
          currentPage = '0'; // Indicates we are at home screen
          myGLCD.clrScr();
          drawHomeScreen(); // Draws the home screen
        }
      }
  }

  // RGB LED Control
  if (currentPage == '2') {
    setLedColor();
    if (myTouch.dataAvailable()) {
        myTouch.read();
        x=myTouch.getX();
        y=myTouch.getY();

        //Back button
        if ((x>=10) && (x<=60) &&(y>=10) && (y<=36)) {
          drawFrame(10, 10, 60, 36);
          currentPage = '0';
          myGLCD.clrScr();
          drawHomeScreen();
          // Turns the LED off
          analogWrite(redLed, 0);
          analogWrite(greenLed, 0);
          analogWrite(blueLed, 0);
        }
    }
  }
//==== This section of the code, for the game example, is explained in my next tutorial
  // Birduino Game
  if (currentPage == '3') {
    //delay(1);
    xP=xP-3;
    drawPilars(xP, yP);

    yB+=fallRateInt;
    fallRate=fallRate+0.4;
    fallRateInt= int(fallRate);
    if (yB>=220) {
      yB=220;
    }
    if(yB>=180 || yB<=0){
      restartGame();
    }
    if((xP<=85) && (xP>=30) && (yB<=yP-2)){
      restartGame();
    }
    if((xP<=85) && (xP>=30) && (yB>=yP+60)){
      restartGame();
    }
    drawBird(yB);

    if (xP<=-51){
      xP=319;
      yP = rand() % 100+20;
      score++;
    }
    if (myTouch.dataAvailable()) {
        myTouch.read();
        x=myTouch.getX();
        y=myTouch.getY();
        if ((x>=0) && (x<=319) &&(y>=50) && (y<=239)) {
          fallRate=-5;
        }
    }
    buttonState = digitalRead(button);
    if (buttonState == HIGH) {
      fallRate=-5;
      }
  }
    if (myTouch.dataAvailable()) {
        myTouch.read();
        x=myTouch.getX();
        y=myTouch.getY();
        if ((x>=10) && (x<=60) &&(y>=10) && (y<=36)) {
          drawFrame(10, 10, 60, 36);
          currentPage = '0';
          myGLCD.clrScr();
          drawHomeScreen();
          analogWrite(redLed, 0);
          analogWrite(greenLed, 0);
          analogWrite(blueLed, 0);
        }
    }
}

// ====== Custom Funtions ======
// drawHomeScreen - Custom Function
void drawHomeScreen() {
  // Title
  myGLCD.setBackColor(0,0,0); // Sets the background color of the area where the text will be printed to black
  myGLCD.setColor(255, 255, 255); // Sets color to white
  myGLCD.setFont(BigFont); // Sets font to big
  myGLCD.print("Arduino TFT Tutorial", CENTER, 10); // Prints the string on the screen
  myGLCD.setColor(255, 0, 0); // Sets color to red
  myGLCD.drawLine(0,32,319,32); // Draws the red line
  myGLCD.setColor(255, 255, 255); // Sets color to white
  myGLCD.setFont(SmallFont); // Sets the font to small
  myGLCD.print("by HowToMechatronics.com", CENTER, 41); // Prints the string
  myGLCD.setFont(BigFont);
  myGLCD.print("Select Example", CENTER, 64);

  // Button - Distance Sensor
  myGLCD.setColor(16, 167, 103); // Sets green color
  myGLCD.fillRoundRect (35, 90, 285, 130); // Draws filled rounded rectangle
  myGLCD.setColor(255, 255, 255); // Sets color to white
  myGLCD.drawRoundRect (35, 90, 285, 130); // Draws rounded rectangle without a fill, so the overall appearance of the button looks like it has a frame
  myGLCD.setFont(BigFont); // Sets the font to big
  myGLCD.setBackColor(16, 167, 103); // Sets the background color of the area where the text will be printed to green, same as the button
  myGLCD.print("DISTANCE SENSOR", CENTER, 102); // Prints the string

  // Button - RGB LED Control
  myGLCD.setColor(16, 167, 103);
  myGLCD.fillRoundRect (35, 140, 285, 180);
  myGLCD.setColor(255, 255, 255);
  myGLCD.drawRoundRect (35, 140, 285, 180);
  myGLCD.setFont(BigFont);
  myGLCD.setBackColor(16, 167, 103);
  myGLCD.print("RGB LED CONTROL", CENTER, 152);

  // Button - Birduino
  myGLCD.setColor(16, 167, 103);
  myGLCD.fillRoundRect (35, 190, 285, 230);
  myGLCD.setColor(255, 255, 255);
  myGLCD.drawRoundRect (35, 190, 285, 230);
  myGLCD.setFont(BigFont);
  myGLCD.setBackColor(16, 167, 103);
  myGLCD.print("BIRDUINO GAME", CENTER, 202);
}

// Highlights the button when pressed
void drawFrame(int x1, int y1, int x2, int y2) {
  myGLCD.setColor(255, 0, 0);
  myGLCD.drawRoundRect (x1, y1, x2, y2);
  while (myTouch.dataAvailable())
    myTouch.read();
    myGLCD.setColor(255, 255, 255);
    myGLCD.drawRoundRect (x1, y1, x2, y2);
}
//====================================================
void drawDistanceSensor() {
  myGLCD.setColor(100, 155, 203);
  myGLCD.fillRoundRect (10, 10, 60, 36);
  myGLCD.setColor(255, 255, 255);
  myGLCD.drawRoundRect (10, 10, 60, 36);
  myGLCD.setFont(BigFont);
  myGLCD.setBackColor(100, 155, 203);
  myGLCD.print("<-", 18, 15);
  myGLCD.setBackColor(0, 0, 0);
  myGLCD.setFont(SmallFont);
  myGLCD.print("Back to Main Menu", 70, 18);
  myGLCD.setFont(BigFont);
  myGLCD.print("Ultrasonic Sensor", CENTER, 50);
  myGLCD.print("HC-SR04", CENTER, 76);
  myGLCD.setColor(255, 0, 0);
  myGLCD.drawLine(0,100,319,100);
  myGLCD.setBackColor(0, 0, 0);
  myGLCD.setColor(255, 255, 255);
  myGLCD.setFont(SmallFont);
  myGLCD.print("Select Unit", 10, 114);
  myGLCD.setFont(BigFont);
  myGLCD.print("Distance:", 130, 120);
  myGLCD.setColor(223, 77, 55);
  myGLCD.fillRoundRect (10, 135, 90, 163);
  myGLCD.setColor(225, 255, 255);
  myGLCD.drawRoundRect (10, 135, 90, 163);
  myGLCD.setBackColor(223, 77, 55);
  myGLCD.setColor(255, 255, 255);
  myGLCD.print("cm", 33, 140);
  myGLCD.setColor(223, 77, 55);
  myGLCD.fillRoundRect (10, 173, 90, 201);
  myGLCD.setColor(255, 255, 255);
  myGLCD.drawRoundRect (10, 173, 90, 201);
  myGLCD.setBackColor(223, 77, 55);
  myGLCD.setColor(255, 255, 255);
  myGLCD.print("inch", 17, 180);
  myGLCD.setBackColor(0, 0, 0);
  myGLCD.setFont(SmallFont);
  myGLCD.print("Source code at: HowToMechatronics.com", CENTER, 220);
}
//====================================================
//===== getDistance - Custom Function
void getDistance() {
  // Clears the trigPin
  digitalWrite(trigPin, LOW);
  delayMicroseconds(2);
  // Sets the trigPin on HIGH state for 10 micro seconds
  digitalWrite(trigPin, HIGH);
  delayMicroseconds(10);
  digitalWrite(trigPin, LOW);
  // Reads the echoPin, returns the sound wave travel time in microseconds
  duration = pulseIn(echoPin, HIGH);
  // Calculating the distance
  distanceCm= duration*0.034/2;
  distanceInch= distanceCm/2.53;
  // Prints the distance in centimeters
  if (selectedUnit == '0' && distanceCm <=400) {
    myGLCD.setFont(SevenSegNumFont);
    myGLCD.setColor(0, 255, 0);
    myGLCD.setBackColor(0, 0, 0);
    myGLCD.printNumI(distanceCm,130, 145, 3,'0');
    myGLCD.setFont(BigFont);
    myGLCD.print("cm  ", 235, 178);

  }
  // Prints the distance in inches
  if (selectedUnit == '1' && distanceCm <=160) {
    myGLCD.setFont(SevenSegNumFont);
    myGLCD.setColor(0, 255, 0);
    myGLCD.setBackColor(0, 0, 0);
    myGLCD.printNumI(distanceInch,130, 145, 3,'0');
    myGLCD.setFont(BigFont);
    myGLCD.print("inch", 235, 178);
  }
  delay(10);
}
//====================================================
void drawLedControl() {
  myGLCD.setColor(100, 155, 203);
  myGLCD.fillRoundRect (10, 10, 60, 36);
  myGLCD.setColor(255, 255, 255);
  myGLCD.drawRoundRect (10, 10, 60, 36);
  myGLCD.setFont(BigFont);
  myGLCD.setBackColor(100, 155, 203);
  myGLCD.print("<-", 18, 15);
  myGLCD.setBackColor(0, 0, 0);
  myGLCD.setFont(SmallFont);
  myGLCD.print("Back to Main Menu", 70, 18);
  myGLCD.setFont(BigFont);
  myGLCD.print("RGB LED Control", CENTER, 50);
  myGLCD.print("LED Color:", 10, 95);
  myGLCD.print("R", 10, 135);
  myGLCD.print("G", 10, 175);
  myGLCD.print("B", 10, 215);
  myGLCD.setColor(255, 0, 0);
  myGLCD.drawLine(0,75,319,75);
  myGLCD.setColor(255, 255, 255);
  myGLCD.drawRect(30, 138, 310, 148); // R - Slider
  myGLCD.drawRect(30, 178, 310, 188);
  myGLCD.drawRect(30, 218, 310, 228);
}
//====================================================
//============= setLedColor() - Custom Funtion
void setLedColor() {
  if (myTouch.dataAvailable()) {
    myTouch.read();
    x=myTouch.getX();
    y=myTouch.getY();
    // Area of the Red color slider
    if( (y>=130) && (y<=156)) {
      xR=x; // Stores the X value where the screen has been pressed in to variable xR
      if (xR<=38) { // Confines the area of the slider to be above 38 pixels
        xR=38;
      }
      if (xR>=303){ /// Confines the area of the slider to be under 310 pixels
        xR=303;
      }
    }
    // Area of the Green color slider
    if( (y>=170) && (y<=196)) {
      xG=x;
      if (xG<=38) {
        xG=38;
      }
      if (xG>=303){
        xG=303;
      }
    }
    // Area of the Blue color slider
    if( (y>=210) && (y<=236)) {
      xB=x;
      if (xB<=38) {
        xB=38;
      }
      if (xB>=303){
        xB=303;
      }
    }
  }
  // Maps the values of the X - Axis from 38 to 0 and 310 to 255, because we need values from 0 to 255 for turning on the led
  int xRC = map(xR,38,310,0,255);
  int xGC = map(xG,38,310,0,255);
  int xBC = map(xB,38,310,0,255);

  // Sends PWM signal to the pins of the led
  analogWrite(redLed, xRC);
  analogWrite(greenLed, xGC);
  analogWrite(blueLed, xBC);

  // Draws a rectangle with the latest color combination
  myGLCD.setColor(xRC, xGC, xBC);
  myGLCD.fillRoundRect(175, 87, 310, 119);

  // Draws the positioners
  myGLCD.setColor(255, 255, 255);
  myGLCD.fillRect(xR,139,(xR+4),147); // Positioner
  myGLCD.setColor(xRC, 0, 0);
  myGLCD.fillRect(31, 139, (xR-1), 147);
  myGLCD.setColor(0, 0, 0);
  myGLCD.fillRect((xR+5), 139, 309, 147);

  myGLCD.setColor(255, 255, 255);
  myGLCD.fillRect(xG,179,(xG+4),187);
  myGLCD.setColor(0, xGC, 0);
  myGLCD.fillRect(31, 179, (xG-1), 187);
  myGLCD.setColor(0, 0, 0);
  myGLCD.fillRect((xG+5), 179, 309, 187);


  myGLCD.setColor(255, 255, 255);
  myGLCD.fillRect(xB,219,(xB+4),227);
  myGLCD.setColor(0, 0, xBC);
  myGLCD.fillRect(31, 219, (xB-1), 227);
  myGLCD.setColor(0, 0, 0);
  myGLCD.fillRect((xB+5), 219, 309, 227);
}
//====================================================
void drawGround() {
  myGLCD.setColor(221,216,148);
  myGLCD.fillRect(0, 215, 319, 239);
  myGLCD.setColor(47,175,68);
  myGLCD.fillRect(0, 205, 319, 214);
  myGLCD.setColor(0, 0, 0);
  myGLCD.setBackColor(221, 216, 148);
  myGLCD.setFont(BigFont);
  myGLCD.print("Score:",5,220);
  myGLCD.setFont(SmallFont);
  myGLCD.print("HowToMechatronics.com", 140, 220);
}
void drawPilars(int x, int y) {

    if (x>=270){
      myGLCD.setColor(0, 200, 20);
      myGLCD.fillRect(318, 0, x, y-1);
      myGLCD.setColor(0, 0, 0);
      myGLCD.drawRect(319, 0, x-1, y);

      myGLCD.setColor(0, 200, 20);
      myGLCD.fillRect(318, y+81, x, 203);
      myGLCD.setColor(0, 0, 0);
      myGLCD.drawRect(319, y+80, x-1, 204);
    }
    else if( x<=268) {
    myGLCD.setColor(114, 198, 206);
    myGLCD.fillRect(x+51, 0, x+53, y);
    myGLCD.setColor(0, 200, 20);
    myGLCD.fillRect(x+49, 1, x+1, y-1);
    myGLCD.setColor(0, 0, 0);
    myGLCD.drawRect(x+50, 0, x, y);
    myGLCD.setColor(114, 198, 206);
    myGLCD.fillRect(x-1, 0, x-3, y);

    myGLCD.setColor(114, 198, 206);
    myGLCD.fillRect(x+51, y+80, x+53, 204);
    myGLCD.setColor(0, 200, 20);
    myGLCD.fillRect(x+49, y+81, x+1, 203);
    myGLCD.setColor(0, 0, 0);
    myGLCD.drawRect(x+50, y+80, x, 204);
    myGLCD.setColor(114, 198, 206);
    myGLCD.fillRect(x-1, y+80, x-3, 204);
  }
  myGLCD.setColor(0, 0, 0);
  myGLCD.setBackColor(221, 216, 148);
  myGLCD.setFont(BigFont);
  myGLCD.printNumI(score, 100, 220);
}
//====================================================
void drawBird(int y) {
  if(y<=219) {
    myGLCD.drawBitmap (50, y, 35, 30, bird01);
    myGLCD.setColor(114, 198, 206);
    myGLCD.fillRoundRect(50,y,85,y-6);
    myGLCD.fillRoundRect(50,y+30,85,y+36);
  }
  else if(y>=200) {
    myGLCD.drawBitmap (50, 200, 35, 30, bird01);
    myGLCD.setColor(114, 198, 206);
    myGLCD.fillRoundRect(50,200,85,200-6);
    myGLCD.fillRoundRect(50,200+30,85,200+36);
  }
}
void gameOver() {
  myGLCD.clrScr();
  myGLCD.setColor(255, 255, 255);
  myGLCD.setBackColor(0, 0, 0);
  myGLCD.setFont(BigFont);
  myGLCD.print("GAME OVER", CENTER, 40);
  myGLCD.print("Score:", 100, 80);
  myGLCD.printNumI(score,200, 80);
  myGLCD.print("Restarting...", CENTER, 120);
  myGLCD.setFont(SevenSegNumFont);
  myGLCD.printNumI(2,CENTER, 150);
  delay(1000);
  myGLCD.printNumI(1,CENTER, 150);
  delay(1000);
  myGLCD.setColor(114, 198, 206);
  myGLCD.fillRect(0,0,319,239);
  drawBird(30);
  drawGround();
  delay(1000);
}
//====================================================
void restartGame() {
  delay(1000);
  gameOver();
  xP=319;
  yB=30;
  fallRate=0;
  score=0;
}
Code language: Arduino (arduino)
Tutorial de temperatura e umidade dos sensores DHT11 e DHT22 usando Arduino
O que é MEMS? Acelerômetro, Giroscópio e Magnetômetro com Arduino
Processo de manufatura
- Tutorial de bloqueio RFID do Arduino
- Piano portátil de toque capacitivo
- Animação de LCD e jogos
- Exibindo uma imagem em uma tela LCD TFT com o Arduino UNO!
- Exibir imagens BMP do cartão SD no escudo LCD TFT
- Interface e correção de problema de toque no LCD TFT 2.4 ″ Blindagem
- Estação meteorológica Arduino
- Tutorial do sensor de impressão digital Arduino
- Dodge The Defs!
- Arduino Tutorial 01:Começando