


Microfusão de peças impressas em 3D com resinas de queima
Microfusão ou fundição por cera perdida é um dos métodos de fabricação mais amplamente utilizados na indústria de joias e é o mais antigo processo de fundição conhecido.
A fundição permite obter réplicas metálicas por meio de um molde que é feito a partir de um protótipo modelado tradicionalmente em cera. Nesse caso, peças impressas em 3D com resinas burn-out são usadas para substituir os modelos de cera.
As joias podem ser feitas de uma variedade de metais, incluindo ouro, platina, prata e latão , usando o processo de fundição. Abaixo você pode ver o processo de microfusão para joias a partir de peças impressas em 3D com resinas burn-out:
1- Impressão 3D da peça
Com base em projetos criados usando software CAD, os modelos desejados devem ser impressos em 3D. Atualmente, existe um grande número de resinas calcináveis disponíveis de diferentes fabricantes. A utilização de um material ou outro depende da impressora 3D utilizada e das características requeridas para as peças.
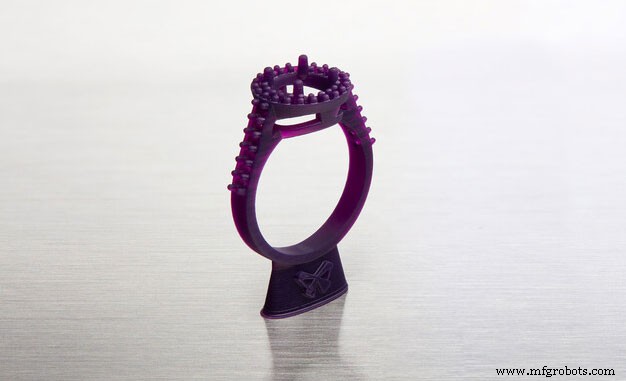
Imagem 1:Anel impresso em 3D com resina de queima FormLabs. Fonte:FormLabs.
Uma das impressoras 3D mais populares para impressão 3D no setor de joias é a Form3 do renomado fabricante FormLabs. Esta impressora 3D não requer conhecimentos técnicos avançados e por isso pode ser utilizada sem dificuldade . A impressora 3D Form3 limita seu uso por apenas suportar materiais desenvolvidos pelo fabricante. Isso pode ser uma vantagem, pois nenhuma configuração é necessária e os parâmetros de configuração e valores modificáveis são reduzidos ao mínimo, com apenas o tipo de material e alguns parâmetros básicos a serem selecionados. Isso reduz a margem de erro ao mínimo.
A tabela a seguir mostra algumas das resinas queimáveis mais populares e sua compatibilidade com impressoras 3D:
| Resina | Fabricante | Tecnologia | Compatibilidade |
|---|---|---|---|
| Cera Castable | FormLabs | SLA | Formulário 2, Formulário 3, Formulário 3L, Formulário3+ |
| Cera Castable 40 | FormLabs | SLA | Formulário 2, Formulário 3, Formulário 3L, Formulário3+ |
| zWax Amber | UniZ | LCD | Slash, Slash 2, Slash 2 Plus, Slash 2 Pro |
| zWax Roxo | UniZ | LCD | Slash, Slash 2, Slash 2 Plus, Slash 2 Pro |
| Bluecast original | Zortrax | LCD | UniZ, WANHAO, zortrax, ANYCUBIC, ASIGA, B9 Creator, FLASH FORGE Moon Ray, Prusa. |
| Bluecast X5 | Zortrax | LCD | UniZ, WANHAO, zortrax, ANYCUBIC, ASIGA, B9 Creator, FLASH FORGE Moon Ray, Prusa. |
| Bluecast X10 | Zortrax | LCD | UniZ, WANHAO, zortrax, ANYCUBIC, ASIGA, B9 Creator, FLASH FORGE Moon Ray, Prusa. |
| Dental Cast | Harz Labs | LCD | Formlabs, PEOPOLY, UniZ, WANHAO, zortrax, ANYCUBIC, ASIGA, B9 Creator, FLASH FORGE Moon Ray, Prusa. |
Table 1:Burn-out resins and compatibility. Fonte:Filament2print.
Each material has different properties and requires different parameters. However, they all have a common characteristic:they have been developed to replace wax parts in the microfusion process, with a composition that achieves castings free of residues that could affect the final result of the parts.
Once the parts have been printed, they must be cured if the material requires it. This depends on the composition of the resin and the manufacturer's advice should always be followed to achieve an optimum result.
2- Wax tree
Once the parts are cured (in cases where this step is required), the removal of the backing can be carried out, always with great care. Sandpaper (400 grit or higher) or even a rotary tool with a polishing attachment can be used to achieve total removal of the support and a perfect finish.
To create the wax tree, a wax base is taken and attached to a rubber cover of the sprue. Small cylindrical wax rods are welded to the wax base using a heat tool. The 3D printed parts are welded to the other end of the bars.
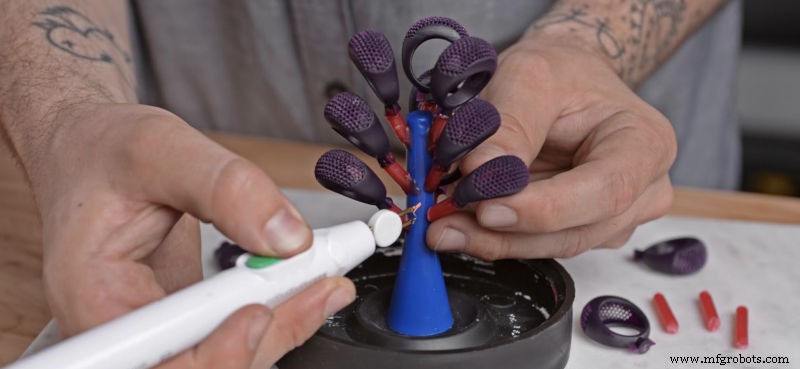
Image 2:Casting wax tree. Source:FormLabs.
This process is similar to that carried out in microfusion when casting traditionally carved wax pieces.
3- Mould preparation
The wax tree with the 3D printed parts in burn-out resin is to be placed inside a refractory steel cylinder, which is to be fitted into the rubber cylinder cover. In case the refractory steel cylinder has holes, these should be covered by wrapping the cylinder in adhesive tape.
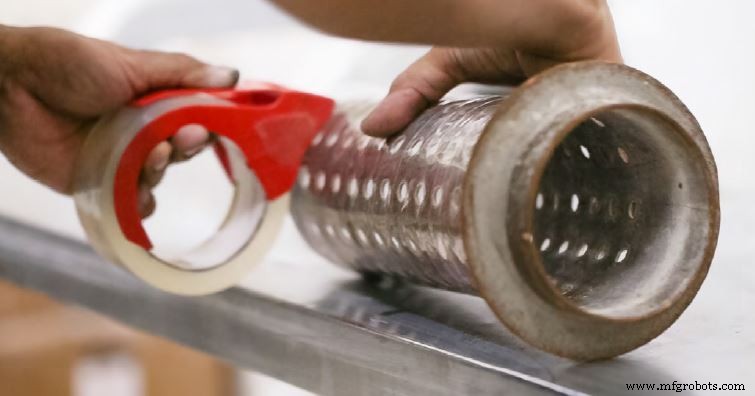
Image 3:Refractory steel cylinder shell. Source:Formlabs.
The casting must then be poured slowly, always from the side of the cylinder to avoid damaging the tree with the parts 3D printed with calcineable resin.
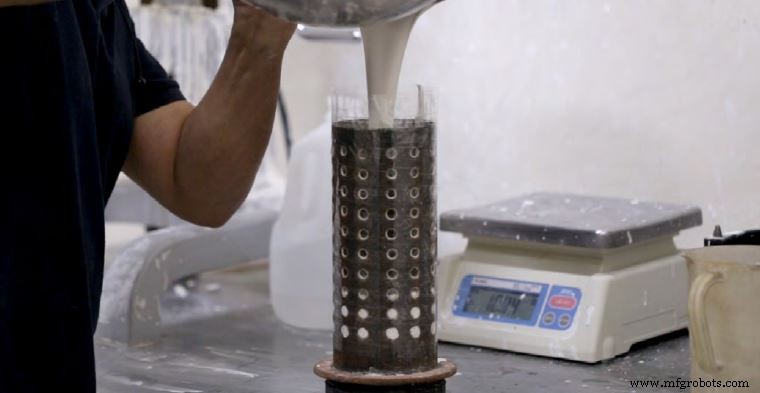
Image 4:Pouring of the casting into a refractory steel cylinder. Source:Formlabs.
When pouring the casting, it is possible that small air pockets may remain which can affect the quality of the final parts. For this reason, it is very important to carry out the degassing process in a vacuum chamber.
4- Burnout
The cylinder is placed in the oven following the time and temperature instructions recommended by the manufacturer. During this time, the wax will burn out without leaving residues, leaving the mould ready.
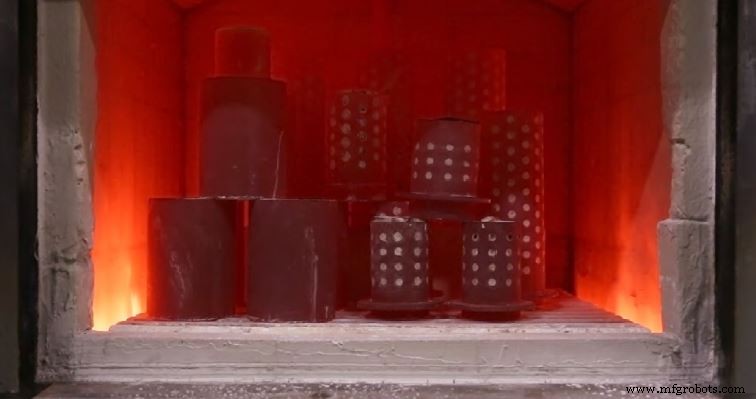
Image 5:Burnout process. Source:Formlabs.
The desired metal must then be poured into the mould to produce the final parts.
5- Washing and polishing
After casting, the mould is carefully removed from the furnace and immersed in water using tongs. During this process, the casting will melt, leaving the metal parts visible. Once washed, the metal parts are separated from the tree, polished and polished until the desired finish is achieved.
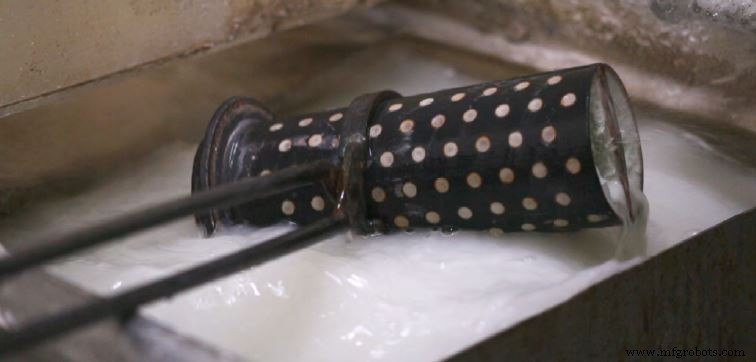
Image 6:Washing process. Source:Formlabs.
Once washed, the metal parts are separated from the tree, polished and polished to the desired finish.
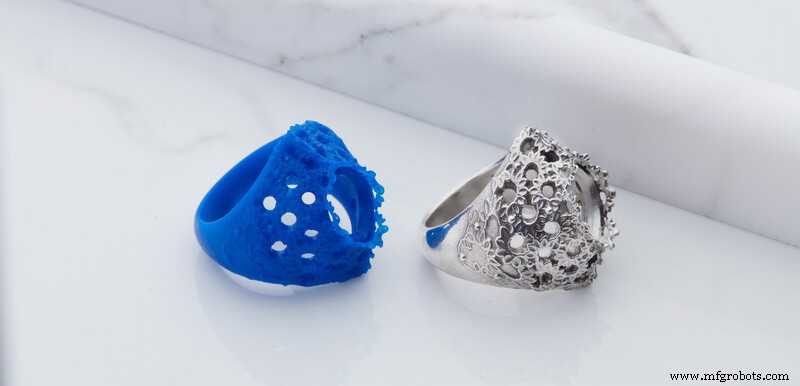
Image 7:3D printed ring with burn-out resin and silver ring after the microfusion process. Source:Formlabs.
The use of castable resins in the jewellery sector offers numerous advantages . Among others, it allows you to 3D print as many models as you want, quickly and with extreme precision . This results in a significant reduction in costs and production times.
Como tingir peças impressas em 3D com poliamida
Móveis impressos em 3D:funcionalidade e sustentabilidade
impressao 3D
- Soldagem e colagem de peças de plástico impressas em 3D
- Você deve terminar suas peças impressas em 3D internamente?
- Concluindo as peças impressas em 3D com… giz de cera?
- Uma introdução à impressão 3D com sinterização seletiva a laser
- Impressão 3D com resinas:uma introdução
- Tornando peças de metal mais leves com impressão 3D de metal
- Impressão do fusível 1 com o fusível 1
- Substituição de peças de alumínio por fibra de carbono impressa em 3D
- Melhor controle de qualidade com peças impressas em 3D
- Amarre-se com peças impressas em 3D funcionais!