


Projeto de reprodutor de música e despertador com tela de toque do Arduino
Neste projeto, mostrarei como você pode fazer um reprodutor de música MP3 com tela de toque do Arduino e um despertador. Você pode assistir ao vídeo a seguir ou ler o tutorial escrito abaixo.
Visão geral
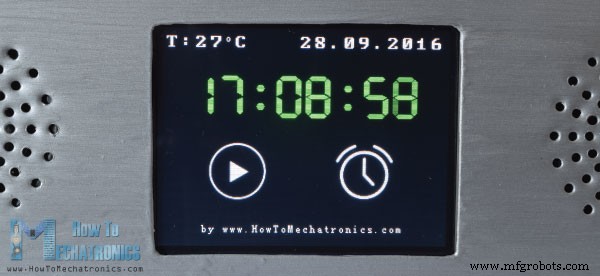
A tela inicial apresenta um grande relógio, informações de data e temperatura, além de dois botões para o Music Player e o Alarm Clock.
Se entrarmos no Music Player, podemos começar a tocar a música pressionando o grande botão “Play” no meio da tela. Ao lado dele, há mais dois botões, para tocar a música anterior ou a próxima.
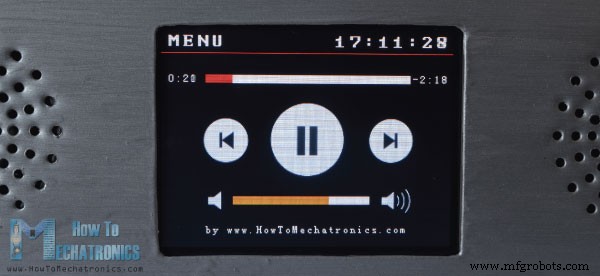
Acima desses botões está a barra de progresso da música, e na parte inferior da tela temos uma barra de volume e dois botões para diminuir e aumentar o volume. No canto superior direito há um relógio e no lado esquerdo está o botão “Menu” que nos leva de volta à tela inicial.
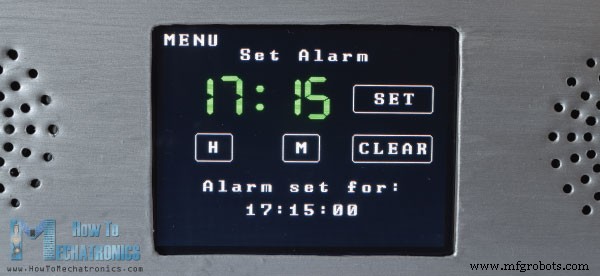
Por outro lado, se entrarmos no Despertador, podemos definir um alarme usando os dois botões para definir as horas e os minutos.
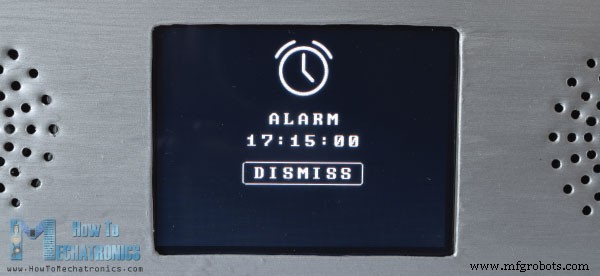
Quando o alarme for ativado, uma música começará a tocar em um volume mais alto e continuará tocando até pressionarmos o botão “Dismiss”.
Como funciona
Agora vamos dar uma olhada como este dispositivo funciona. Utiliza uma placa Arduino Mega e uma tela TFT touch screen de 3,2” com shield adequado para conectar a tela com a placa Arduino. Para tocar a música, utiliza o módulo BY8001 MP3 Player e para o despertador utiliza o módulo DS3231 Real Time Clock.

Você pode obter os componentes necessários para este projeto Arduino nos links abaixo:
- BY8001-16P Módulo MP3 ………
- Tela de toque TFT de 3,2″……….…
- TFT Display Mega Shield………..
- Alto-falante de 0,5 W ……………………….
- Relógio em tempo real DS3231 ………..
- Arduíno Mega…………………………..
Esquema do circuito
Aqui está o esquema do circuito deste projeto:

Podemos notar aqui que o shield TFT está bloqueando os pinos livres da placa Arduino, então precisamos fazer cabeçalhos de pinos personalizados para que possamos inseri-los entre o shield e o Arduino.
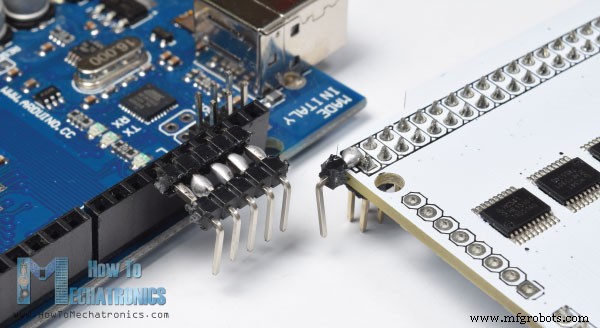
Observe também que, para alimentar o Arduino, precisamos soldar pinos adicionais no pino de 5 V do shield, pois o shield já usa todos os pinos Arduino VCC.
Depois de conectar tudo, podemos prosseguir com a programação do Arduino. No entanto, antes de continuarmos, sugiro que você verifique meus tutoriais detalhados anteriores para a tela de toque TFT e o módulo DS3231 Real Time Clock. E quanto ao módulo MP3 Player vou dar uma explicação rápida aqui neste artigo.
Módulo de MP3 Player BY8001-16P
O BY8001-16P é um módulo MP3 que funciona com cartões MicroSD e suporta arquivos de formato de áudio MP3 e WAV. O módulo possui um amplificador de potência de 3W integrado e pode acionar diretamente um único alto-falante de 3W.
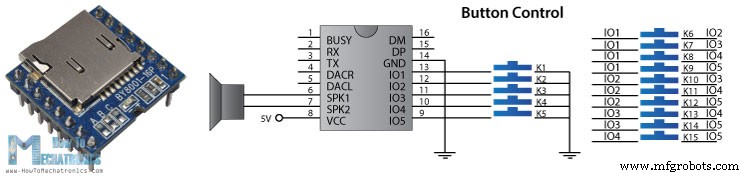
O módulo MP3 Player pode ser controlado por botão usando os 5 pinos de entrada ou usando um microcontrolador através da comunicação serial.
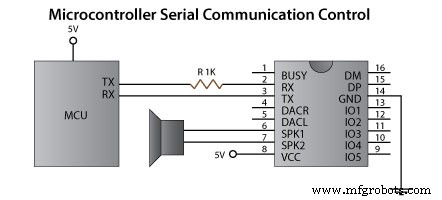
Observe aqui que os pinos da porta serial do módulo funcionam a 3,3V, portanto, o pino RX do módulo precisa ser conectado através de um resistor de 1K ao pino TX do Arduino. Observe também as 3 portas A, B e C que são usadas para selecionar os modos de controle. Para controlar o módulo usando um microcontrolador, os 3 resistores nesses blocos precisam ser removidos. Os pinos 6 e 7 podem ser usados para conectar diretamente alto-falantes de baixa potência ou os pinos 4 e 5 se estiver usando amplificador externo.
Quanto à parte do Arduino, a maneira mais fácil é usar a biblioteca BY8001 que pode ser baixada do GitHub. Se abrirmos alguns de seus exemplos de demonstração, podemos ver como funciona. Portanto, após inicializar o módulo na seção de configuração, podemos usar qualquer uma das funções personalizadas para controlar o módulo.
Código-fonte
Agora estamos prontos para dar uma olhada no código deste Arduino Touch Screen MP3 Screen Music Player e Alarm Clock. Como o código é um pouco mais longo, para melhor entendimento, postarei o código fonte do programa em seções com descrição de cada seção. E no final deste artigo postarei o código-fonte completo.
Então, primeiro precisamos incluir as bibliotecas para a tela TFT touch screen, o MP3 Player BY8001-16P e o módulo DS3231 Real Time Clock, além da biblioteca para a comunicação serial. Então temos que criar os objetos apropriados e definir algumas variáveis necessárias para o programa.
#include <UTFT.h>
#include <URTouch.h>
#include <SoftwareSerial.h>
#include <BY8001.h>
#include <DS3231.h>

//==== Creating Objects
UTFT     myGLCD(SSD1289, 38, 39, 40, 41); //Parameters should be adjusted to your Display/Schield model
URTouch  myTouch( 6, 5, 4, 3, 2);


SoftwareSerial mp3Serial(11, 10);  // RX, TX
BY8001 mp3;  // creating an instance of class BY8001 and call it 'mp3'

DS3231  rtc(SDA, SCL);

//==== Defining Fonts
extern uint8_t SmallFont[];
extern uint8_t BigFont[];
extern uint8_t SevenSegNumFont[];

extern unsigned int MusicPlayerButton[0x1040];
extern unsigned int AlarmButton[0x1040];
extern unsigned int ButtonPlay[0x1AE9];
extern unsigned int ButtonPause[0x1AE9];
extern unsigned int PreviousButton[0x9C4];
extern unsigned int NextButton[0x9C4];
extern unsigned int VolumeDown[0x170];
extern unsigned int VolumeUp[0x3B8];

int x, y; // Variables for the coordinates where the display has been pressed
char currentPage, playStatus;
int iV = 15;
int trackNum = 1;
int b = 16;
int aHours = 0;
int aMinutes = 0;
boolean alarmNotSet = true;
String alarmString = "";
float currentTemperature, temperature;
static word totalTime, elapsedTime, playback, minutes, seconds, lastSeconds, minutesR, secondsR;
String currentClock, currentHours, currentMinutes, currentSeconds, currentDate;
String timeString, hoursString, minutesString, secondsString, hoursS, minutesS, secondsS, dateS;Code language: Arduino (arduino)
Podemos notar aqui a definição dos bitmaps. Alguns dos botões do programa são na verdade imagens que são convertidas em bitmaps usando a ferramenta ImageConverter565 que vem com a biblioteca TFT.

Portanto, esses arquivos “.c” precisam ser incluídos no diretório do arquivo de código para que sejam carregados ao iniciar o sketch. Aqui você pode fazer o download dessas imagens e arquivos ".c".
Na seção de configuração após inicializar os objetos, chamamos a função personalizada drawHomeScreen() que desenha todos os gráficos da tela inicial. Também aqui definimos os valores iniciais de algumas das variáveis, como playStatus, currentTemp e Date, o valor inicial do volume e assim por diante.
void setup() {
  // Initiate display
  myGLCD.InitLCD();
  myGLCD.clrScr();
  myTouch.InitTouch();
  myTouch.setPrecision(PREC_MEDIUM);

  // Initialize the rtc object
  rtc.begin();

  // Music
  Serial.begin(9600);  // set serial monitor baud rate to Arduino IDE
  mp3Serial.begin(9600);  // BY8001 set to 9600 baud (required)
  mp3.setup(mp3Serial); // tell BY8001 library which serial port to use.
  delay(800);  // allow time for BY8001 cold boot; may adjust depending on flash storage size

  drawHomeScreen();  // Draws the Home Screen
  currentPage = '0'; // Indicates that we are at Home Screen
  playStatus = '0';

  mp3.setVolume(15);
  delay(100);
  currentTemperature = rtc.getTemp();
  currentDate = rtc.getDateStr();
  currentClock = rtc.getTimeStr();
  timeString = rtc.getTimeStr();
  currentHours = timeString.substring(0, 2);
  currentMinutes = timeString.substring(3, 5);
  currentSeconds = timeString.substring(6, 8);
}Code language: Arduino (arduino)
Em seguida é a seção de loop. A primeira instrução if é verdadeira, pois definimos a variável currentPage como 0, o que indica que estamos na tela inicial. Aqui, com a próxima instrução if, verificamos se temos uma mudança no relógio e isso acontece a cada segundo. Agora como estamos usando a fonte de sete segmentos das bibliotecas TFT, que não suporta nenhum caractere exceto números, temos que extrair apenas os números da string que vem com a função getTimeStr() para ler o relógio do DS3231 Módulo RTC.
Assim, usando a função substring(), obtemos as horas, os minutos e os segundos em variáveis separadas e as imprimimos cada vez que uma mudança ocorre nos segundos, minutos ou horas.
Quanto à data e temperatura, semelhante , verificamos se há uma mudança em relação ao estado anterior.
void loop() {
  // Homes Screen
  if (currentPage == '0') {
    // Checks for change of the clock
    if ( currentClock != rtc.getTimeStr()) {
      timeString = rtc.getTimeStr();
      hoursS = timeString.substring(0, 2);
      minutesS = timeString.substring(3, 5);
      secondsS = timeString.substring(6, 8);

      myGLCD.setFont(SevenSegNumFont);
      myGLCD.setColor(0, 255, 0);

      myGLCD.print(secondsS, 224, 50);

      if ( currentMinutes != minutesS ) {
        myGLCD.print(minutesS, 128, 50);
        currentMinutes = minutesS;
      }
      if ( currentHours != hoursS ) {
        myGLCD.print(hoursS, 32, 50);
        currentHours = hoursS;
      }
      // Checks for change of the date
      dateS = rtc.getDateStr();
      delay(10);
      if ( currentDate != dateS){
          myGLCD.setColor(255, 255, 255); // Sets color to white
          myGLCD.setFont(BigFont); // Sets font to big
          myGLCD.print(rtc.getDateStr(), 153, 7);
        }
      // Checks for change of the temperature
      temperature = rtc.getTemp();
      delay(10);
      if ( currentTemperature != temperature ){
        myGLCD.setColor(255, 255, 255); // Sets color to white
        myGLCD.setFont(BigFont); // Sets font to big
        myGLCD.printNumI(temperature, 39, 7);
        currentTemperature = temperature;
      }
      delay(10);
      currentClock = rtc.getTimeStr();
    }Code language: Arduino (arduino)
Em seguida, usando a função myTouch.dataAvailable() verificamos se tocamos na tela e também verificamos se é o Music Player ou o botão Alarm. Então, se esse é o botão Music Player, primeiro chamamos a função personalizada drawFrame() que desenha um círculo vermelho ao redor do botão indicando que o botão foi pressionado. Além disso, esta função personalizada tem um loop while que mantém o programa empilhado até soltarmos o botão. Logo em seguida, configuramos a variável currentPage para 1, limpamos a tela e chamamos a função customizada drawMusicPlayerScreen() que desenha todos os gráficos da tela do Music Player. Da mesma forma, se pressionarmos o botão Alarm nós, definimos a variável currentPage como 2 e limpamos a tela.
// Checks whether the screen has been touched
    if (myTouch.dataAvailable()) {
      myTouch.read();
      x = myTouch.getX(); // X coordinate where the screen has been pressed
      y = myTouch.getY(); // Y coordinates where the screen has been pressed
      // If we press the Music Player Button
      if ((x >= 55) && (x <= 120) && (y >= 125) && (y <= 190)) {
          drawFrame(87, 157, 33);
          currentPage = '1';
          myGLCD.clrScr();
          delay(100);
          drawMusicPlayerScreen();
          delay(100);
        }
      // If we press the Alarm Button
      if ((x >= 195) && (x <= 260) && (y >= 125) && (y <= 190)) {
          drawFrame(227, 160, 29);
          currentPage = '2';
          myGLCD.clrScr();
        }
    }Code language: Arduino (arduino)
Em seguida, vamos ver o que acontece na tela do Music Player. Aqui estamos constantemente verificando se tocamos na tela. Se tocarmos no botão Play e a variável playStatus atual for 0, chamaremos a função mp3.playTrackFromFolder() que iniciará a reprodução da primeira música do cartão MicroSD. Ao mesmo tempo, chamamos a função personalizada drawPauseButton() que desenha o botão Pause e define a variável playStatus como 2. Usando as próximas duas instruções if, dependendo da variável playStatues, alternamos entre reproduzir e pausar a música.
// Music Player Screen
  if (currentPage == '1') {
    if (myTouch.dataAvailable()) {
      myTouch.read();
      x = myTouch.getX(); // X coordinate where the screen has been pressed
      y = myTouch.getY(); // Y coordinates where the screen has been pressed
      // If we press the Play Button
      if ((x >= 116) && (x <= 204) && (y >= 77) && (y <= 165)) {
        if (playStatus == '0') {
          drawFrame(159, 121, 42);
          drawPauseButton();
          mp3.playTrackFromFolder(00, 001);
          delay(100);
          playStatus = '2';
          return;
        }
        if (playStatus == '1') {
          drawFrame(159, 121, 42);
          drawPauseButton();
          mp3.play();
          delay(100);
          playStatus = '2';
          return;
        }
        if (playStatus == '2') {
          drawFrame(159, 121, 42);
          drawPlayButton();
          mp3.pause();
          delay(100);
          playStatus = '1';
          return;
        }
      }Code language: Arduino (arduino)
Da mesma forma, para cada botão pressionado chamamos as funções apropriadas para reproduzir a faixa anterior ou seguinte, diminuir ou aumentar o volume, assim como o botão “Menu” que nos leva de volta à tela inicial.
// If we press the Previous Button
      if ((x >= 45) && (x <= 95) && (y >= 97) && (y <= 147)) {
        drawFrame(70, 121, 26);
        mp3.previousTrack();
        delay(100);
        drawTrackBar();
      }
      // If we press the Next Button
      if ((x >= 227) && (x <= 277) && (y >= 97) && (y <= 147)) {
        drawFrame(252, 122, 26);
        mp3.nextTrack();
        delay(100);
        drawTrackBar();
      }
      // If we press the VolumeDown Button
      if ((x >= 35) && (x <= 75) && (y >= 165) && (y <= 209)) {
        drawUnderline(45, 205, 65, 205);
        if (iV >= 0 & iV <= 30) {
          iV--;
          drawVolume(iV);
        }
        mp3.decreaseVolume();
        delay(100);
      }
      // If we press the VolumeUp Button
      if ((x >= 230) && (x <= 280) && (y >= 165) && (y <= 209)) {
        drawUnderline(235, 205, 275, 205);
        if (iV >= 0 & iV <= 30) {
          iV++;
          drawVolume(iV);
        }
        mp3.increaseVolume();
        delay(100);
      }
      // If we press the MENU Button
      if ((x >= 0) && (x <= 75) && (y >= 0) && (y <= 30)) {
        myGLCD.clrScr();
        drawHomeScreen();  // Draws the Home Screen
        currentPage = '0';
        return;
      }Code language: Arduino (arduino)
A próxima instrução if é usada para atualizar a barra de progresso da faixa.
// Updates the track bar
    if (playStatus == '1' || playStatus == '2') {
      trackPlayTime();
    }
Portanto, se a música estiver tocando, chamamos a função personalizada trackPlayTime() que, usando algumas das funções da biblioteca do Music Player, como mp3.getElapsedTrackPlaybackTime(), calcula e imprime o tempo decorrido e o tempo restante, bem como os gráficos da barra de progresso da faixa. Usando a função personalizada printClock(), imprimimos o relógio no canto superior direito.
// Updates the track bar
void trackPlayTime() {
  totalTime = mp3.getTotalTrackPlaybackTime();
  delay(10);
  elapsedTime = mp3.getElapsedTrackPlaybackTime();
  delay(10);
  minutes = (int)elapsedTime / 60;
  seconds = (((float)elapsedTime / 60) - minutes) * 60;
  playback = totalTime - elapsedTime;
  minutesR = (int)playback / 60;
  secondsR = (((float)playback / 60) - minutesR) * 60;

  myGLCD.setFont(SmallFont);
  myGLCD.setColor(255, 255, 255);
  myGLCD.printNumI(minutes, 8, 48);

  myGLCD.print(":", 16, 48);
  myGLCD.printNumI((int)seconds, 24, 48, 2, '0');

  myGLCD.print("-", 276, 48);
  myGLCD.printNumI(minutesR, 284, 48);
  myGLCD.print(":", 292, 48);
  myGLCD.printNumI((int)secondsR, 300, 48, 2, '0');

  int trackBarX = map(elapsedTime, 0, totalTime, 0, 224);
  myGLCD.setColor(255, 0, 0);
  myGLCD.fillRect (48, 50, 48 + trackBarX, 50 + 8);

  if (totalTime == elapsedTime) {
    mp3.nextTrack();
    delay(30);
    myGLCD.setColor(255, 255, 255);
    myGLCD.fillRect (48, 50, 48 + 224, 50 + 8);
  }
}Code language: Arduino (arduino)
Em seguida é a tela Despertador. Aqui primeiro desenhamos todos os gráficos, o relógio, o texto e os botões e também configuramos a variável alarmNotSet como true para que possamos entrar no próximo loop while. Aqui, usando os dois botões, H e M, definimos o alarme e uma vez que clicamos no botão “Set” o valor do alarme é armazenado na variável alarmString.
// Alarm Clock Screen
  if (currentPage == '2') {
    myGLCD.setFont(BigFont);
    myGLCD.setColor(255, 255, 255);
    myGLCD.print("MENU", 5, 5);
    myGLCD.print("Set Alarm", CENTER, 20);

    // Draws a colon between the hours and the minutes
    myGLCD.setColor(0, 255, 0);
    myGLCD.fillCircle (112, 65, 4);
    myGLCD.setColor(0, 255, 0);
    myGLCD.fillCircle (112, 85, 4);

    myGLCD.setFont(SevenSegNumFont);
    myGLCD.setColor(0, 255, 0);
    myGLCD.printNumI(aHours, 32, 50, 2, '0');
    myGLCD.printNumI(aMinutes, 128, 50, 2, '0');
    myGLCD.setColor(255, 255, 255);
    myGLCD.drawRoundRect (42, 115, 82, 145);
    myGLCD.drawRoundRect (138, 115, 178, 145);
    myGLCD.setFont(BigFont);
    myGLCD.print("H", 54, 122);
    myGLCD.print("M", 150, 122);

    myGLCD.drawRoundRect (215, 60, 303, 90);
    myGLCD.print("SET", 236, 67);
    myGLCD.drawRoundRect (215, 115, 303, 145);
    myGLCD.print("CLEAR", 220, 122);

    alarmNotSet = true;

    while (alarmNotSet){
      if (myTouch.dataAvailable()) {
        myTouch.read();
        x = myTouch.getX(); // X coordinate where the screen has been pressed
        y = myTouch.getY(); // Y coordinates where the screen has been pressed
        //Set hours button
        if ((x >= 42) && (x <= 82) && (y >= 115) && (y <= 145)) {
          drawRectFrame(42, 115, 82, 145);
          aHours++;
          if(aHours >=24){
            aHours = 0;
          }
          myGLCD.setFont(SevenSegNumFont);
          myGLCD.setColor(0, 255, 0);
          myGLCD.printNumI(aHours, 32, 50, 2, '0');
        }
        // Set minutes buttons
        if ((x >= 138) && (x <= 178) && (y >= 115) && (y <= 145)) {
          drawRectFrame(138, 115, 178, 145);
          aMinutes++;
          if(aMinutes >=60){
            aMinutes = 0;
          }
          myGLCD.setFont(SevenSegNumFont);
          myGLCD.setColor(0, 255, 0);
          myGLCD.printNumI(aMinutes, 128, 50, 2, '0');
      }
      // Set alarm button
      if ((x >= 215) && (x <= 303) && (y >= 60) && (y <= 80)) {
        drawRectFrame(215, 60, 303, 90);
        if (aHours < 10 && aMinutes < 10){
          alarmString = "0"+(String)aHours + ":" + "0"+ (String)aMinutes + ":" + "00";
        }
        else if (aHours < 10 && aMinutes > 9){
          alarmString = "0"+(String)aHours + ":" + (String)aMinutes + ":" + "00";
        }
        else if (aHours > 9 && aMinutes < 10){
          alarmString = (String)aHours + ":" + "0"+ (String)aMinutes + ":" + "00";
        }
        else {
          alarmString = (String)aHours + ":" + (String)aMinutes + ":" + "00";
        }
        myGLCD.setFont(BigFont);
        myGLCD.print("Alarm set for:", CENTER, 165);
        myGLCD.print(alarmString, CENTER, 191);

      }
      // Clear alarm button
      if ((x >= 215) && (x <= 303) && (y >= 115) && (y <= 145)) {
        drawRectFrame(215, 115, 303, 145);
        alarmString="";
        myGLCD.setColor(0, 0, 0);
        myGLCD.fillRect(45, 165, 275, 210);
      }
      // If we press the MENU Button
      if ((x >= 0) && (x <= 75) && (y >= 0) && (y <= 30)) {
        alarmNotSet = false;
        currentPage = '0';
        myGLCD.clrScr();
        drawHomeScreen();  // Draws the Home Screen
      }
      }
  }
}Code language: Arduino (arduino)
Observe aqui que precisamos ajustar essa string para ter a mesma forma da string que obtemos da função getTimeString(). Desta forma, poderemos compará-los e ativar o alarme quando o relógio atingir esse mesmo valor ou hora.
Se pressionarmos o botão clear, limparemos o alarmString e, se pressionarmos o botão menu, ele nos tirará do loop while e nos enviará de volta à tela inicial.
Para ativar o alarme, verificamos se o alarme foi definido e se o alarme corresponde ao relógio, a primeira música do cartão MicroSD começará a tocar em um volume mais alto. Também vamos desenhar todos os gráficos junto com o botão “Dismiss” e definir a variável alarmOn para true. Isso nos levará ao próximo loop while que permitirá que a música continue tocando até pressionarmos o botão “Dismiss”.
// Alarm activation
    if (alarmNotSet == false) {
      if (alarmString == rtc.getTimeStr()){
        myGLCD.clrScr();
        mp3.setVolume(25);
        mp3.playTrackByIndexNumber(1);
        delay(100);
        myGLCD.setFont(BigFont);
        myGLCD.setColor(255, 255, 255);
        myGLCD.print("ALARM", CENTER, 90);
        myGLCD.drawBitmap (127, 10, 65, 64, AlarmButton);
        myGLCD.print(alarmString, CENTER, 114);
        myGLCD.drawRoundRect (94, 146, 226, 170);
        myGLCD.print("DISMISS", CENTER, 150);
        boolean alarmOn = true;
        while (alarmOn){
          if (myTouch.dataAvailable()) {
          myTouch.read();
          x = myTouch.getX(); // X coordinate where the screen has been pressed
          y = myTouch.getY(); // Y coordinates where the screen has been pressed

          // Stop alarm button
          if ((x >= 94) && (x <= 226) && (y >= 146) && (y <= 170)) {
          drawRectFrame(94, 146, 226, 170);
          alarmOn = false;
          alarmString="";
          myGLCD.clrScr();
          mp3.stopPlayback();
          delay(100);
          currentPage = '0';
          playStatus = '0';
          mp3.setVolume(15);
          drawHomeScreen();
          }

      }
     }
  }
}Code language: Arduino (arduino)
Então é assim que o código funciona e você pode encontrar o código-fonte completo na parte inferior do artigo.
Construindo o dispositivo
Usando o Solidworks, fiz o design e veja como ficou.

Você pode fazer o download deste modelo para fazer as medições aqui:
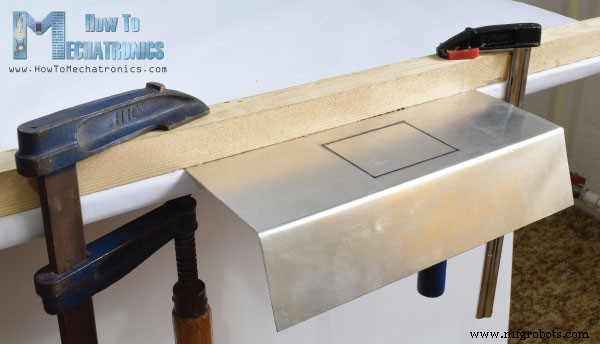
Para este projeto eu escolho usar chapa de alumínio que eu cortei no tamanho usando uma multiferramenta. Então na beirada da minha mesa e com a ajuda de alguns grampos e ripas dobrei a chapa.
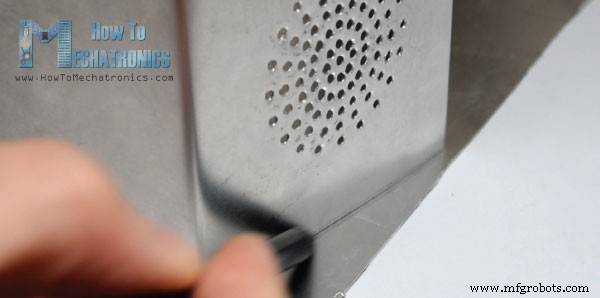
Quanto aos alto-falantes, imprimi um padrão circular, prendi no lugar e com uma furadeira fiz todos os furos.
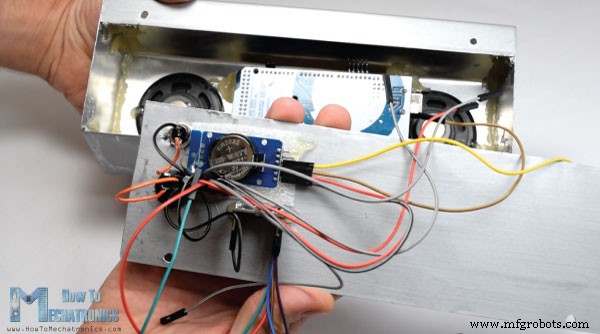
Em seguida, cortei as laterais na forma adequada e as prendi à chapa de metal previamente dobrada usando uma pistola de cola.
No final pintei a caixa de chapa e ela estava pronta para a montagem dos componentes eletrônicos. Novamente, usando uma pistola de cola, prendi todos os componentes, conectei tudo e prendi a tampa traseira do dispositivo usando dois parafusos.
Isso é tudo, sinta-se à vontade para fazer qualquer pergunta na seção de comentários abaixo.
Aqui está o código-fonte completo do dispositivo:
/*
* Arduino Touch Screen MP3 Music Player and Alarm Clock
*
* Crated by Dejan Nedelkovski,
* www.HowToMechatronics.com
*
* UFTF, URTouch and DS3231 libraries made by Henning Karlsen which can be found and downloaded from his website, www.rinkydinkelectronics.com.
* BY8001 MP3 Player Library made by borland of Arduino forum, Released in public domain. Dowload link: https://github.com/r0ndL/BY8001
*/
#include <UTFT.h>
#include <URTouch.h>
#include <SoftwareSerial.h>
#include <BY8001.h>
#include <DS3231.h>
//==== Creating Objects
UTFT myGLCD(SSD1289, 38, 39, 40, 41); //Parameters should be adjusted to your Display/Schield model
URTouch myTouch( 6, 5, 4, 3, 2);
SoftwareSerial mp3Serial(11, 10); // RX, TX
BY8001 mp3; // creating an instance of class BY8001 and call it 'mp3'
DS3231 rtc(SDA, SCL);
//==== Defining Fonts
extern uint8_t SmallFont[];
extern uint8_t BigFont[];
extern uint8_t SevenSegNumFont[];
extern unsigned int MusicPlayerButton[0x1040];
extern unsigned int AlarmButton[0x1040];
extern unsigned int ButtonPlay[0x1AE9];
extern unsigned int ButtonPause[0x1AE9];
extern unsigned int PreviousButton[0x9C4];
extern unsigned int NextButton[0x9C4];
extern unsigned int VolumeDown[0x170];
extern unsigned int VolumeUp[0x3B8];
int x, y; // Variables for the coordinates where the display has been pressed
char currentPage, playStatus;
int iV = 15;
int trackNum = 1;
int b = 16;
int aHours = 0;
int aMinutes = 0;
boolean alarmNotSet = true;
String alarmString = "";
float currentTemperature, temperature;
static word totalTime, elapsedTime, playback, minutes, seconds, lastSeconds, minutesR, secondsR;
String currentClock, currentHours, currentMinutes, currentSeconds, currentDate;
String timeString, hoursString, minutesString, secondsString, hoursS, minutesS, secondsS, dateS;
void setup() {
// Initiate display
myGLCD.InitLCD();
myGLCD.clrScr();
myTouch.InitTouch();
myTouch.setPrecision(PREC_MEDIUM);
// Initialize the rtc object
rtc.begin();
// Music
Serial.begin(9600); // set serial monitor baud rate to Arduino IDE
mp3Serial.begin(9600); // BY8001 set to 9600 baud (required)
mp3.setup(mp3Serial); // tell BY8001 library which serial port to use.
delay(800); // allow time for BY8001 cold boot; may adjust depending on flash storage size
drawHomeScreen(); // Draws the Home Screen
currentPage = '0'; // Indicates that we are at Home Screen
playStatus = '0';
mp3.setVolume(15);
delay(100);
currentTemperature = rtc.getTemp();
currentDate = rtc.getDateStr();
currentClock = rtc.getTimeStr();
timeString = rtc.getTimeStr();
currentHours = timeString.substring(0, 2);
currentMinutes = timeString.substring(3, 5);
currentSeconds = timeString.substring(6, 8);
}
void loop() {
// Homes Screen
if (currentPage == '0') {
// Checks for change of the clock
if ( currentClock != rtc.getTimeStr()) {
timeString = rtc.getTimeStr();
hoursS = timeString.substring(0, 2);
minutesS = timeString.substring(3, 5);
secondsS = timeString.substring(6, 8);
myGLCD.setFont(SevenSegNumFont);
myGLCD.setColor(0, 255, 0);
myGLCD.print(secondsS, 224, 50);
if ( currentMinutes != minutesS ) {
myGLCD.print(minutesS, 128, 50);
currentMinutes = minutesS;
}
if ( currentHours != hoursS ) {
myGLCD.print(hoursS, 32, 50);
currentHours = hoursS;
}
// Checks for change of the date
dateS = rtc.getDateStr();
delay(10);
if ( currentDate != dateS){
myGLCD.setColor(255, 255, 255); // Sets color to white
myGLCD.setFont(BigFont); // Sets font to big
myGLCD.print(rtc.getDateStr(), 153, 7);
}
// Checks for change of the temperature
temperature = rtc.getTemp();
delay(10);
if ( currentTemperature != temperature ){
myGLCD.setColor(255, 255, 255); // Sets color to white
myGLCD.setFont(BigFont); // Sets font to big
myGLCD.printNumI(temperature, 39, 7);
currentTemperature = temperature;
}
delay(10);
currentClock = rtc.getTimeStr();
}
// Checks whether the screen has been touched
if (myTouch.dataAvailable()) {
myTouch.read();
x = myTouch.getX(); // X coordinate where the screen has been pressed
y = myTouch.getY(); // Y coordinates where the screen has been pressed
// If we press the Music Player Button
if ((x >= 55) && (x <= 120) && (y >= 125) && (y <= 190)) {
drawFrame(87, 157, 33);
currentPage = '1';
myGLCD.clrScr();
delay(100);
drawMusicPlayerScreen();
delay(100);
}
// If we press the Alarm Button
if ((x >= 195) && (x <= 260) && (y >= 125) && (y <= 190)) {
drawFrame(227, 160, 29);
currentPage = '2';
myGLCD.clrScr();
}
}
}
// Music Player Screen
if (currentPage == '1') {
if (myTouch.dataAvailable()) {
myTouch.read();
x = myTouch.getX(); // X coordinate where the screen has been pressed
y = myTouch.getY(); // Y coordinates where the screen has been pressed
// If we press the Play Button
if ((x >= 116) && (x <= 204) && (y >= 77) && (y <= 165)) {
if (playStatus == '0') {
drawFrame(159, 121, 42);
drawPauseButton();
mp3.playTrackFromFolder(00, 001);
delay(100);
playStatus = '2';
return;
}
if (playStatus == '1') {
drawFrame(159, 121, 42);
drawPauseButton();
mp3.play();
delay(100);
playStatus = '2';
return;
}
if (playStatus == '2') {
drawFrame(159, 121, 42);
drawPlayButton();
mp3.pause();
delay(100);
playStatus = '1';
return;
}
}
// If we press the Previous Button
if ((x >= 45) && (x <= 95) && (y >= 97) && (y <= 147)) {
drawFrame(70, 121, 26);
mp3.previousTrack();
delay(100);
drawTrackBar();
}
// If we press the Next Button
if ((x >= 227) && (x <= 277) && (y >= 97) && (y <= 147)) {
drawFrame(252, 122, 26);
mp3.nextTrack();
delay(100);
drawTrackBar();
}
// If we press the VolumeDown Button
if ((x >= 35) && (x <= 75) && (y >= 165) && (y <= 209)) {
drawUnderline(45, 205, 65, 205);
if (iV >= 0 & iV <= 30) {
iV--;
drawVolume(iV);
}
mp3.decreaseVolume();
delay(100);
}
// If we press the VolumeUp Button
if ((x >= 230) && (x <= 280) && (y >= 165) && (y <= 209)) {
drawUnderline(235, 205, 275, 205);
if (iV >= 0 & iV <= 30) {
iV++;
drawVolume(iV);
}
mp3.increaseVolume();
delay(100);
}
// If we press the MENU Button
if ((x >= 0) && (x <= 75) && (y >= 0) && (y <= 30)) {
myGLCD.clrScr();
drawHomeScreen(); // Draws the Home Screen
currentPage = '0';
return;
}
}
// Updates the track bar
if (playStatus == '1' || playStatus == '2') {
trackPlayTime();
}
// Printing the clock in the upper right corner
myGLCD.setFont(BigFont);
myGLCD.setColor(255, 255, 255);
printClock(187, 5);
}
// Alarm Clock Screen
if (currentPage == '2') {
myGLCD.setFont(BigFont);
myGLCD.setColor(255, 255, 255);
myGLCD.print("MENU", 5, 5);
myGLCD.print("Set Alarm", CENTER, 20);
// Draws a colon between the hours and the minutes
myGLCD.setColor(0, 255, 0);
myGLCD.fillCircle (112, 65, 4);
myGLCD.setColor(0, 255, 0);
myGLCD.fillCircle (112, 85, 4);
myGLCD.setFont(SevenSegNumFont);
myGLCD.setColor(0, 255, 0);
myGLCD.printNumI(aHours, 32, 50, 2, '0');
myGLCD.printNumI(aMinutes, 128, 50, 2, '0');
myGLCD.setColor(255, 255, 255);
myGLCD.drawRoundRect (42, 115, 82, 145);
myGLCD.drawRoundRect (138, 115, 178, 145);
myGLCD.setFont(BigFont);
myGLCD.print("H", 54, 122);
myGLCD.print("M", 150, 122);
myGLCD.drawRoundRect (215, 60, 303, 90);
myGLCD.print("SET", 236, 67);
myGLCD.drawRoundRect (215, 115, 303, 145);
myGLCD.print("CLEAR", 220, 122);
alarmNotSet = true;
while (alarmNotSet){
if (myTouch.dataAvailable()) {
myTouch.read();
x = myTouch.getX(); // X coordinate where the screen has been pressed
y = myTouch.getY(); // Y coordinates where the screen has been pressed
//Set hours button
if ((x >= 42) && (x <= 82) && (y >= 115) && (y <= 145)) {
drawRectFrame(42, 115, 82, 145);
aHours++;
if(aHours >=24){
aHours = 0;
}
myGLCD.setFont(SevenSegNumFont);
myGLCD.setColor(0, 255, 0);
myGLCD.printNumI(aHours, 32, 50, 2, '0');
}
// Set minutes buttons
if ((x >= 138) && (x <= 178) && (y >= 115) && (y <= 145)) {
drawRectFrame(138, 115, 178, 145);
aMinutes++;
if(aMinutes >=60){
aMinutes = 0;
}
myGLCD.setFont(SevenSegNumFont);
myGLCD.setColor(0, 255, 0);
myGLCD.printNumI(aMinutes, 128, 50, 2, '0');
}
// Set alarm button
if ((x >= 215) && (x <= 303) && (y >= 60) && (y <= 80)) {
drawRectFrame(215, 60, 303, 90);
if (aHours < 10 && aMinutes < 10){
alarmString = "0"+(String)aHours + ":" + "0"+ (String)aMinutes + ":" + "00";
}
else if (aHours < 10 && aMinutes > 9){
alarmString = "0"+(String)aHours + ":" + (String)aMinutes + ":" + "00";
}
else if (aHours > 9 && aMinutes < 10){
alarmString = (String)aHours + ":" + "0"+ (String)aMinutes + ":" + "00";
}
else {
alarmString = (String)aHours + ":" + (String)aMinutes + ":" + "00";
}
myGLCD.setFont(BigFont);
myGLCD.print("Alarm set for:", CENTER, 165);
myGLCD.print(alarmString, CENTER, 191);
}
// Clear alarm button
if ((x >= 215) && (x <= 303) && (y >= 115) && (y <= 145)) {
drawRectFrame(215, 115, 303, 145);
alarmString="";
myGLCD.setColor(0, 0, 0);
myGLCD.fillRect(45, 165, 275, 210);
}
// If we press the MENU Button
if ((x >= 0) && (x <= 75) && (y >= 0) && (y <= 30)) {
alarmNotSet = false;
currentPage = '0';
myGLCD.clrScr();
drawHomeScreen(); // Draws the Home Screen
}
}
}
}
// Alarm activation
if (alarmNotSet == false) {
if (alarmString == rtc.getTimeStr()){
myGLCD.clrScr();
mp3.setVolume(25);
mp3.playTrackByIndexNumber(1);
delay(100);
myGLCD.setFont(BigFont);
myGLCD.setColor(255, 255, 255);
myGLCD.print("ALARM", CENTER, 90);
myGLCD.drawBitmap (127, 10, 65, 64, AlarmButton);
myGLCD.print(alarmString, CENTER, 114);
myGLCD.drawRoundRect (94, 146, 226, 170);
myGLCD.print("DISMISS", CENTER, 150);
boolean alarmOn = true;
while (alarmOn){
if (myTouch.dataAvailable()) {
myTouch.read();
x = myTouch.getX(); // X coordinate where the screen has been pressed
y = myTouch.getY(); // Y coordinates where the screen has been pressed
// Stop alarm button
if ((x >= 94) && (x <= 226) && (y >= 146) && (y <= 170)) {
drawRectFrame(94, 146, 226, 170);
alarmOn = false;
alarmString="";
myGLCD.clrScr();
mp3.stopPlayback();
delay(100);
currentPage = '0';
playStatus = '0';
mp3.setVolume(15);
drawHomeScreen();
}
}
}
}
}
}
void drawHomeScreen() {
myGLCD.setBackColor(0, 0, 0); // Sets the background color of the area where the text will be printed to black
myGLCD.setColor(255, 255, 255); // Sets color to white
myGLCD.setFont(BigFont); // Sets font to big
myGLCD.print(rtc.getDateStr(), 153, 7);
myGLCD.print("T:", 7, 7);
myGLCD.printNumI(rtc.getTemp(), 39, 7);
myGLCD.print("C", 82, 7);
myGLCD.setFont(SmallFont);
myGLCD.print("o", 74, 5);
if (alarmString == "" ) {
myGLCD.setColor(255, 255, 255);
myGLCD.print("by www.HowToMechatronics.com", CENTER, 215);
}
else {
myGLCD.setColor(255, 255, 255);
myGLCD.print("Alarm set for: ", 68, 215);
myGLCD.print(alarmString, 188, 215);
}
drawMusicPlayerButton();
drawAlarmButton();
drawHomeClock();
}
void drawMusicPlayerScreen() {
// Title
myGLCD.setBackColor(0, 0, 0); // Sets the background color of the area where the text will be printed to black
myGLCD.setColor(255, 255, 255); // Sets color to white
myGLCD.setFont(BigFont); // Sets font to big
myGLCD.print("MENU", 5, 5); // Prints the string on the screen
myGLCD.setColor(255, 0, 0); // Sets color to red
myGLCD.drawLine(0, 26, 319, 26); // Draws the red line
myGLCD.setColor(255, 255, 255); // Sets color to white
myGLCD.setFont(SmallFont); // Sets font to big
myGLCD.print("by www.HowToMechatronics.com", CENTER, 215); // Prints the string on the screen
// Volume Bar
myGLCD.setColor(255, 255, 255);
myGLCD.fillRect (78, 184, 78 + 150, 184 + 8);
myGLCD.setColor(240, 196, 30);
myGLCD.fillRect (78, 184, 78 + 75, 184 + 8);
// Track Bar
myGLCD.setColor(255, 255, 255);
myGLCD.fillRect (48, 50, 48 + 224, 50 + 8);
myGLCD.setFont(SmallFont);
myGLCD.setColor(255, 255, 255);
myGLCD.print("0:00", 8, 48);
myGLCD.print("-0:00", 276, 48);
drawPlayButton();
if (playStatus == '2') {
drawPauseButton();
}
drawPreviousButton();
drawNextButton();
drawVolumeDown();
drawVolumeUp();
}
void drawMusicPlayerButton() {
myGLCD.drawBitmap (55, 125, 65, 64, MusicPlayerButton);
}
void drawAlarmButton() {
myGLCD.drawBitmap (195, 125, 65, 64, AlarmButton);
}
void drawPlayButton() {
myGLCD.drawBitmap (118, 79, 83, 83, ButtonPlay);
}
void drawPauseButton() {
myGLCD.drawBitmap (118, 79, 83, 83, ButtonPause);
}
void drawNextButton() {
myGLCD.drawBitmap (227, 97, 50, 50, NextButton);
}
void drawPreviousButton() {
myGLCD.drawBitmap (45, 97, 50, 50, PreviousButton);
}
void drawVolumeDown() {
myGLCD.drawBitmap (50, 177, 16, 23, VolumeDown);
}
void drawVolumeUp() {
myGLCD.drawBitmap (241, 175, 34, 28, VolumeUp);
}
// check for if Mp3 Player is stopped
bool checkFor_mp3IsStopped() {
if (mp3Serial.available() > 0) {
if (mp3.getPlaybackStatus() == 0) {
return true;
}
}
else return false;
}
// Highlights the button when pressed
void drawFrame(int x, int y, int r) {
myGLCD.setColor(255, 0, 0);
myGLCD.drawCircle (x, y, r);
while (myTouch.dataAvailable())
myTouch.read();
myGLCD.setColor(0, 0, 0);
myGLCD.drawCircle (x, y, r);
}
void drawRectFrame(int x1, int y1, int x2, int y2) {
myGLCD.setColor(255, 0, 0);
myGLCD.drawRoundRect (x1, y1, x2, y2);
while (myTouch.dataAvailable())
myTouch.read();
myGLCD.setColor(255, 255, 255);
myGLCD.drawRoundRect (x1, y1, x2, y2);
}
void drawUnderline(int x1, int y1, int x2, int y2) {
myGLCD.setColor(255, 0, 0);
myGLCD.drawLine (x1, y1, x2, y2);
while (myTouch.dataAvailable())
myTouch.read();
myGLCD.setColor(0, 0, 0);
myGLCD.drawLine (x1, y1, x2, y2);
}
// Sound bar
void drawVolume(int x) {
myGLCD.setColor(255, 255, 255);
myGLCD.fillRect (78 + 5 * x, 184, 78 + 150, 184 + 8);
myGLCD.setColor(240, 196, 30);
myGLCD.fillRect (78, 184, 78 + 5 * x, 184 + 8);
}
// Clears the track bar
void drawTrackBar() {
myGLCD.setColor(255, 255, 255);
myGLCD.fillRect (48, 50, 48 + 224, 50 + 8);
}
// Updates the track bar
void trackPlayTime() {
totalTime = mp3.getTotalTrackPlaybackTime();
delay(10);
elapsedTime = mp3.getElapsedTrackPlaybackTime();
delay(10);
minutes = (int)elapsedTime / 60;
seconds = (((float)elapsedTime / 60) - minutes) * 60;
playback = totalTime - elapsedTime;
minutesR = (int)playback / 60;
secondsR = (((float)playback / 60) - minutesR) * 60;
myGLCD.setFont(SmallFont);
myGLCD.setColor(255, 255, 255);
myGLCD.printNumI(minutes, 8, 48);
myGLCD.print(":", 16, 48);
myGLCD.printNumI((int)seconds, 24, 48, 2, '0');
myGLCD.print("-", 276, 48);
myGLCD.printNumI(minutesR, 284, 48);
myGLCD.print(":", 292, 48);
myGLCD.printNumI((int)secondsR, 300, 48, 2, '0');
int trackBarX = map(elapsedTime, 0, totalTime, 0, 224);
myGLCD.setColor(255, 0, 0);
myGLCD.fillRect (48, 50, 48 + trackBarX, 50 + 8);
if (totalTime == elapsedTime) {
mp3.nextTrack();
delay(30);
myGLCD.setColor(255, 255, 255);
myGLCD.fillRect (48, 50, 48 + 224, 50 + 8);
}
}
void printClock(int x, int y) {
if ( currentClock != rtc.getTimeStr()) {
myGLCD.print(rtc.getTimeStr(), x, y);
currentClock = rtc.getTimeStr();
}
}
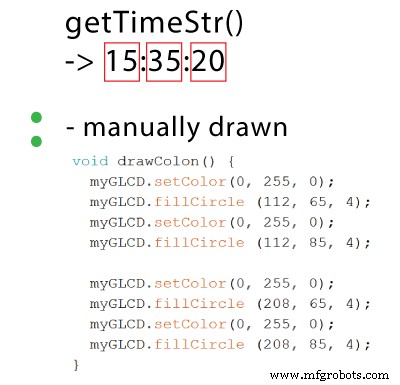
void drawColon() {
myGLCD.setColor(0, 255, 0);
myGLCD.fillCircle (112, 65, 4);
myGLCD.setColor(0, 255, 0);
myGLCD.fillCircle (112, 85, 4);
myGLCD.setColor(0, 255, 0);
myGLCD.fillCircle (208, 65, 4);
myGLCD.setColor(0, 255, 0);
myGLCD.fillCircle (208, 85, 4);
}
void drawHomeClock() {
timeString = rtc.getTimeStr();
currentHours = timeString.substring(0, 2);
currentMinutes = timeString.substring(3, 5);
currentSeconds = timeString.substring(6, 8);
myGLCD.setFont(SevenSegNumFont);
myGLCD.setColor(0, 255, 0);
myGLCD.print(currentSeconds, 224, 50);
myGLCD.print(currentMinutes, 128, 50);
myGLCD.print(currentHours, 32, 50);
drawColon();
}Code language: Arduino (arduino)Feel free to ask any question in the comments section below and don’t forget to check out my collection of Arduino Projects.
Processo de manufatura
- Relógio de visão pov do Arduino
- Relógio mestre
- Arduino Temp. Monitor e relógio em tempo real com tela 3.2
- Tocar áudio no Arduino
- Relógio digital TM1637 com configuração de hora e funcionalidade de alarme
- Arduino - MP3 Player baseado na web
- Tech-TicTacToe
- Voltímetro DIY com Arduino e um visor Nokia 5110
- Cronômetro de contagem regressiva do Arduino
- Despertador simples com DS1302 RTC