


Arduino Game Project – Réplica do Flappy Bird para Arduino
Neste projeto Arduino faremos um jogo legal do Arduino, na verdade uma réplica do popular jogo Flappy Bird para smartphones, usando um Arduino e uma tela TFT Touch Screen. Você pode aprender como funciona assistindo ao vídeo a seguir ou lendo o texto escrito abaixo.
Visão geral
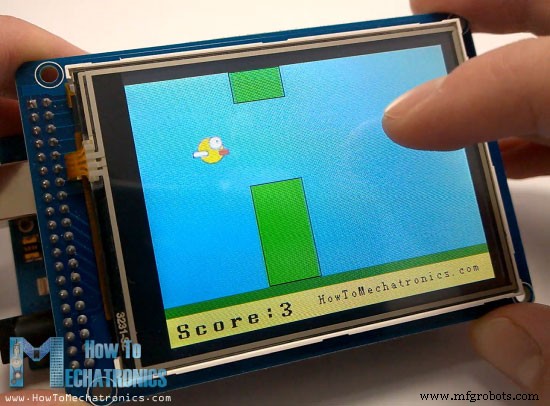
O jogo é bastante simples, mas interessante e viciante. Usando a tela sensível ao toque, controlamos o pássaro e tentamos evitar os pilares em movimento que aumentam a velocidade à medida que avançamos. Além disso, o jogo pode armazenar sua pontuação mais alta, mesmo se você desconectar a energia.[/column]
No tutorial anterior (Arduino TFT Tutorial) aprendemos em detalhes como usar TFT Touch Screens com um Arduino e deixamos o exemplo do jogo para ser explicado neste tutorial. Então agora, assim como no tutorial anterior, vamos explicar passo a passo o código por trás deste jogo Arduino.
Código-fonte
Como o código é um pouco mais longo e para melhor entendimento vou postar o código fonte do programa em seções com descrição para cada seção. E no final deste artigo postarei o código-fonte completo.
Usaremos as bibliotecas UTFT e URTouch feitas por Henning Karlsen. Você pode baixar essas bibliotecas de seu site, www.RinkyDinkElectronics.com. Também usaremos a biblioteca EEPROM para armazenar a pontuação mais alta na EEPROM. A EEPROM é uma memória que pode armazenar dados mesmo quando a placa está desligada.
Depois de incluir as bibliotecas, precisamos criar os objetos UTFT e URTouch, bem como definir as variáveis necessárias para o jogo. Na seção de configuração, precisamos iniciar a exibição e o toque, ler a pontuação mais alta da EEPROM e iniciar o jogo usando a função personalizada iniciarGame().
#include <UTFT.h>
#include <URTouch.h>
#include <EEPROM.h>
//==== Creating Objects
UTFT myGLCD(SSD1289,38,39,40,41); //Parameters should be adjusted to your Display/Schield model
URTouch myTouch( 6, 5, 4, 3, 2);
//==== Defining Fonts
extern uint8_t SmallFont[];
extern uint8_t BigFont[];
extern uint8_t SevenSegNumFont[];
extern unsigned int bird01[0x41A]; // Bird Bitmap
int x, y; // Variables for the coordinates where the display has been pressed
// Floppy Bird
int xP = 319;
int yP = 100;
int yB = 50;
int movingRate = 3;
int fallRateInt = 0;
float fallRate = 0;
int score = 0;
int lastSpeedUpScore = 0;
int highestScore;
boolean screenPressed = false;
boolean gameStarted = false;
void setup() {
// Initiate display
myGLCD.InitLCD();
myGLCD.clrScr();
myTouch.InitTouch();
myTouch.setPrecision(PREC_MEDIUM);
highestScore = EEPROM.read(0); // Read the highest score from the EEPROM
initiateGame(); // Initiate the game
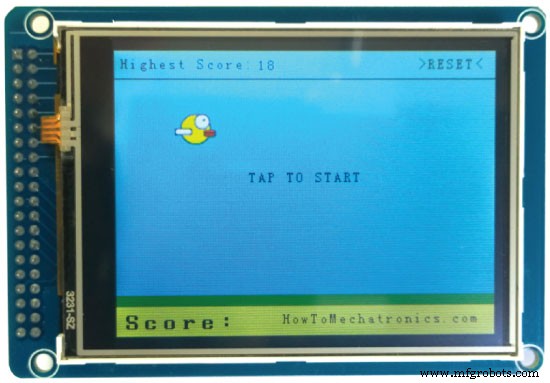
}Code language: Arduino (arduino)Então, com a função personalizada startGame(), desenharemos o estado inicial do jogo e veja como faremos isso. Primeiro, precisamos limpar a tela, depois desenhar o fundo azul, desenhar a seção inferior, adicionar o texto e chamar a função personalizada drawBird() para desenhar o pássaro. Depois disso, precisamos de um loop while que impedirá que o jogo inicie até tocarmos na tela. Então, enquanto estamos neste estado, se pressionarmos o canto superior direito, podemos redefinir a pontuação mais alta para zero e, se pressionarmos em qualquer outro lugar da tela, sairemos do loop while e entraremos no loop principal do código que vai começar o jogo.
// ===== initiateGame - Custom Function
void initiateGame() {
myGLCD.clrScr();
// Blue background
myGLCD.setColor(114, 198, 206);
myGLCD.fillRect(0,0,319,239);
// Ground
myGLCD.setColor(221,216,148);
myGLCD.fillRect(0, 215, 319, 239);
myGLCD.setColor(47,175,68);
myGLCD.fillRect(0, 205, 319, 214);
// Text
myGLCD.setColor(0, 0, 0);
myGLCD.setBackColor(221, 216, 148);
myGLCD.setFont(BigFont);
myGLCD.print("Score:",5,220);
myGLCD.setFont(SmallFont);
myGLCD.print("HowToMechatronics.com", 140, 220);
myGLCD.setColor(0, 0, 0);
myGLCD.setBackColor(114, 198, 206);
myGLCD.print("Highest Score: ",5,5);
myGLCD.printNumI(highestScore, 120, 6);
myGLCD.print(">RESET<",255,5);
myGLCD.drawLine(0,23,319,23);
myGLCD.print("TAP TO START",CENTER,100);
drawBird(yB); // Draws the bird
// Wait until we tap the sreen
while (!gameStarted) {
if (myTouch.dataAvailable()) {
myTouch.read();
x=myTouch.getX();
y=myTouch.getY();
// Reset higest score
if ((x>=250) && (x<=319) &&(y>=0) && (y<=28)) {
highestScore = 0;
myGLCD.setColor(114, 198, 206);
myGLCD.fillRect(120, 0, 150, 22);
myGLCD.setColor(0, 0, 0);
myGLCD.printNumI(highestScore, 120, 5);
}
if ((x>=0) && (x<=319) &&(y>=30) && (y<=239)) {
gameStarted = true;
myGLCD.setColor(114, 198, 206);
myGLCD.fillRect(0, 0, 319, 32);
}
}
}
// Clears the text "TAP TO START" before the game start
myGLCD.setColor(114, 198, 206);
myGLCD.fillRect(85, 100, 235, 116);
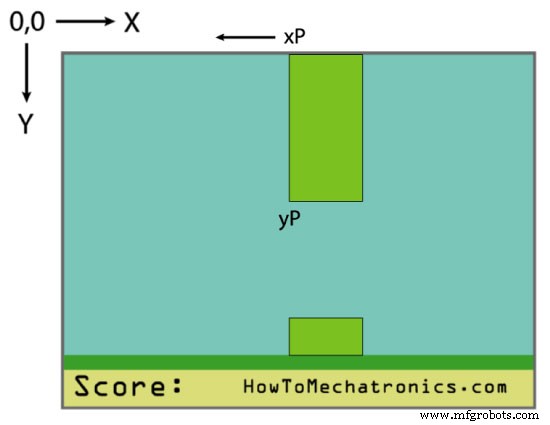
}Code language: Arduino (arduino)Na seção do loop principal temos a variável xP que é usada para desenhar os pilares, assim como a variável yP. No início, a variável xP tem o valor 319 como tamanho da tela e a variável yP tem o valor 100 que é a altura do primeiro pilar. A cada iteração o valor da variável xP é diminuído pelo valor da variável MovingRate que no início tem o valor de 3 e à medida que avançamos no jogo ele aumenta.
// The Main Loop Section
void loop() {
    xP=xP-movingRate; // xP - x coordinate of the pilars; range: 319 - (-51)
    drawPilars(xP, yP); // Draws the pillars

    // yB - y coordinate of the bird which depends on value of the fallingRate variable
    yB+=fallRateInt;
    fallRate=fallRate+0.4; // Each inetration the fall rate increase so that we can the effect of acceleration/ gravity
    fallRateInt= int(fallRate);

    // Checks for collision
    if(yB>=180 || yB<=0){ // top and bottom
      gameOver();
    }
    if((xP<=85) && (xP>=5) && (yB<=yP-2)){ // upper pillar
      gameOver();
    }
    if((xP<=85) && (xP>=5) && (yB>=yP+60)){ // lower pillar
      gameOver();
    }

    // Draws the bird
    drawBird(yB);

    // After the pillar has passed through the screen
    if (xP<=-51){
      xP=319; // Resets xP to 319
      yP = rand() % 100+20; // Random number for the pillars height
      score++; // Increase score by one
    }
    //==== Controlling the bird
    if (myTouch.dataAvailable()&& !screenPressed) {
       fallRate=-6; // Setting the fallRate negative will make the bird jump
       screenPressed = true;
    }
    // Doesn't allow holding the screen / you must tap it
    else if ( !myTouch.dataAvailable() && screenPressed){
      screenPressed = false;
    }

    // After each five points, increases the moving rate of the pillars
    if ((score - lastSpeedUpScore) == 5) {
      lastSpeedUpScore = score;
      movingRate++;
    }
}Code language: Arduino (arduino)
Aqui está o princípio de funcionamento do jogo:temos pilares de 50 pixels de largura que se movem da direita para a esquerda e cada pilar seguinte tem uma altura aleatória diferente. Para fazê-los se mover, logicamente, após cada iteração, precisamos limpar a tela e redesenhar o gráfico com os pilares em sua nova posição. No entanto, não podemos fazer isso por causa da baixa taxa de atualização da tela, o que causaria cintilação dos gráficos. Para ativar todos os seus pixels, a tela precisa de um pouco mais de tempo, portanto, teremos que improvisar e redesenhar apenas as coisas que estão se movendo.
Então, vamos dar uma olhada em como a função customizada drawPilars() fará isso. Ele pega as variáveis xP e yP e, usando-as e a função fillRect(), desenha os pilares. Assim, cada iteração desenha os pilares em seu novo local com retângulos azuis adicionais do lado esquerdo e direito, que limpam o pilar desenhado anteriormente e, dessa forma, fazemos a improvisação de apenas redesenhar os pilares em movimento. As instruções if aqui são uma improvisação adicional porque, por algum motivo, a função fillRect() não funcionou se seu parâmetro 'x2' tivesse um valor fora do tamanho da tela. Além disso, no final desta função personalizada, precisamos imprimir o valor da pontuação alcançada.
// ===== drawPlillars - Custom Function
void drawPilars(int x, int y) {
if (x>=270){
myGLCD.setColor(0, 200, 20);
myGLCD.fillRect(318, 0, x, y-1);
myGLCD.setColor(0, 0, 0);
myGLCD.drawRect(319, 0, x-1, y);
myGLCD.setColor(0, 200, 20);
myGLCD.fillRect(318, y+81, x, 203);
myGLCD.setColor(0, 0, 0);
myGLCD.drawRect(319, y+80, x-1, 204);
}
else if( x<=268) {
// Draws blue rectangle right of the pillar
myGLCD.setColor(114, 198, 206);
myGLCD.fillRect(x+51, 0, x+60, y);
// Draws the pillar
myGLCD.setColor(0, 200, 20);
myGLCD.fillRect(x+49, 1, x+1, y-1);
// Draws the black frame of the pillar
myGLCD.setColor(0, 0, 0);
myGLCD.drawRect(x+50, 0, x, y);
// Draws the blue rectangle left of the pillar
myGLCD.setColor(114, 198, 206);
myGLCD.fillRect(x-1, 0, x-3, y);
// The bottom pillar
myGLCD.setColor(114, 198, 206);
myGLCD.fillRect(x+51, y+80, x+60, 204);
myGLCD.setColor(0, 200, 20);
myGLCD.fillRect(x+49, y+81, x+1, 203);
myGLCD.setColor(0, 0, 0);
myGLCD.drawRect(x+50, y+80, x, 204);
myGLCD.setColor(114, 198, 206);
myGLCD.fillRect(x-1, y+80, x-3, 204);
}
// Draws the score
myGLCD.setColor(0, 0, 0);
myGLCD.setBackColor(221, 216, 148);
myGLCD.setFont(BigFont);
myGLCD.printNumI(score, 100, 220);
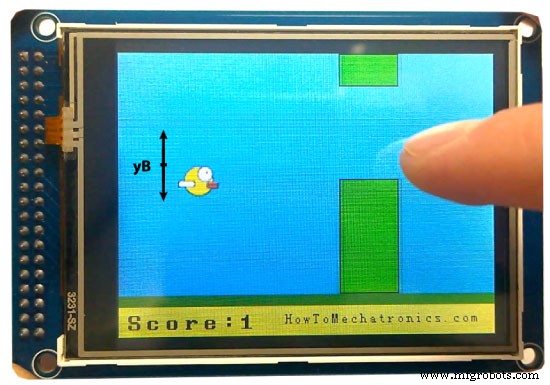
}Code language: Arduino (arduino)De volta à seção do loop, temos a variável yB que é a posição y do pássaro e depende da taxa de queda que após cada iteração é aumentada e dessa forma obtemos o efeito da aceleração ou gravidade. Além disso, aqui verificamos se há colisões e usamos as instruções if para confinar o pássaro para que, se ele atingir o topo, o chão ou os pilares, o jogo acabe.
A seguir está a função customizada drawBird() e vamos ver como ela funciona. O pássaro é na verdade uma foto que é convertida em bitmap usando a ferramenta ImageConverter565 feita por Henning Karlsen. O arquivo “.c” que é criado usando a ferramenta precisa ser incluído no diretório para que seja carregado ao iniciar o esboço. Também temos que definir o bitmap assim e usando a função drawBitmap() vamos desenhar a foto na tela. A ave tem uma coordenada X fixa e a variável yB como coordenada Y. Semelhante aos pilares, limparemos o estado anterior do pássaro desenhando dois retângulos azuis acima e abaixo do pássaro.
//====== drawBird() - Custom Function
void drawBird(int y) {
  // Draws the bird - bitmap
  myGLCD.drawBitmap (50, y, 35, 30, bird01);
  // Draws blue rectangles above and below the bird in order to clear its previus state
  myGLCD.setColor(114, 198, 206);
  myGLCD.fillRoundRect(50,y,85,y-6);
  myGLCD.fillRoundRect(50,y+30,85,y+36);
}Code language: Arduino (arduino)
De volta ao loop, podemos ver que após o pilar ter passado pela tela a variável xP será redefinida para 319, yP receberá um novo valor aleatório de 20 a 100 para a altura dos pilares e a pontuação aumentará em um. Com a próxima instrução if, controlamos o pássaro. Se tocarmos na tela, definiremos a taxa de queda como negativa, o que fará o pássaro pular e a instrução else if não permitirá que isso aconteça se apenas segurarmos a tela. A última declaração if é para a dificuldade do jogo e aumenta a taxa de movimento dos pilares após cada ponto fino.
Ok o que resta agora é ver como funciona a função customizada gameOver(). Após um atraso de um segundo ele irá limpar a tela, imprimir a pontuação e algum texto, se a pontuação for maior que a pontuação mais alta ele irá anotá-lo na EEPROM, ele irá redefinir todas as variáveis para seus valores de posição inicial e no final ele chamará a função personalizada startGame() para reiniciar o jogo.
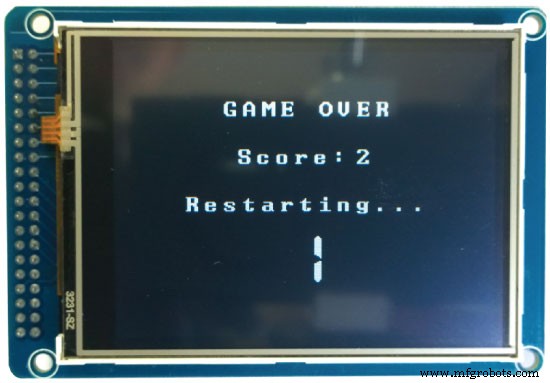
//======== gameOver() - Custom Function
void gameOver() {
  delay(1000); // 1 second
  // Clears the screen and prints the text
  myGLCD.clrScr();
  myGLCD.setColor(255, 255, 255);
  myGLCD.setBackColor(0, 0, 0);
  myGLCD.setFont(BigFont);
  myGLCD.print("GAME OVER", CENTER, 40);
  myGLCD.print("Score:", 100, 80);
  myGLCD.printNumI(score,200, 80);
  myGLCD.print("Restarting...", CENTER, 120);
  myGLCD.setFont(SevenSegNumFont);
  myGLCD.printNumI(2,CENTER, 150);
  delay(1000);
  myGLCD.printNumI(1,CENTER, 150);
  delay(1000);

  // Writes the highest score in the EEPROM
  if (score > highestScore) {
    highestScore = score;
    EEPROM.write(0,highestScore);
  }
  // Resets the variables to start position values
  xP=319;
  yB=50;
  fallRate=0;
  score = 0;
  lastSpeedUpScore = 0;
  movingRate = 3;
  gameStarted = false;
  // Restart game
  initiateGame();
}Code language: Arduino (arduino)
Isso é tudo e espero que a explicação do código tenha sido clara o suficiente. Se você tiver alguma dúvida, sinta-se à vontade para perguntar na seção de comentários abaixo.
Aqui está o código completo do jogo:
/*  Arduino Game Proejct
 *  Program made by Dejan Nedelkovski,
 *  www.HowToMechatronics.com
 */

/*  This program uses the UTFT and URTouch libraries
 *  made by Henning Karlsen.
 *  You can find and download them at:
 *  www.RinkyDinkElectronics.com
 */

#include <UTFT.h>
#include <URTouch.h>
#include <EEPROM.h>

//==== Creating Objects
UTFT    myGLCD(SSD1289,38,39,40,41); //Parameters should be adjusted to your Display/Schield model
URTouch  myTouch( 6, 5, 4, 3, 2);

//==== Defining Fonts
extern uint8_t SmallFont[];
extern uint8_t BigFont[];
extern uint8_t SevenSegNumFont[];

extern unsigned int bird01[0x41A]; // Bird Bitmap

int x, y; // Variables for the coordinates where the display has been pressed

// Floppy Bird
int xP = 319;
int yP = 100;
int yB = 50;
int movingRate = 3;
int fallRateInt = 0;
float fallRate = 0;
int score = 0;
int lastSpeedUpScore = 0;
int highestScore;
boolean screenPressed = false;
boolean gameStarted = false;

void setup() {
  // Initiate display
  myGLCD.InitLCD();
  myGLCD.clrScr();
  myTouch.InitTouch();
  myTouch.setPrecision(PREC_MEDIUM);

  highestScore = EEPROM.read(0); // Read the highest score from the EEPROM

  initiateGame(); // Initiate the game
}

void loop() {
    xP=xP-movingRate; // xP - x coordinate of the pilars; range: 319 - (-51)
    drawPilars(xP, yP); // Draws the pillars

    // yB - y coordinate of the bird which depends on value of the fallingRate variable
    yB+=fallRateInt;
    fallRate=fallRate+0.4; // Each inetration the fall rate increase so that we can the effect of acceleration/ gravity
    fallRateInt= int(fallRate);

    // Checks for collision
    if(yB>=180 || yB<=0){ // top and bottom
      gameOver();
    }
    if((xP<=85) && (xP>=5) && (yB<=yP-2)){ // upper pillar
      gameOver();
    }
    if((xP<=85) && (xP>=5) && (yB>=yP+60)){ // lower pillar
      gameOver();
    }

    // Draws the bird
    drawBird(yB);

    // After the pillar has passed through the screen
    if (xP<=-51){
      xP=319; // Resets xP to 319
      yP = rand() % 100+20; // Random number for the pillars height
      score++; // Increase score by one
    }
    //==== Controlling the bird
    if (myTouch.dataAvailable()&& !screenPressed) {
       fallRate=-6; // Setting the fallRate negative will make the bird jump
       screenPressed = true;
    }
    // Doesn't allow holding the screen / you must tap it
    else if ( !myTouch.dataAvailable() && screenPressed){
      screenPressed = false;
    }

    // After each five points, increases the moving rate of the pillars
    if ((score - lastSpeedUpScore) == 5) {
      lastSpeedUpScore = score;
      movingRate++;
    }
}
// ===== initiateGame - Custom Function
void initiateGame() {
  myGLCD.clrScr();
  // Blue background
  myGLCD.setColor(114, 198, 206);
  myGLCD.fillRect(0,0,319,239);
  // Ground
  myGLCD.setColor(221,216,148);
  myGLCD.fillRect(0, 215, 319, 239);
  myGLCD.setColor(47,175,68);
  myGLCD.fillRect(0, 205, 319, 214);
  // Text
  myGLCD.setColor(0, 0, 0);
  myGLCD.setBackColor(221, 216, 148);
  myGLCD.setFont(BigFont);
  myGLCD.print("Score:",5,220);
  myGLCD.setFont(SmallFont);
  myGLCD.print("HowToMechatronics.com", 140, 220);
  myGLCD.setColor(0, 0, 0);
  myGLCD.setBackColor(114, 198, 206);
  myGLCD.print("Highest Score: ",5,5);
  myGLCD.printNumI(highestScore, 120, 6);
  myGLCD.print(">RESET<",255,5);
  myGLCD.drawLine(0,23,319,23);
  myGLCD.print("TAP TO START",CENTER,100);

  drawBird(yB); // Draws the bird

  // Wait until we tap the sreen
  while (!gameStarted) {
    if (myTouch.dataAvailable()) {
    myTouch.read();
    x=myTouch.getX();
    y=myTouch.getY();
    // Reset higest score
    if ((x>=250) && (x<=319) &&(y>=0) && (y<=28)) {
    highestScore = 0;
    myGLCD.setColor(114, 198, 206);
    myGLCD.fillRect(120, 0, 150, 22);
    myGLCD.setColor(0, 0, 0);
    myGLCD.printNumI(highestScore, 120, 5);
    }
    if ((x>=0) && (x<=319) &&(y>=30) && (y<=239)) {
    gameStarted = true;
    myGLCD.setColor(114, 198, 206);
    myGLCD.fillRect(0, 0, 319, 32);
    }
  }
  }
  // Clears the text "TAP TO START" before the game start
  myGLCD.setColor(114, 198, 206);
  myGLCD.fillRect(85, 100, 235, 116);

}
// ===== drawPlillars - Custom Function
void drawPilars(int x, int y) {
    if (x>=270){
      myGLCD.setColor(0, 200, 20);
      myGLCD.fillRect(318, 0, x, y-1);
      myGLCD.setColor(0, 0, 0);
      myGLCD.drawRect(319, 0, x-1, y);

      myGLCD.setColor(0, 200, 20);
      myGLCD.fillRect(318, y+81, x, 203);
      myGLCD.setColor(0, 0, 0);
      myGLCD.drawRect(319, y+80, x-1, 204);
    }
    else if( x<=268) {
      // Draws blue rectangle right of the pillar
      myGLCD.setColor(114, 198, 206);
      myGLCD.fillRect(x+51, 0, x+60, y);
      // Draws the pillar
      myGLCD.setColor(0, 200, 20);
      myGLCD.fillRect(x+49, 1, x+1, y-1);
      // Draws the black frame of the pillar
      myGLCD.setColor(0, 0, 0);
      myGLCD.drawRect(x+50, 0, x, y);
      // Draws the blue rectangle left of the pillar
      myGLCD.setColor(114, 198, 206);
      myGLCD.fillRect(x-1, 0, x-3, y);

      // The bottom pillar
      myGLCD.setColor(114, 198, 206);
      myGLCD.fillRect(x+51, y+80, x+60, 204);
      myGLCD.setColor(0, 200, 20);
      myGLCD.fillRect(x+49, y+81, x+1, 203);
      myGLCD.setColor(0, 0, 0);
      myGLCD.drawRect(x+50, y+80, x, 204);
      myGLCD.setColor(114, 198, 206);
      myGLCD.fillRect(x-1, y+80, x-3, 204);
  }
  // Draws the score
  myGLCD.setColor(0, 0, 0);
  myGLCD.setBackColor(221, 216, 148);
  myGLCD.setFont(BigFont);
  myGLCD.printNumI(score, 100, 220);
}

//====== drawBird() - Custom Function
void drawBird(int y) {
  // Draws the bird - bitmap
  myGLCD.drawBitmap (50, y, 35, 30, bird01);
  // Draws blue rectangles above and below the bird in order to clear its previus state
  myGLCD.setColor(114, 198, 206);
  myGLCD.fillRoundRect(50,y,85,y-6);
  myGLCD.fillRoundRect(50,y+30,85,y+36);
}
//======== gameOver() - Custom Function
void gameOver() {
  delay(3000); // 1 second
  // Clears the screen and prints the text
  myGLCD.clrScr();
  myGLCD.setColor(255, 255, 255);
  myGLCD.setBackColor(0, 0, 0);
  myGLCD.setFont(BigFont);
  myGLCD.print("GAME OVER", CENTER, 40);
  myGLCD.print("Score:", 100, 80);
  myGLCD.printNumI(score,200, 80);
  myGLCD.print("Restarting...", CENTER, 120);
  myGLCD.setFont(SevenSegNumFont);
  myGLCD.printNumI(2,CENTER, 150);
  delay(1000);
  myGLCD.printNumI(1,CENTER, 150);
  delay(1000);

  // Writes the highest score in the EEPROM
  if (score > highestScore) {
    highestScore = score;
    EEPROM.write(0,highestScore);
  }
  // Resets the variables to start position values
  xP=319;
  yB=50;
  fallRate=0;
  score = 0;
  lastSpeedUpScore = 0;
  movingRate = 3;
  gameStarted = false;
  // Restart game
  initiateGame();
}Code language: Arduino (arduino)
Aqui está um arquivo de download com o esboço do Arduino, a imagem do pássaro e o arquivo de bitmap do pássaro.
Moldura de foto de coração LED DIY - Projeto Arduino
Como fazer uma bússola usando Arduino e IDE de processamento
Processo de manufatura
- Faça Monitor Ambilight usando Arduino
- Jogo Arduino Pong - Tela OLED
- Controlador de jogo Arduino
- Jogo Arduino Touch Breakout
- Jogo de Operação Gigante Animatronics Lego Minfig
- Detector de frequência de áudio
- Tech-TicTacToe
- Cronômetro de contagem regressiva do Arduino
- Jogo Pixel Chaser
- RC Porsche Car (Projeto Arduino)