



Construa um Termômetro Arduino com Conexão Web usando Sensor DS18B20
Componentes e Materiais Necessários
- Arduino UNO × 1
- PHPoC WiFi Shield para Arduino × 1 (pode usar PHPoC Shield)
- Sensor de Temperatura Adafruit DS18B20 × 1
- Resistor 4.7k ohm Seeed × 1
- Tubo Termorretrátil × 1
Sobre este Projeto
Se você é iniciante, pode aprender sobre WiFi e sensores no Arduino através dos tutoriais Wifi and Arduino e DS18B20 temperature sensor. Fiz um projeto semelhante usando apenas PHPoC aqui.
Demonstração
O sistema exibe a temperatura em tempo real em uma interface web acessível via navegador.
Fluxo de Dados
Arduino → PHPoC WiFi Shield → Navegador Web
O Arduino lê a temperatura do sensor e envia o valor para o PHPoC WiFi Shield. Ao receber o valor, o shield o transmite ao navegador via WebSocket. Uma função JavaScript visualiza a temperatura na interface do usuário.
Nota: O shield PHPoC possui um programa integrado para passar dados do Arduino ao navegador. Portanto, não precisamos nos preocupar com essa parte.
O que Precisamos Fazer
- Configurar informações de WiFi para o shield PHPoC (SSID e senha)
- Carregar nova interface web (UI) no shield PHPoC
- Escrever o código do Arduino
Configuração do WiFi no Shield PHPoC
Consulte esta instrução.
Upload da Nova Interface Web para o Shield PHPoC
- Baixe o código fonte PHPoC
remote_thermometer.php(na seção de código). - Carregue-o no shield PHPoC usando o PHPoC Debugger conforme esta instrução.
Escrever o Código do Arduino
- Instale três bibliotecas: PHPoC Library for Arduino, OneWire e Dallas Temperature (veja instrução).
- Carregue o código do Arduino (na seção de código) no Arduino.
Teste
- Clique no botão serial na IDE do Arduino para ver o endereço IP.
- Abra o navegador web, digite
https://substitua_pelo_endereço_ip/remote_thermometer.php - Clique no botão conectar e teste.
O Melhor Kit Inicial Arduino para Iniciantes
Se procura um kit Arduino, veja The Best Arduino Kit for Beginners.
Referências de Funções
- Serial.begin()
- Serial.println()
- delay()
- millis()
- for loop
- while loop
- if else
- loop()
- setup()
- String.toInt()
- String.substring()
- String.indexOf()
- String.remove()
- String.equals()
Código
Código do Arduino
#include <OneWire.h>
#include <DallasTemperature.h>
#include "SPI.h"
#include "Phpoc.h"

// Fio de dados conectado à porta 8 no Arduino
OneWire oneWire(8);
DallasTemperature sensors(&oneWire);
PhpocServer server(80);
boolean alreadyConnected = false;

void setup() {
  Serial.begin(9600);
  while(!Serial) ;
  sensors.begin();
  Phpoc.begin(PF_LOG_SPI | PF_LOG_NET);
  server.beginWebSocket("thermometer");
  Serial.print("Endereço do servidor WebSocket: ");
  Serial.println(Phpoc.localIP());
}

void loop() {
  // Quando o cliente envia o primeiro byte, diz olá:
  PhpocClient client = server.available();
  if (client) {
    sensors.requestTemperatures();
    float temp = sensors.getTempCByIndex(0);
    String txtMsg = String(temp) + "\r\n";
    char buf[txtMsg.length()];
    txtMsg.toCharArray(buf, txtMsg.length());
    server.write(buf, txtMsg.length());
    delay(300);
  }
}
remote_thermometer.php
Este arquivo fornece a interface web do usuário. Carregue este arquivo no PHPoC WiFi Shield ou PHPoC Shield conforme as instruções descritas.
<!DOCTYPE html>
<html>
<head>
<title>Arduino - PHPoC Shield - Termômetro</title>
<meta name="viewport" content="width=device-width, initial-scale=0.7, maximum-scale=0.7">
<meta charset="utf-8">
<style>
body { text-align: center; font-size: width/2pt; }
h1 { font-weight: bold; font-size: width/2pt; }
h2 { font-weight: bold; font-size: width/2pt; }
button { font-weight: bold; font-size: width/2pt; }
</style>
<script>
var canvas_width = 200, canvas_height = 450;
var ws;
var buffer = "";
function init() {
  var canvas = document.getElementById("remote");
  canvas.width = canvas_width;
  canvas.height = canvas_height;
  var ctx = canvas.getContext("2d");
  ctx.translate(canvas_width/2, canvas_height - 80);
  update_view(0);
}
function connect_onclick() {
  if(ws == null) {
    var ws_host_addr = "";
    if((navigator.platform.indexOf("Win") != -1) && (ws_host_addr.charAt(0) == "[")) {
      ws_host_addr = ws_host_addr.replace(/[\[\]]/g, '');
      ws_host_addr = ws_host_addr.replace(/:/g, "-");
      ws_host_addr += ".ipv6-literal.net";
    }
    ws = new WebSocket("ws://" + ws_host_addr + "/thermometer", "text.phpoc");
    document.getElementById("ws_state").innerHTML = "CONECTANDO";
    ws.onopen = ws_onopen;
    ws.onclose = ws_onclose;
    ws.onmessage = ws_onmessage;
  } else ws.close();
}
function ws_onopen() {
  document.getElementById("ws_state").innerHTML = "<font color='blue'>CONECTADO</font>";
  document.getElementById("bt_connect").innerHTML = "Desconectar";
  ws.send("B\r\n");
  update_view(0);
}
function ws_onclose() {
  document.getElementById("ws_state").innerHTML = "<font color='gray'>FECHADO</font>";
  document.getElementById("bt_connect").innerHTML = "Conectar";
  ws.onopen = null;
  ws.onclose = null;
  ws.onmessage = null;
  ws = null;
  update_view(0);
}
function ws_onmessage(e_msg) {
  e_msg = e_msg || window.event;
  console.log(e_msg.data);
  update_view(parseFloat(e_msg.data));
}
function update_view(temp) {
  var canvas = document.getElementById("remote");
  var ctx = canvas.getContext("2d");
  var radius = 70;
  var offset = 5;
  var width = 45;
  var height = 330;
  ctx.clearRect(-canvas_width/2, -350, canvas_width, canvas_height);
  if(ws != null) {
    ctx.strokeStyle="blue";
    ctx.fillStyle="blue";
  } else {
    ctx.strokeStyle="Gray";
    ctx.fillStyle="Gray";
  }
  // Escala de 5 em 5 graus
  var x = -width/2;
  ctx.lineWidth=2;
  for (var i = 0; i <= 100; i+=5) {
    var y = -(height - radius)*i/100 - radius - 5;
    ctx.beginPath();
    ctx.lineTo(x, y);
    ctx.lineTo(x - 20, y);
    ctx.stroke();
  }
  // Escala de 20 em 20 graus
  ctx.lineWidth=5;
  for (var i = 0; i <= 100; i+=20) {
    var y = -(height - radius)*i/100 - radius - 5;
    ctx.beginPath();
    ctx.lineTo(x, y);
    ctx.lineTo(x - 25, y);
    ctx.stroke();
    ctx.font="20px Georgia";
    ctx.textBaseline="middle";
    ctx.textAlign="right";
    ctx.fillText(i.toString(), x - 35, y);
  }
  // Forma do termômetro
  ctx.lineWidth=16;
  ctx.beginPath();
  ctx.arc(0, 0, radius, 0, 2 * Math.PI);
  ctx.stroke();
  ctx.beginPath();
  ctx.rect(-width/2, -height, width, height);
  ctx.stroke();
  ctx.beginPath();
  ctx.arc(0, -height, width/2, 0, 2 * Math.PI);
  ctx.stroke();
  ctx.fillStyle="#e6e6ff";
  ctx.beginPath();
  ctx.arc(0, 0, radius, 0, 2 * Math.PI);
  ctx.fill();
  ctx.beginPath();
  ctx.rect(-width/2, -height, width, height);
  ctx.fill();
  ctx.beginPath();
  ctx.arc(0, -height, width/2, 0, 2 * Math.PI);
  ctx.fill();
  // Valor da temperatura
  if(ws != null) ctx.fillStyle="#ff1a1a";
  else ctx.fillStyle="Gray";
  ctx.beginPath();
  ctx.arc(0, 0, radius - offset, 0, 2 * Math.PI);
  ctx.fill();
  temp = Math.round(temp);
  var y = (height - radius)*temp/100.0 + radius + 5;
  ctx.beginPath();
  ctx.rect(-width/2 + offset, -y, width - 2*offset, y);
  ctx.fill();
  if(ws != null) {
    ctx.fillStyle="white";
    ctx.font="bold 34px Georgia";
    ctx.textBaseline="middle";
    ctx.textAlign="center";
    ctx.fillText(temp.toString() + "°C", 0, 0);
  }
}
window.onload = init;
</script>
</head>
<body>
<p>
<h1>Arduino - Termômetro Web</h1>
</p>
<canvas id="remote"></canvas>
<h2>
<p> WebSocket : <span id="ws_state">null</span> </p>
<button id="bt_connect" type="button" onclick="connect_onclick();">Conectar</button>
</h2>
</body>
</html>
Esquemáticos
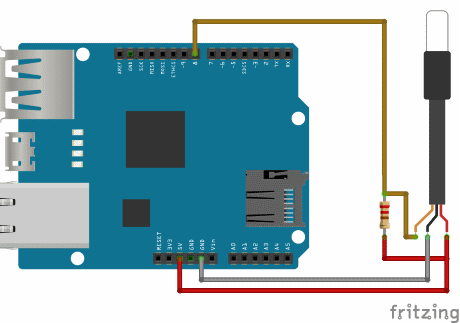
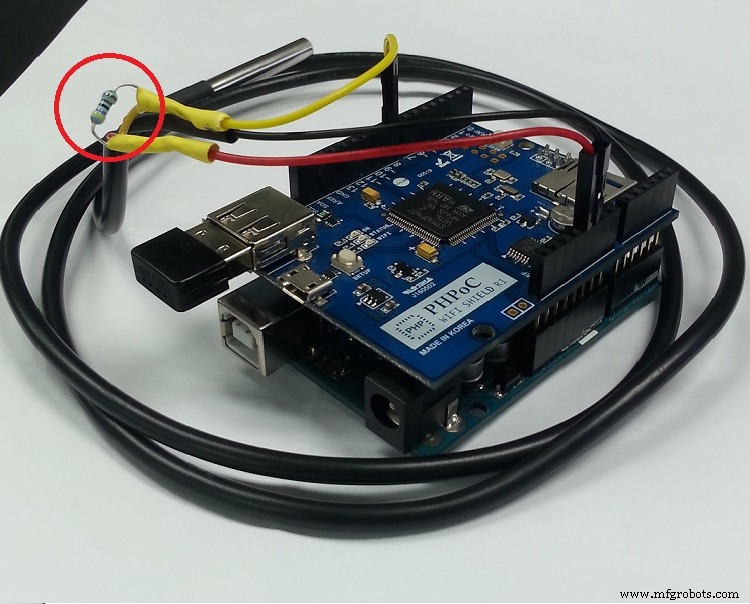
- Empilhe o shield PHPoC WiFi ou PHPoC Shield no Arduino
- Faça a fiação conforme a imagem abaixo
Processo de manufatura
- O Termômetro: Do Termoscópio de Galileo aos Sensores Digitais Modernos
- Construa um Spybot Controlado por Bluetooth com Arduino
- FlickMote: Controle Remoto IR por Gestos para Casa Inteligente
- DIY Arduino TV B-Gone: Controle Remoto Universal para Todas as TVs
- Construa um Relógio Mestre LED Personalizado com Alarme – Visível a 12 Metros
- Find Me: Localizador Inteligente de Objetos com Arduino e Bluetooth
- Soluções de Energia Otimizadas para Projetos Arduino
- Reprodutor MP3 Controlado via Web com Arduino: Reprodução de Áudio Fácil pelo Navegador
- Jogo da Velha com Arduino, Matriz LED MAX7219 e Caixa de Papelão
- Construa um Robô Quadrúpede Inteligente com Arduino: Guia Passo a Passo