Código
Whac_A_Mole_v1.0.0 Arduino
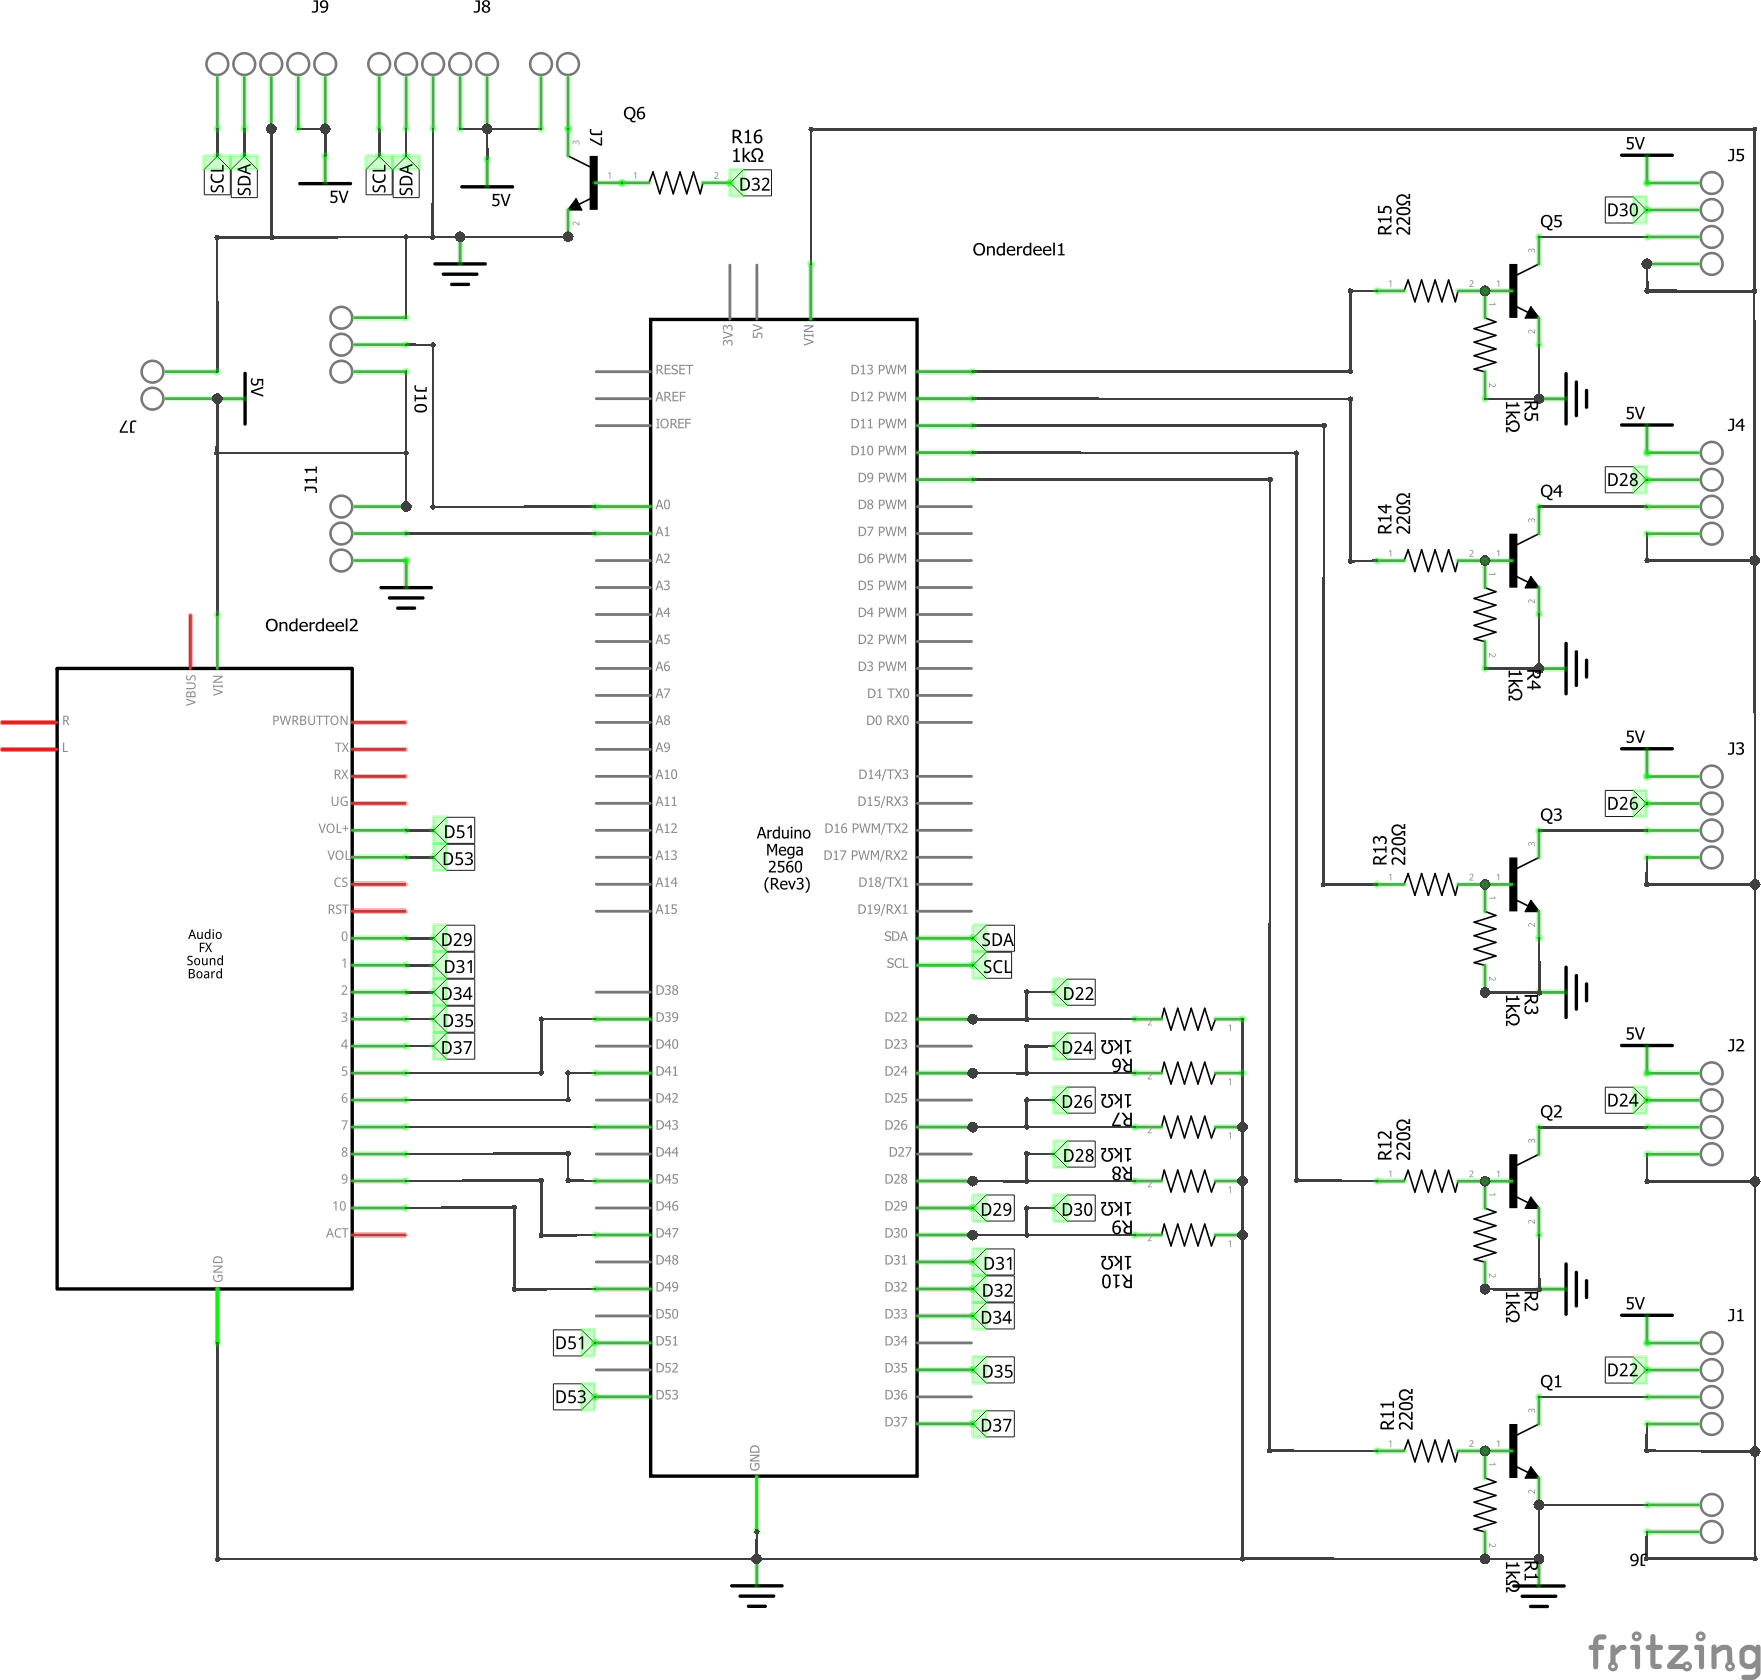
Código Arduino, escrito dentro do Visual Studio /*Whac_A_Mole_v1.0.0By WT040 * / # include "Wire.h" #include "Adafruit_LEDBackpack.h" #include "Adafruit_GFX.h" Adafruit_7segment matrix1 =Adafruit_7segment matrix1 =Adafruit_7segment2; Adafruit_7segment (); # define debounceTime 10 // declara controles potmeter # define potmeterVolume 0 # define potmeterGameLevel 1 // declara amp power pin # define ampPower 32 // declara botões # define btn1Pin 22 # define btn2Pin 24 # define btn3Pin 26 # define btn4Pin 28 # define btn5Pin 30byte btnArray [] ={btn1Pin, btn2Pin, btn3Pin, btn4Pin, btn5Pin}; # define btn1 0 // para usar a matriz btn # define btn2 1 // para usar a matriz btn # define btn3 2 // para usando o array btn # define btn4 3 // para usar o array btn # define btn5 4 // para usar o array btn // declara botão leds # define btnLed1Pin 9 # define btnLed2Pin 10 # define btnLed3Pin 11 # define btnLed4Pin 12 # define btnLed5Pin 13 byte btnLedArray [] ={btnLed1Pin, btnLed2Pin, btnLed3Pin, btnLed4Pin, btnLed5Pin}; # define btnLed1 0 // f ou usando o array btn # define btnLed2 1 // para usar o array btn # define btnLed3 2 // para usar o array btn # define btnLed4 3 // para usar o array btn # define btnLed5 4 // para usar o array btn / / declarar áudio fx digitals # define fx0TriggerPin 29 # define fx1TriggerPin 31 # define fx2TriggerPin 33 # define fx3TriggerPin 35 # define fx3TriggerPin 37 # define fx5TriggerPin 39 # define fx6TriggerPinx # 4310 define fx7TriggerPin8 # 4710 fx3TriggerPin definir fxVolUpPin 51 # definir fxVolDnPin 53byte fxTriggerArray [] ={fx0TriggerPin, fx1TriggerPin, fx2TriggerPin, fx3TriggerPin, fx4TriggerPin, fx5TriggerPin, fx6TriggerPin, fx7TriggerPin, fx8TriggerPin, fx9TriggerPin, fx10TriggerPin}; byte fxVolumeArray [] ={fxVolUpPin, fxVolDnPin}; # definir fx0Trigger 0 // para usar o array btn # define fx1Trigger 1 // para usar o array btn # define fx2Trigger 2 // para usar o array btn # define fx3Trigger 3 // para usar o array btn # define fx4Trigger 4 // para usar o b array tn # define fx5Trigger 5 // para usar o array btn # define fx6Trigger 6 // para usar o array btn # define fx7Trigger 7 // para usar o array btn # define fx8Trigger 8 // para usar o array btn # define fx9Trigger 9 // para usar o array btn # define fx10Trigger 10 // para usar o array btn # define fxVolUp 0 // para usar o array btn # define fxVolDn 1 // para usar o array btn int currentPlayingSound =-1; byte btnPressed [5 ], ledState [5]; // pisca ledunsigned long previousMillisLedBlink =0; // para led piscando # define intervalLedBlink 750 //// game start sequenceunsigned long previousMillisGameStarting =0; #define intervalCountDown 1000byte gameStartCountDown; //// game stepsunsigned long previousMillisGameStep =0; int gameStepLength =0; // comprimento de um stepint individual gameStepBtn =0; // o botão que precisa ser pressionado // int valPotmeterVolume =0; int volume =0; int actualVolume =35; // volume do adafruit fx boardint valPotmeterGameLevel =0; int gameLevel; int currentScore; int highScore; int highScoreAddr =1; byte activeBtn; bool debug; // ativa a depuração ou notbyte wackAMoleState; // estado do gamebool SystemInitialized =false; #define stateUnknown 0 # define waitForStart 1 # define o início 2 # define a execução 3 # define gameOver 4 # define parado 5void setup () {Serial.begin (9600); // pino de alimentação do amplificador inicial pinMode (ampPower, OUTPUT); digitalWrite (ampPower, LOW); // pinos de inicialização do btn para (int Pin =0; Pin <5; Pin ++) {pinMode (btnArray [Pin], INPUT); } // pinos led init btn para (int Pin =0; Pin <5; Pin ++) {pinMode (btnLedArray [Pin], OUTPUT); } // pinos fx init btn para (int Pin =0; Pin <11; Pin ++) {pinMode (fxTriggerArray [Pin], OUTPUT); digitalWrite (fxTriggerArray [Pin], HIGH); } // pinos de volume init btn fx para (int Pin =0; Pin <2; Pin ++) {pinMode (fxVolumeArray [Pin], OUTPUT); digitalWrite (fxVolumeArray [Pin], HIGH); } matrix1.begin (0x70); matrix2.begin (0x71); while (! eeprom_is_ready ()); // Aguarde a EEPROM estar pronta cli (); highScore =eeprom_read_word ((uint16_t *) (gameLevel * 2)); sei (); matrix1.print (0); matrix1.writeDisplay (); matrix2.print (0); matrix2.writeDisplay (); initializeSystem ();} void loop () {checkButtonInputs (); // quando verificarmos as opções, obteremos o estado atual readVolumePotmeter (); if (wackAMoleState ==waitForStart) {playSound (fx0Trigger); if (btnPressed [btn4]) {wackAMoleState =começando; } readGameLevelPotmeter (); ledBlinkStart (); } if (wackAMoleState ==começando) {startGame (); } if (wackAMoleState ==running) {playSound (fx1Trigger); checkNextGameStep (); }} void checkNextGameStep () {unsigned long currentMillisGameStep =millis (); int amountOfButtonPresses =0; for (int btn =0; btn <5; btn ++) {if (btnPressed [btn]) {amountOfButtonPresses ++; }} if (previousMillisGameStep ==0) {previousMillisGameStep =currentMillisGameStep; digitalWrite (btnLedArray [btnLed4], LOW); randomSeed (analogRead (2)); gameStepBtn =aleatório (0, 5); gameStepLength =random (3000 / gameLevel, 5000 / gameLevel); digitalWrite (btnLedArray [gameStepBtn], HIGH); // acender uma nova luz de botão} if ((currentMillisGameStep - previousMillisGameStep>
=gameStepLength) || (amountOfButtonPresses> 1) || (amountOfButtonPresses ==1) &&! btnPressed [gameStepBtn]) {// Jogo acabado ... playSound ( fx2Trigger); wackAMoleState =gameOver; previousMillisGameStep =0; para (contador interno =0; contador <5; contador ++) {analogWrite (btnLedArray [contador], 255); } para (brilho interno =255; brilho> 0; brilho--) {analogWrite (btnLedArray [btnLed1], brilho); analogWrite (btnLedArray [btnLed2], brilho); analogWrite (btnLedArray [btnLed3], brilho); analogWrite (btnLedArray [btnLed4], brilho); analogWrite (btnLedArray [btnLed5], brilho); atraso (10); } analogWrite (btnLedArray [btnLed1], 0); analogWrite (btnLedArray [btnLed2], 0); analogWrite (btnLedArray [btnLed3], 0); analogWrite (btnLedArray [btnLed4], 0); analogWrite (btnLedArray [btnLed5], 0); Serial.println ("Game Over"); if (pontuação atual> pontuação alta) {while (! eeprom_is_ready ()); // Aguarde a EEPROM estar pronta cli (); eeprom_write_word ((uint16_t *) (gameLevel * 2), currentScore); // Vamos inicializar nosso valor em EEPROM sei (); } contador interno =0; faça {demora (1); checkButtonInputs (); contador ++; } while ((contador <1000) &&! btnPressed [btn1] &&! btnPressed [btn2 &&! btnPressed [btn3] &&! btnPressed [btn4] &&! btnPressed [btn5]]); // aguarde o lançamento do botão matrix1 .print (0); matrix1.writeDisplay (); wackAMoleState =waitForStart; } else if (btnPressed [gameStepBtn] &&(amountOfButtonPresses ==1)) {digitalWrite (btnLedArray [gameStepBtn], LOW); // desliga o botão anterior do led int counter =0; faça {demora (1); checkButtonInputs (); contador ++; } while ((counter <1000) &&btnPressed [gameStepBtn]); // aguarde a liberação do botão previousMillisGameStep =currentMillisGameStep; int tempStepBtn =0; faça {tempStepBtn =random (0, 5); gameStepLength =random (3000 / gameLevel, 5000 / gameLevel); } while (gameStepBtn ==tempStepBtn); gameStepBtn =tempStepBtn; digitalWrite (btnLedArray [gameStepBtn], HIGH); // acende um novo botão light currentScore ++; matrix1.print (currentScore); matrix1.writeDisplay (); if (pontuação atual> pontuação alta) {matriz2.print (pontuação atual); matrix2.writeDisplay (); }}} void ledBlinkStart () // pisca um led sem demora {unsigned long currentMillisLedBlink =millis (); if (currentMillisLedBlink - previousMillisLedBlink> =intervalLedBlink) {previousMillisLedBlink =currentMillisLedBlink; if (ledState [0] ==LOW) {ledState [0] =HIGH; } else {ledState [0] =LOW; } digitalWrite (btnLedArray [btnLed4], ledState [0]); // led verde / botão}} void startGame () // inicia a sequência do próprio jogo {unsigned long currentMillisGameStarting =millis (); digitalWrite (btnLedArray [btnLed4], 0); // desligue o led / botão verde currentScore =0; if (gameStartCountDown ==0) {playSound (fx3Trigger); previousMillisGameStarting =millis (); gameStartCountDown =4; atraso (300); matrix1.print (gameStartCountDown, DEC); matrix1.writeDisplay (); } if (currentMillisGameStarting - previousMillisGameStarting> =intervalCountDown) {previousMillisGameStarting =currentMillisGameStarting; if (gameStartCountDown> 0) {gameStartCountDown--; matrix1.print (gameStartCountDown, DEC); matrix1.writeDisplay (); if (gameStartCountDown ==0) {wackAMoleState =running; }}}} void initializeSystem () {// adicionar código init aqui ... digitalWrite (btnLedArray [btnLed1], HIGH); atraso (75); digitalWrite (btnLedArray [btnLed2], HIGH); atraso (75); digitalWrite (btnLedArray [btnLed3], HIGH); atraso (75); digitalWrite (btnLedArray [btnLed4], HIGH); atraso (75); digitalWrite (btnLedArray [btnLed5], HIGH); atraso (1000); digitalWrite (btnLedArray [btnLed5], LOW); atraso (75); digitalWrite (btnLedArray [btnLed4], LOW); atraso (75); digitalWrite (btnLedArray [btnLed3], LOW); atraso (75); digitalWrite (btnLedArray [btnLed2], LOW); atraso (75); digitalWrite (btnLedArray [btnLed1], LOW); atraso (1000); debug =true; wackAMoleState =waitForStart; initVolume (); if (actualVolume> 0) {enableAmpPower (true); }} void checkButtonInputs () // verificar se há alterações no botão {byte estático previousstate [5]; byte estático currentstate [5]; estática longa última hora; índice de bytes; // debounce if ((lasttime + debounceTime)> millis ()) {return; } última vez =milis (); // para (índice =0; índice <5; índice ++) {estado atual [índice] =digitalRead (btnArray [índice]); // ler o botão if (currentstate [index]! =btnPressed [index]) {if ((btnPressed [index] ==HIGH) &&(currentstate [index] ==LOW)) {if (debug) {Serial.print ("botão liberado:"); Serial.println (índice + 1); } btnPressed [índice] =0; } if ((btnPressed [index] ==LOW) &&(currentstate [index] ==HIGH)) {if (debug) {Serial.print ("botão pressionado:"); Serial.println (índice + 1); } btnPressed [índice] =1; }}}} void initVolume () {valPotmeterVolume =(analogRead (potmeterVolume) / 30); if (realVolume> valPotmeterVolume) {do {digitalWrite (fxVolumeArray [fxVolDn], BAIXO); actualVolume--; atraso (20); digitalWrite (fxVolumeArray [fxVolDn], HIGH); atraso (20); } while (actualVolume> valPotmeterVolume); } else if (actualVolume valPotmeterVolume) {digitalWrite (fxVolumeArray [fxVolDn], LOW); actualVolume--; atraso (40); digitalWrite (fxVolumeArray [fxVolDn], HIGH); if (actualVolume ==0) {enableAmpPower (false); }} else if (actualVolume -1) {matrix2.print (highScore); } else {matrix2.print (0); } matrix2.writeDisplay ();} void playSound (int sound) {if (currentPlayingSound! =sound) {for (int counter =0; counter <11; counter ++) {digitalWrite (fxTriggerArray [counter], HIGH); } digitalWrite (fxTriggerArray [som], BAIXO); currentPlayingSound =sound; }} void enableAmpPower (bool state) {digitalWrite (ampPower, state);}