



Controlador Residencial Arduino com Alexa: Automação Inteligente Simplificada
Componentes e Materiais
| Componente | Quantidade |
|---|---|
| Arduino Yun | 1 |
| ControlEverything.com Controlador Relé 4 Canais I2C | 1 |
| Sensor Temperatura e Umidade DHT11 (4 pinos) | 1 |
| Resistor 10k ohm | 2 |
| Buzzer SparkFun RedBot | 1 |
| Transistor NPN Uso Geral | 1 |
| Conversor DC-DC Buck LM2596 | 1 |
| Amazon Alexa Echo Dot | 1 |
| Arduino Proto Shield | 1 |
| Webcam USB | 1 |
| Caixa de Junção Branca 200x155x80mm | 1 |
Ferramentas Necessárias
- Ferro de solda
Aplicativos e Serviços Online
- Arduino IDE
- Amazon Alexa Skills Kit
- Amazon Web Services AWS Lambda
- PubNub Publish/Subscribe API
Sobre o Projeto
Visão Geral
Quando a Amazon lançou a Alexa e dispositivos como o Echo Dot, abriu infinitas possibilidades para uma Smart Home controlada por comandos de voz em linguagem natural.
Este projeto cria um Controlador Residencial Arduino que conecta diversos sensores e dispositivos à internet, controláveis via skill Alexa.
Você pode instalar e habilitar minha skill "Arduino Home Controller" (passo fácil), ou criar sua própria skill guiado por este tutorial.
Controlamos atualmente:
- Quatro luzes: quarto, garagem, cozinha e sala
- Sensor de temperatura e umidade
- Alarme sonoro (buzzer)
- Webcam para foto de segurança enviada por email
Veja o Arduino Home Controller em ação no vídeo demo. Para demo, usei quatro LEDs em protoboard simulando lâmpadas nos cômodos.
Se quiser usar módulos remotos para acionar luzes, veja meu projeto complementar Arduino Home Controller Remote Modules.
Diagrama de Blocos
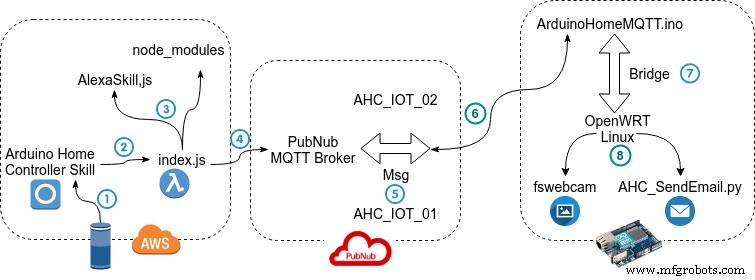
No diagrama de blocos vemos quatro componentes principais:
- Amazon Echo Dot — recebe comandos de voz e envia à AWS.
- AWS com Skill Amazon e Função Lambda — interpreta comandos. Skill: "Arduino Home Controller".
- Broker MQTT usando PubNub cloud — recebe mensagens de controle em dois canais (set values e read values). Não precisa criar conta no PubNub; pode usar minha conta para demo.
- Controlador Residencial com Arduino Yun — tem Ethernet interno e pequena máquina Linux onde rodamos Python para algumas ações. Controla relés, lê sensor DHT11, aciona buzzer e manipula webcam.
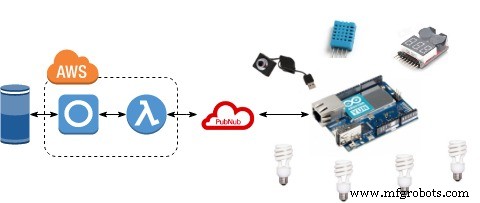
Instale Todo Software Necessário
Duas opções: usar minha skill Alexa (demo) ou criar sua skill pessoal.
Opção 1 — Skill Pronta: Navegue no app Alexa com este URL, selecione Skills no menu, busque "Arduino" e habilite a skill "Arduino Home Controller".
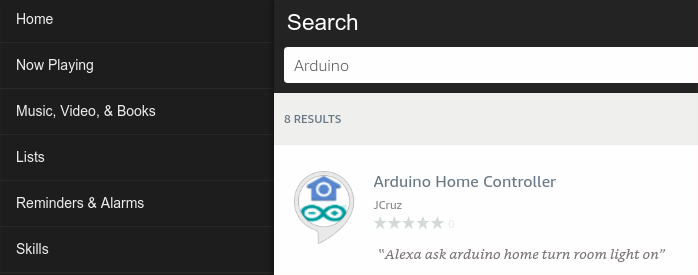
Ou use este link na Amazon Skill Store e clique "Habilitar".
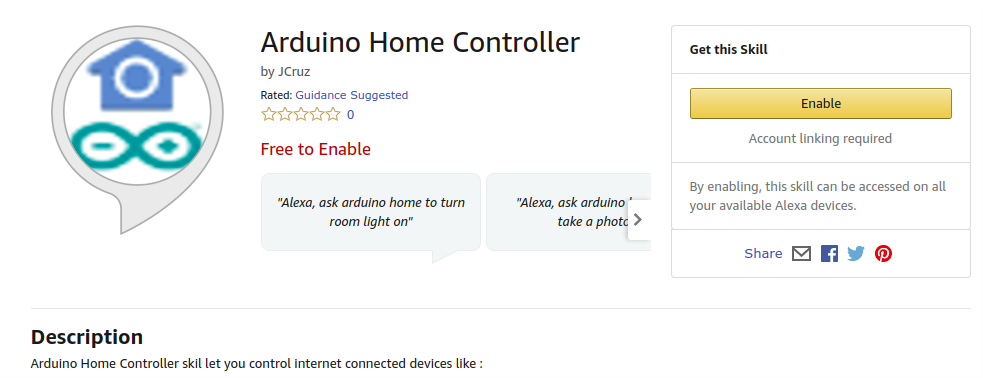
Vincule sua conta Amazon — usaremos seu email como ID para comandos ao Arduino (não enviaremos emails, apenas ID).
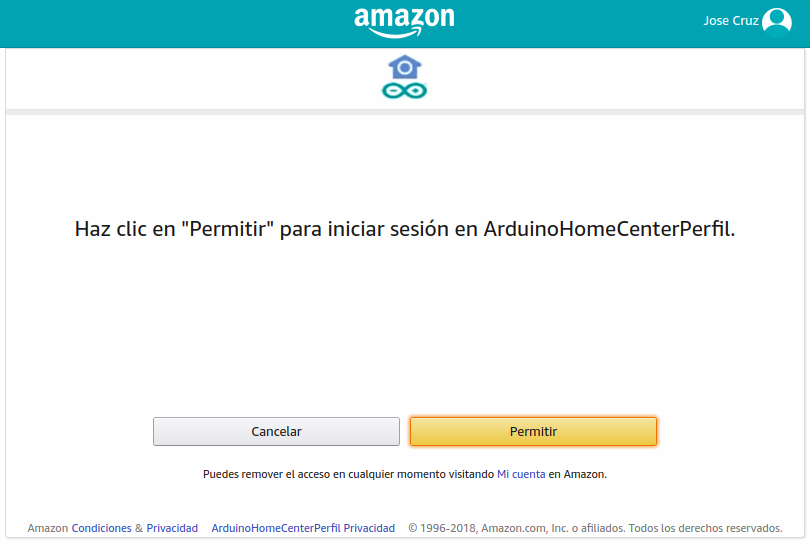
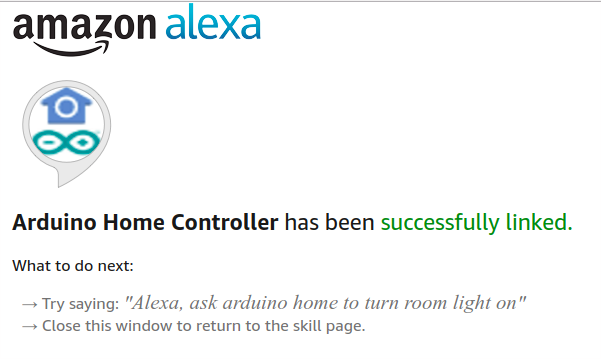
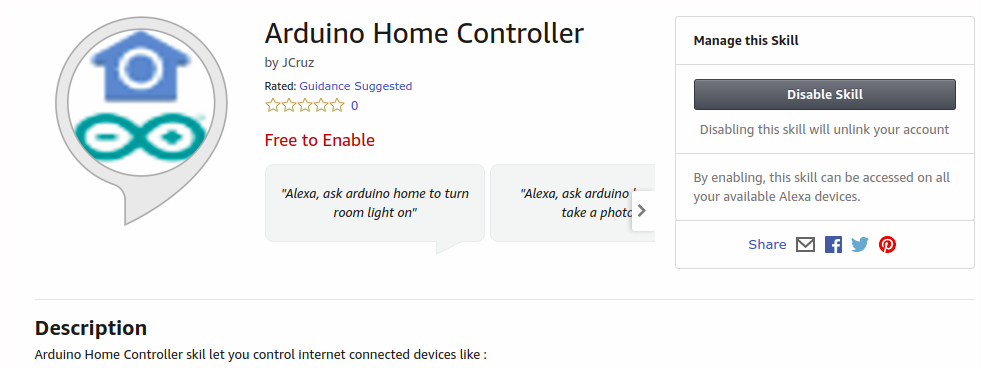
Opção 2 — Crie sua Própria Skill:
1. Crie uma Skill
Registre-se em developer.amazon.com.
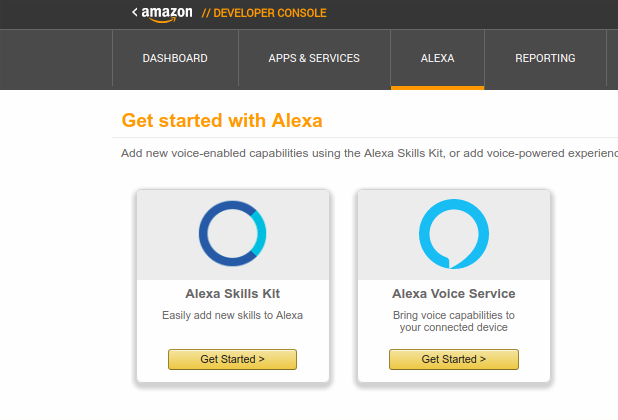
- Login → menu Alexa → Alexa Skills Kit → "Get Started"
- Clique "Add a New Skill"
- Em "Create a New Alexa Skill":
- Selecione: Custom Interaction Model
- Idioma: English US
- Name: TestSkill (nome para busca na store)
- Invocation Name: Test Skill (nome para comandos: "Alexa, ask Test Skill to...")
- Campos globais: todos "No"
- Clique "Save"

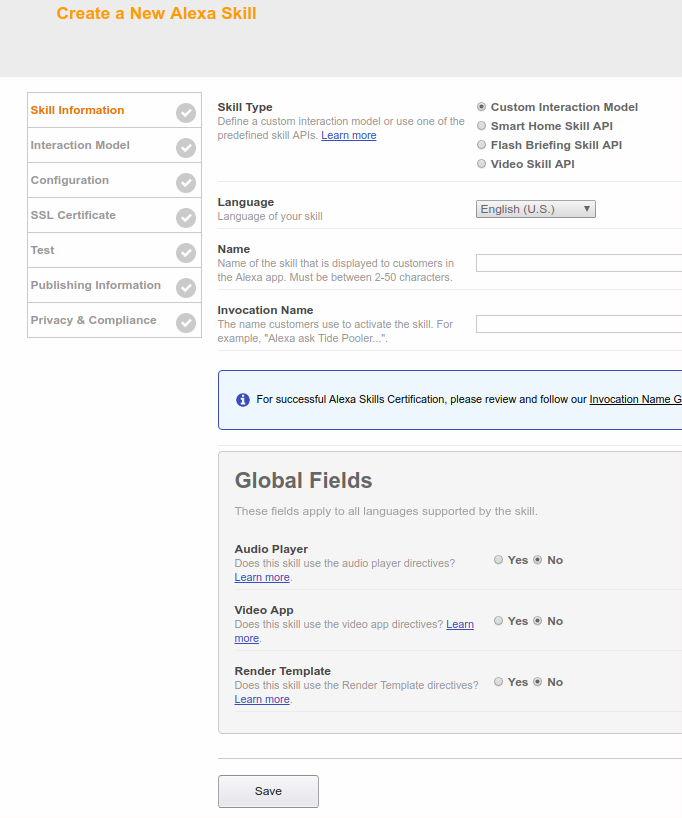
Nova skill criada — anote o Application ID (ex: amzn1.ask.skill.6e22e052-c32f-433c-8d39-dc94a77a4adb) para vincular à Lambda depois.
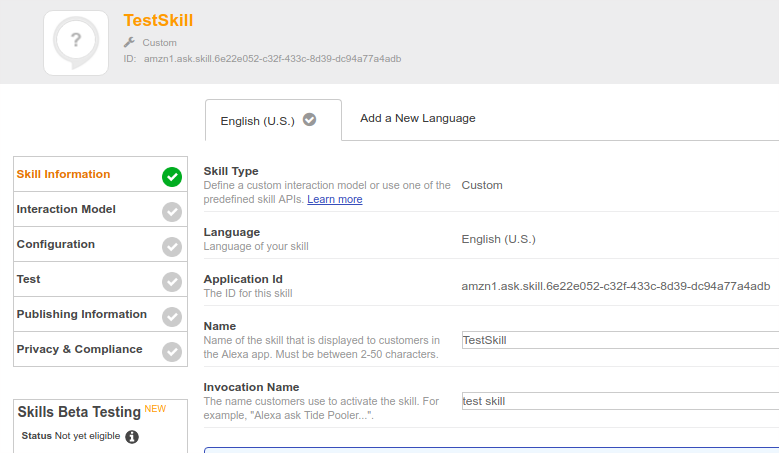
1.4 Interaction Model — defina intents, slots e utterances.
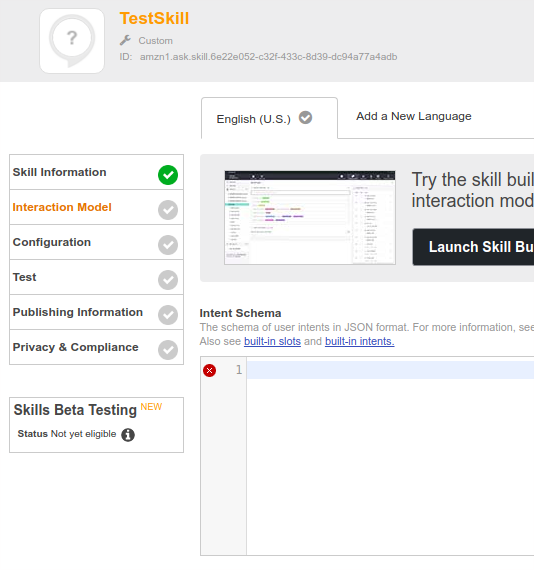
No Intent Schema, cole este JSON:
{
  "intents": [
    {
      "slots": [
        { "name": "light", "type": "States" },
        { "name": "which", "type": "HabRooms" }
      ],
      "intent": "LightIntent"
    },
    {
      "slots": [ { "name": "alarm", "type": "States" } ],
      "intent": "AlarmIntent"
    },
    { "intent": "TakePhotoIntent" },
    { "intent": "GetTemperatureIntent" },
    { "intent": "GetHumidityIntent" },
    { "intent": "AboutIntent" },
    { "intent": "AMAZON.HelpIntent" },
    { "intent": "AMAZON.CancelIntent" },
    { "intent": "AMAZON.StopIntent" }
  ]
}
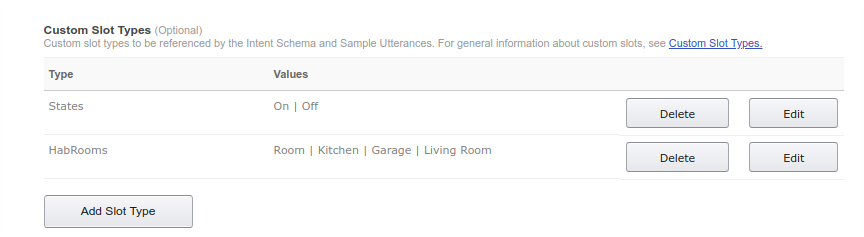
Defina slots personalizados States e HabRooms em Custom Slot Types.
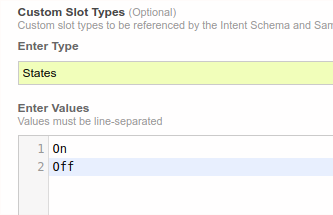
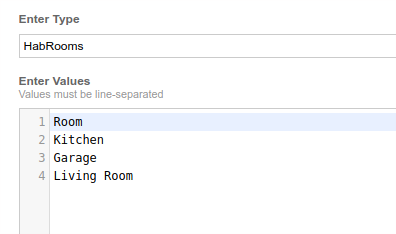
Em Sample Utterances, cole:
LightIntent Turn {which} light {light}
LightIntent Set {which} light {light}
AlarmIntent Turn alarm {alarm}
TakePhotoIntent Take a Photo
TakePhotoIntent Take Security Photo
GetTemperatureIntent Read Temperature
GetHumidityIntent Read Humidity
AboutIntent Tell me about
AboutIntent About
Antes de continuar em Configuration, precisamos criar a Lambda Function para vincular ambas.
2. Crie uma Lambda Function
Registre-se no AWS Console.
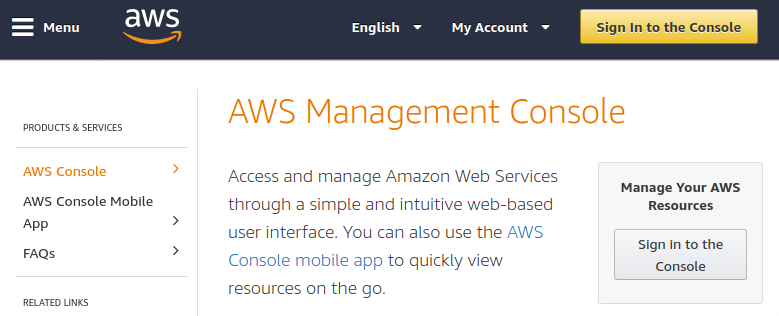
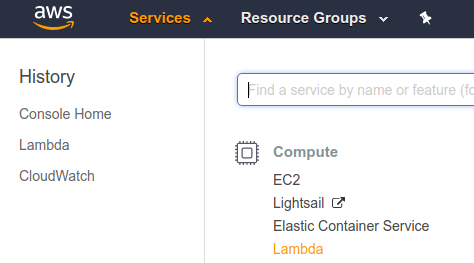
- Services → Lambda (menu lateral)
- Functions → "Create function"
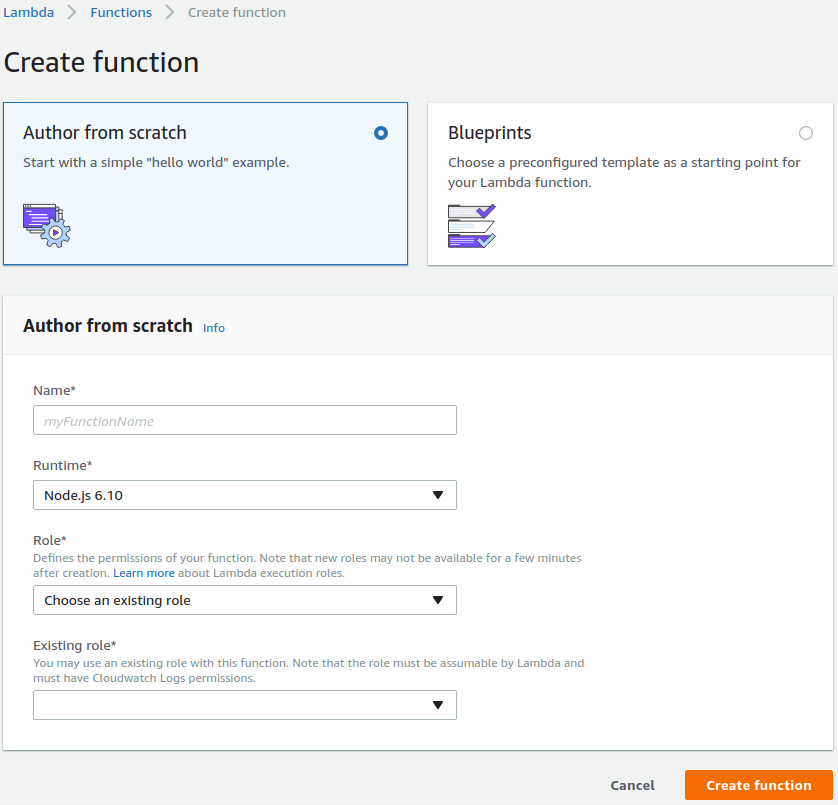
2.3 Configure:
- Author from Scratch
- Name: TestSkillLambda
- Runtime: Node.js 6.10
- Role: Create Custom Role → nova janela:
- IAM Role: Lambda_Basic_Execution
- PolicyName: "Create New Role Policy" → edite e cole:
{
  "Version": "2012-10-17",
  "Statement": [
    {
      "Effect": "Allow",
      "Action": [
        "logs:CreateLogGroup",
        "logs:CreateLogStream",
        "logs:PutLogEvents"
      ],
      "Resource": "arn:aws:logs:*:*:*"
    },
    {
      "Effect": "Allow",
      "Action": [ "iot:UpdateThingShadow" ],
      "Resource": "*"
    }
  ]
}
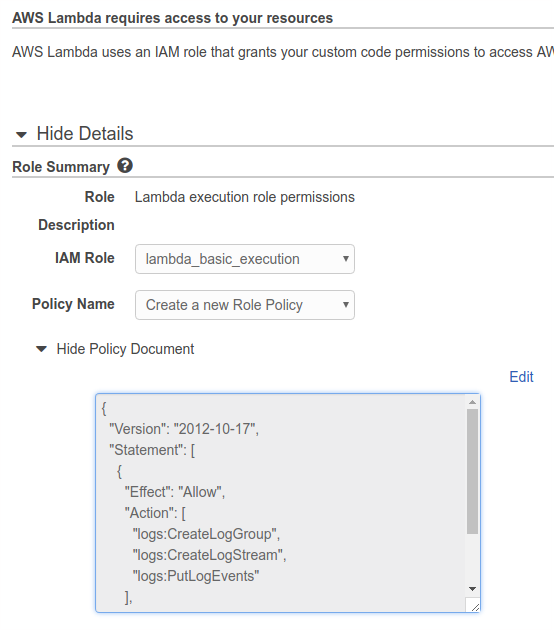
Salve → volte à página Create Function → selecione lambda_basic_execution em Existing role.
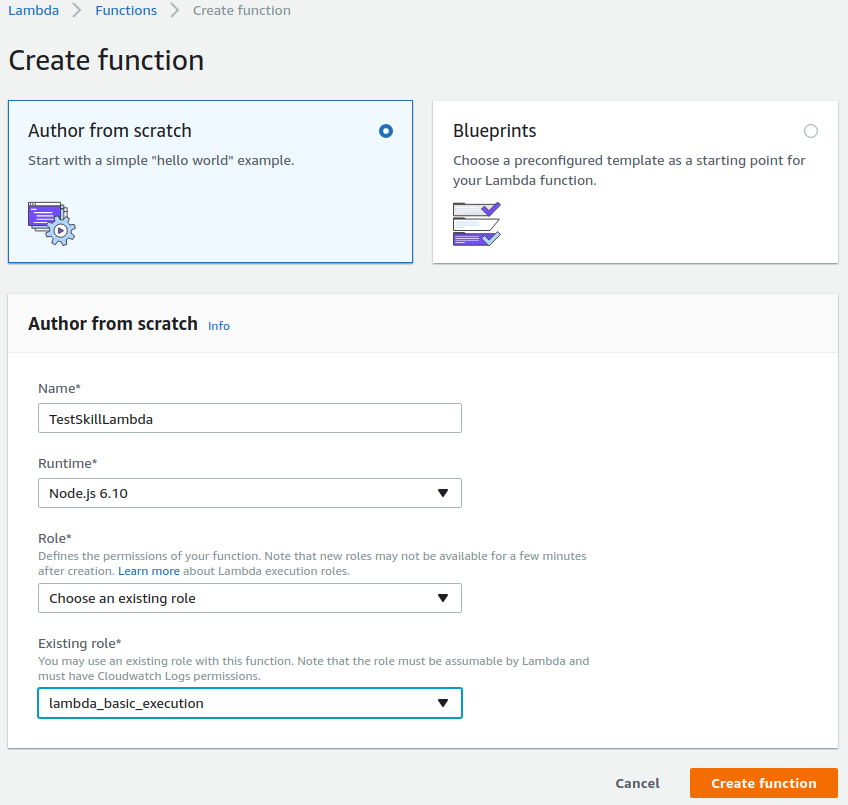
2.4 Função TestSkillLambda criada — página designer.
2.5 Menu lateral → Alexa Skills Kit → adicione em add triggers.
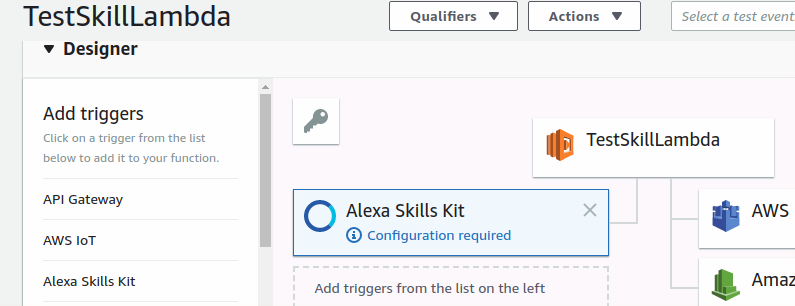
Clique na caixa Alexa Skills Kit → Configure triggers → Enable → Skill ID: cole o Application ID da seção 1.3. Isso vincula Lambda à skill.
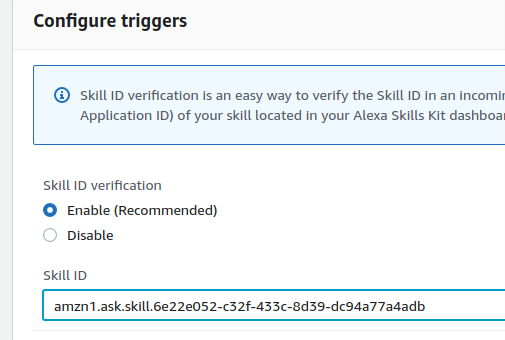
Save → Alexa Skills Kit salvo e função vinculada.

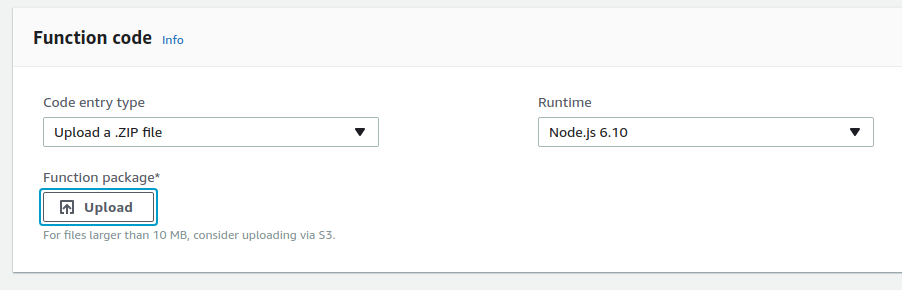
2.6 Role para Function code:
- Code entry type: Upload a .zip file
- Runtime: Node.js 6.10
- Upload
data.zip
Editor abre — selecione index.js (implementação da Lambda).
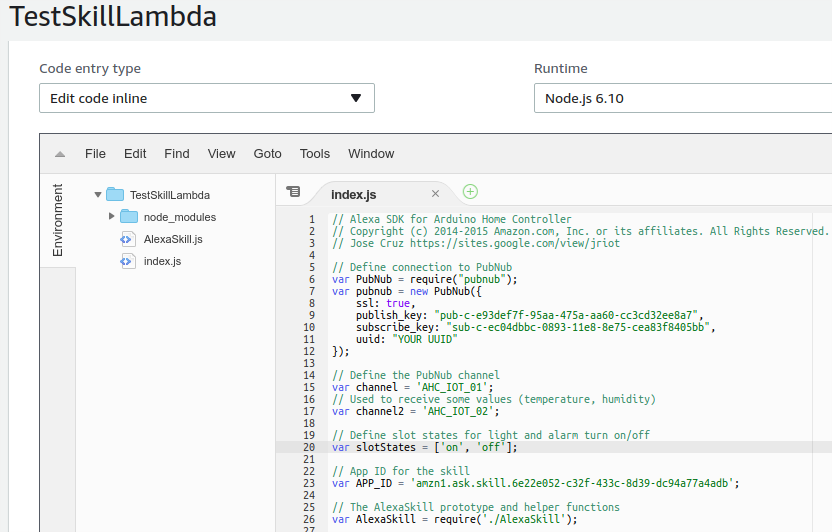
Altere linha 23: cole o mesmo Application ID da seção 1.3.
var APP_ID = 'amzn1.ask.skill.6e22e052-c32f-433c-8d39-dc94a77a4adb';
Save → Lambda ativada. No topo, acima do Save, está o ARN (Amazon Resource Name) — ID da função Lambda para usar em Configuration na skill.

3. Volte à Definição da Skill
3.1 Seção Configuration → EndPoint → AWS Lambda ARN → cole ARN no campo Default. Última ação para vincular skill e Lambda.
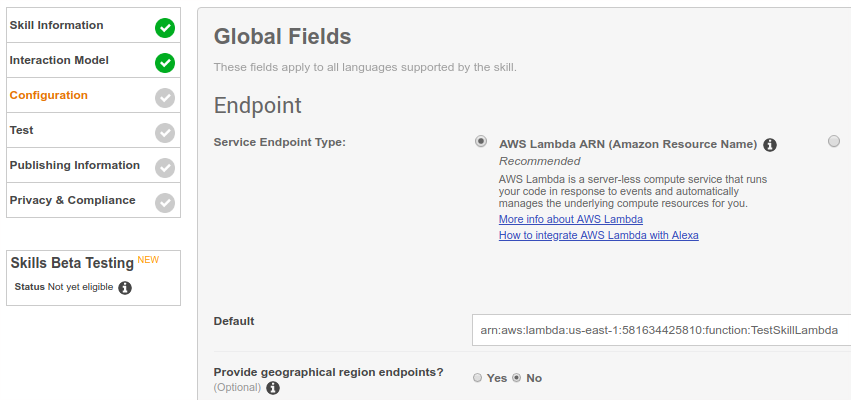
3.2 Role para Account Linking → copie os dois primeiros Redirect URLs para configurar security profile.

4. Crie Security Profile
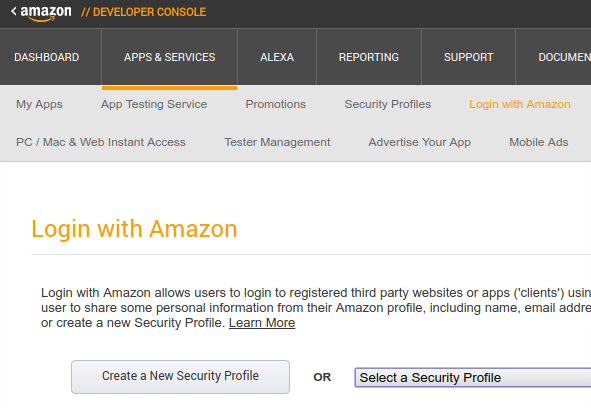
Mesmo console developer → Apps & Services → Login with Amazon → "Create a New Security Profile".
4.1 Página Security Profile Management — perfil com OAuth 2.0 para vincular skill à conta Amazon.
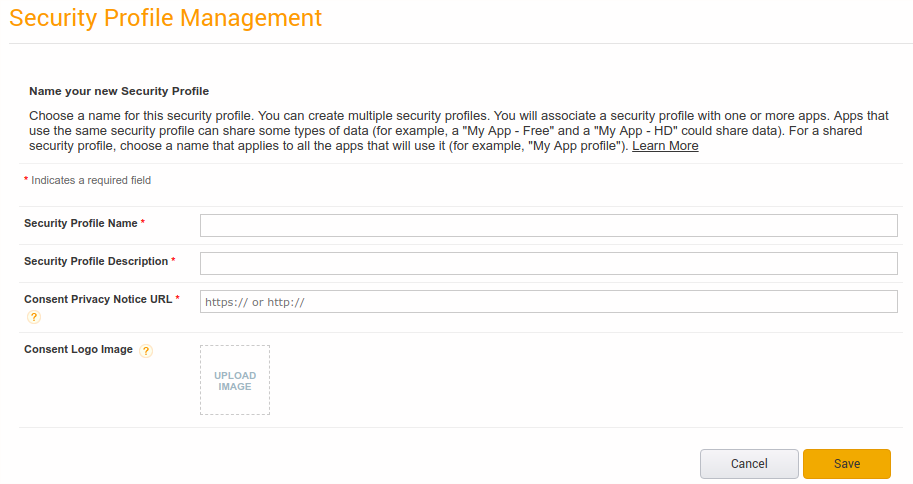
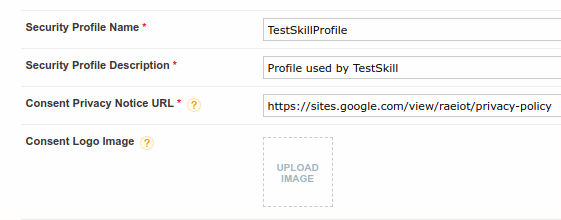
4.2 Preencha:
- Security Profile Name: TestSkillProfile
- Description: Profile used by TestSkill
- Consent Privacy Notice URL:
https://www.amazon.com/gp/help/customer/display.html?nodeId=201809740(use o seu) - Save
4.3 Ao salvar, aparecem Client ID e Client Secret — necessários para finalizar configuração da skill.
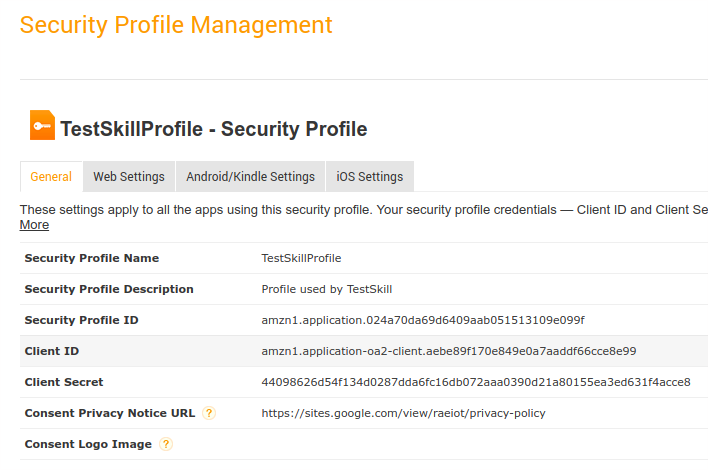
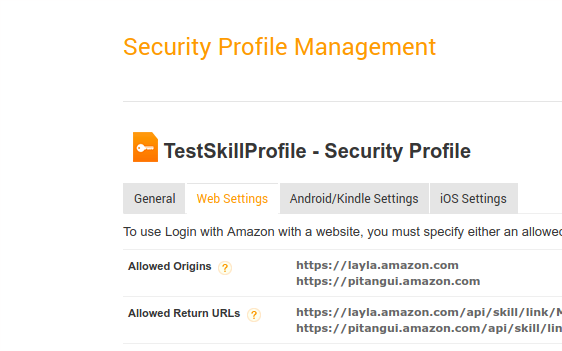
4.4 Aba Web Settings — whitelist URLs:
- Allowed Origins:
https://layla.amazon.comehttps://pitangui.amazon.com - Allowed Return URLs: adicione as duas URLs da seção 3.2
5. Finalize Criação da Skill
5.1 Volte à skill → Configuration → Account Linking:
- Allow users to create account: Yes
- Authorization URL:
https://www.amazon.com/ap/oa/?redirect_url=UUUUUU— substitua "UUUUUU" por um dos Redirect URLs da seção 3.2. Ficará:https://www.amazon.com/ap/oa/?redirect_url=https://layla.amazon.com/api/skill/link/UUUUUU - Client Id: da seção 4.3
- Scope: profile
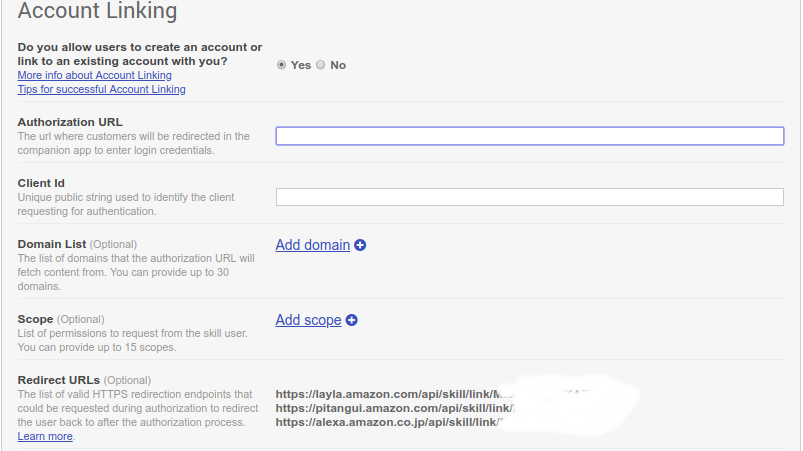
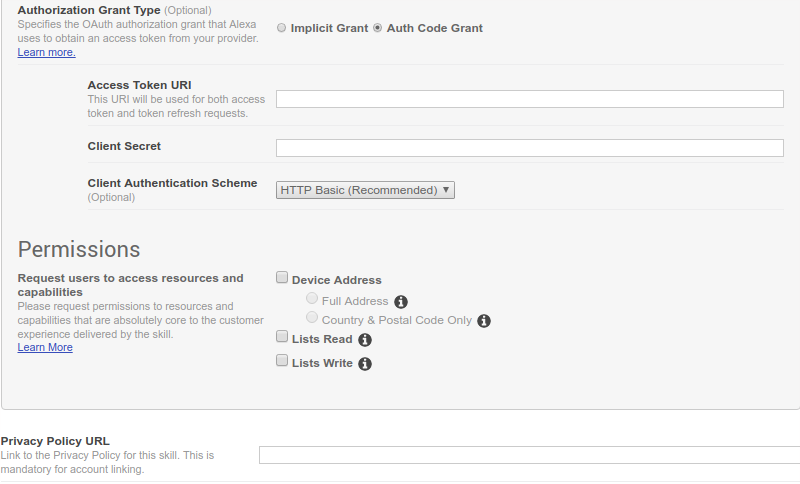
5.2 Continue Account Linking:
- Authorization Grant Type: Auth Code Grant
- Access Token URI:
https://api.amazon.com/auth/o2/token - Client Secret: da seção 4.3
- Privacy Policy URL: seu URL
- Save e Next
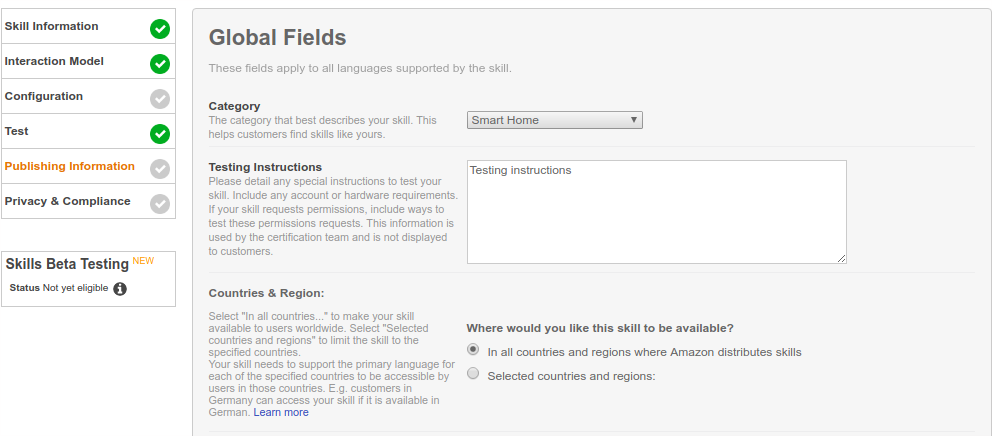
5.3 Global Fields — documentação da skill:
- Categoria: Smart Home
- Testing instructions
- Disponível em todos países
- Short/Full description
- Example phrases
- Keywords
- Ícones PNG/JPG 108x108 e 512x512
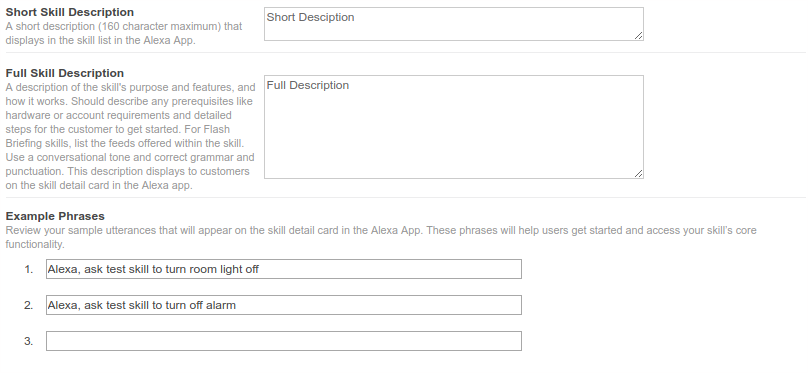
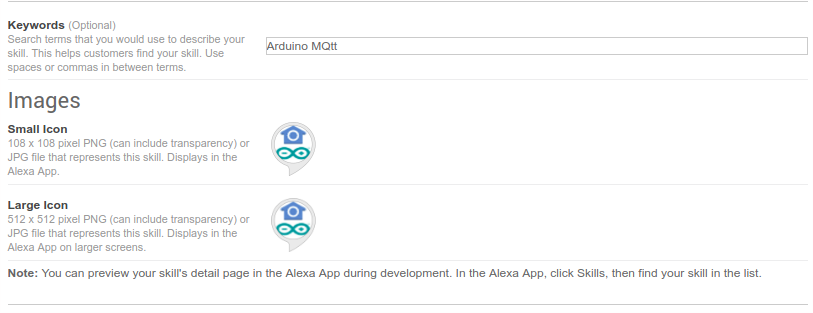
5.4 Privacy & Compliance
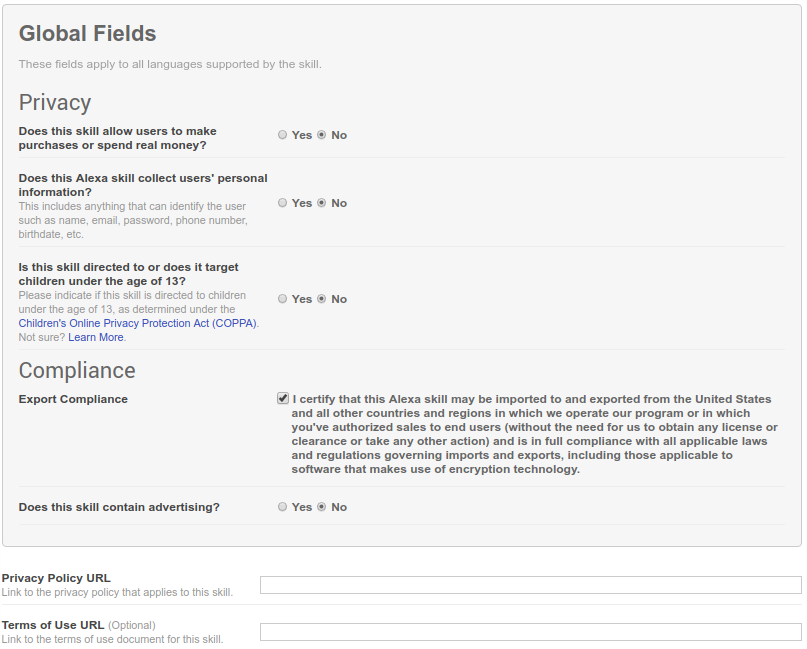
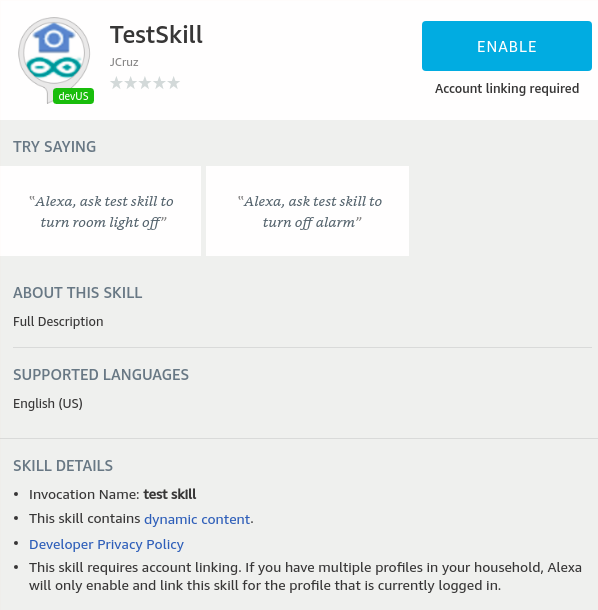
6. Instale TestSkill no App Alexa
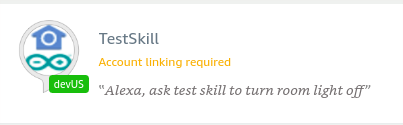
- Vá a alexa.amazon.com → Skills → "Your skills" → filtro "Dev Skills" → veja card TestSkill (account linking required).
- Clique no card → "Enable".
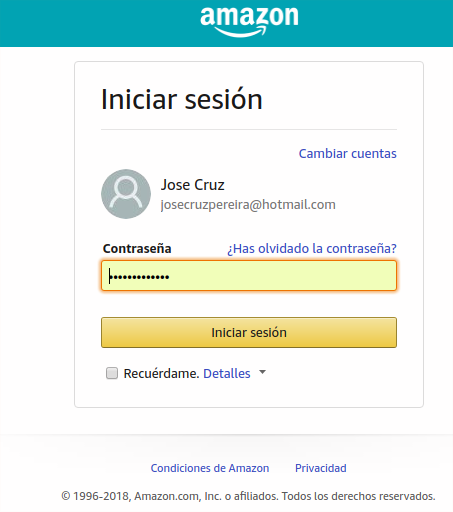
- Redireciona para login Amazon → vincule conta.
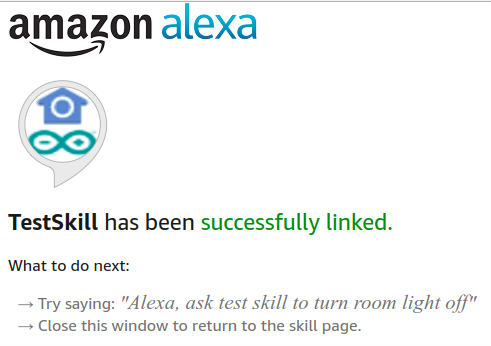
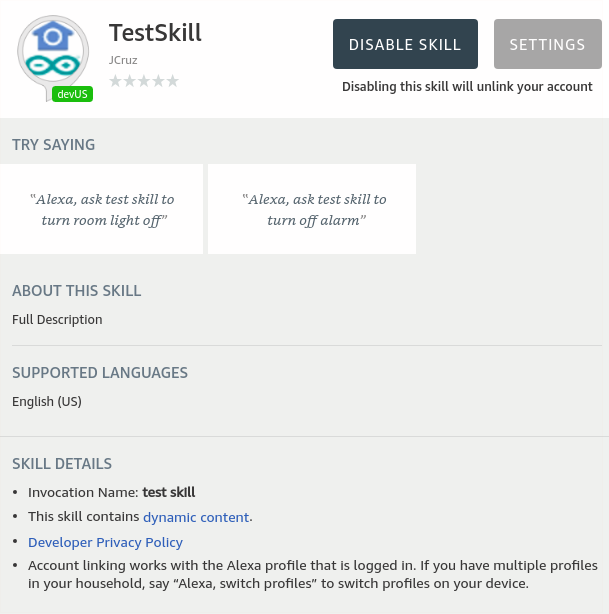
- Se válido, página confirma skill vinculada.
- Skill pronta, instalada, vinculada à conta e conectada à Lambda.
Configure Arduino Yun
Se primeira vez com Arduino Yun, prepare antes do upload. Sugiro guia do Greg Baugues "Getting started with the Arduino Yun". Obrigado ao @BenEagen do Hackster.
Para foto e email, instale software adicional. Teste a webcam USB. Conecte webcam na porta USB do Yun.
Terminal no Yun:
ssh root@seuYunName.local
Senha padrão: arduino. Prompt OpenWRT aparece.
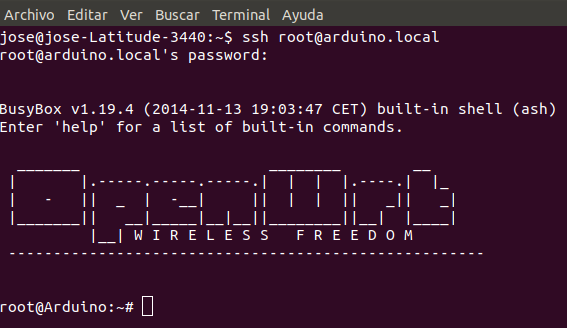
Instale software de imagem:
opkg update
opkg install kmod-video-uvc
opkg install python-openssl
opkg install fswebcam
Verifique SD card montado:
mount
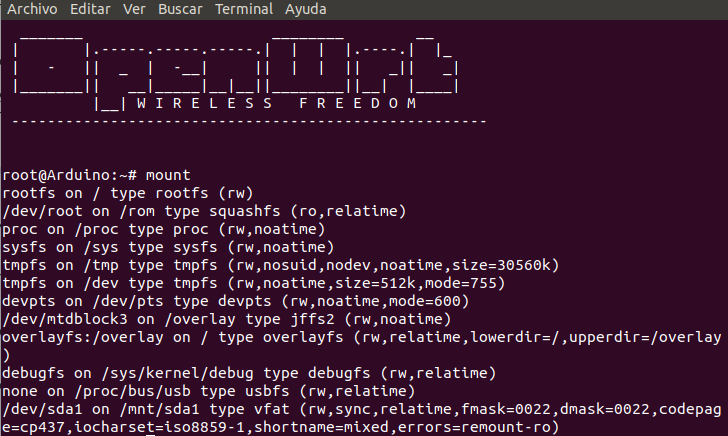
Se vir /dev/sda1 on /mnt/sda1 type vfat, SD OK.
Teste câmera:
cd /mnt/sda1
fswebcam test.png
Deve ver --- Opening /dev/video0... Trying source module v4l2... /dev/video0 opened.
Retire SD, leia no computador — deve haver test.png na raiz. Abra para confirmar.
Instale software de email:
No computador, copie AHC_SendEmail.py para o SD, altere email/senha Gmail (linhas 11,12,13) e servidor se outro provedor (linha 36).


Recoloque SD no Yun. No terminal:
cd /mnt/sda1
python /mnt/sda1/AHC_SendEmail.py /mnt/sda1/ test.png
Se OK, receberá email com a foto.
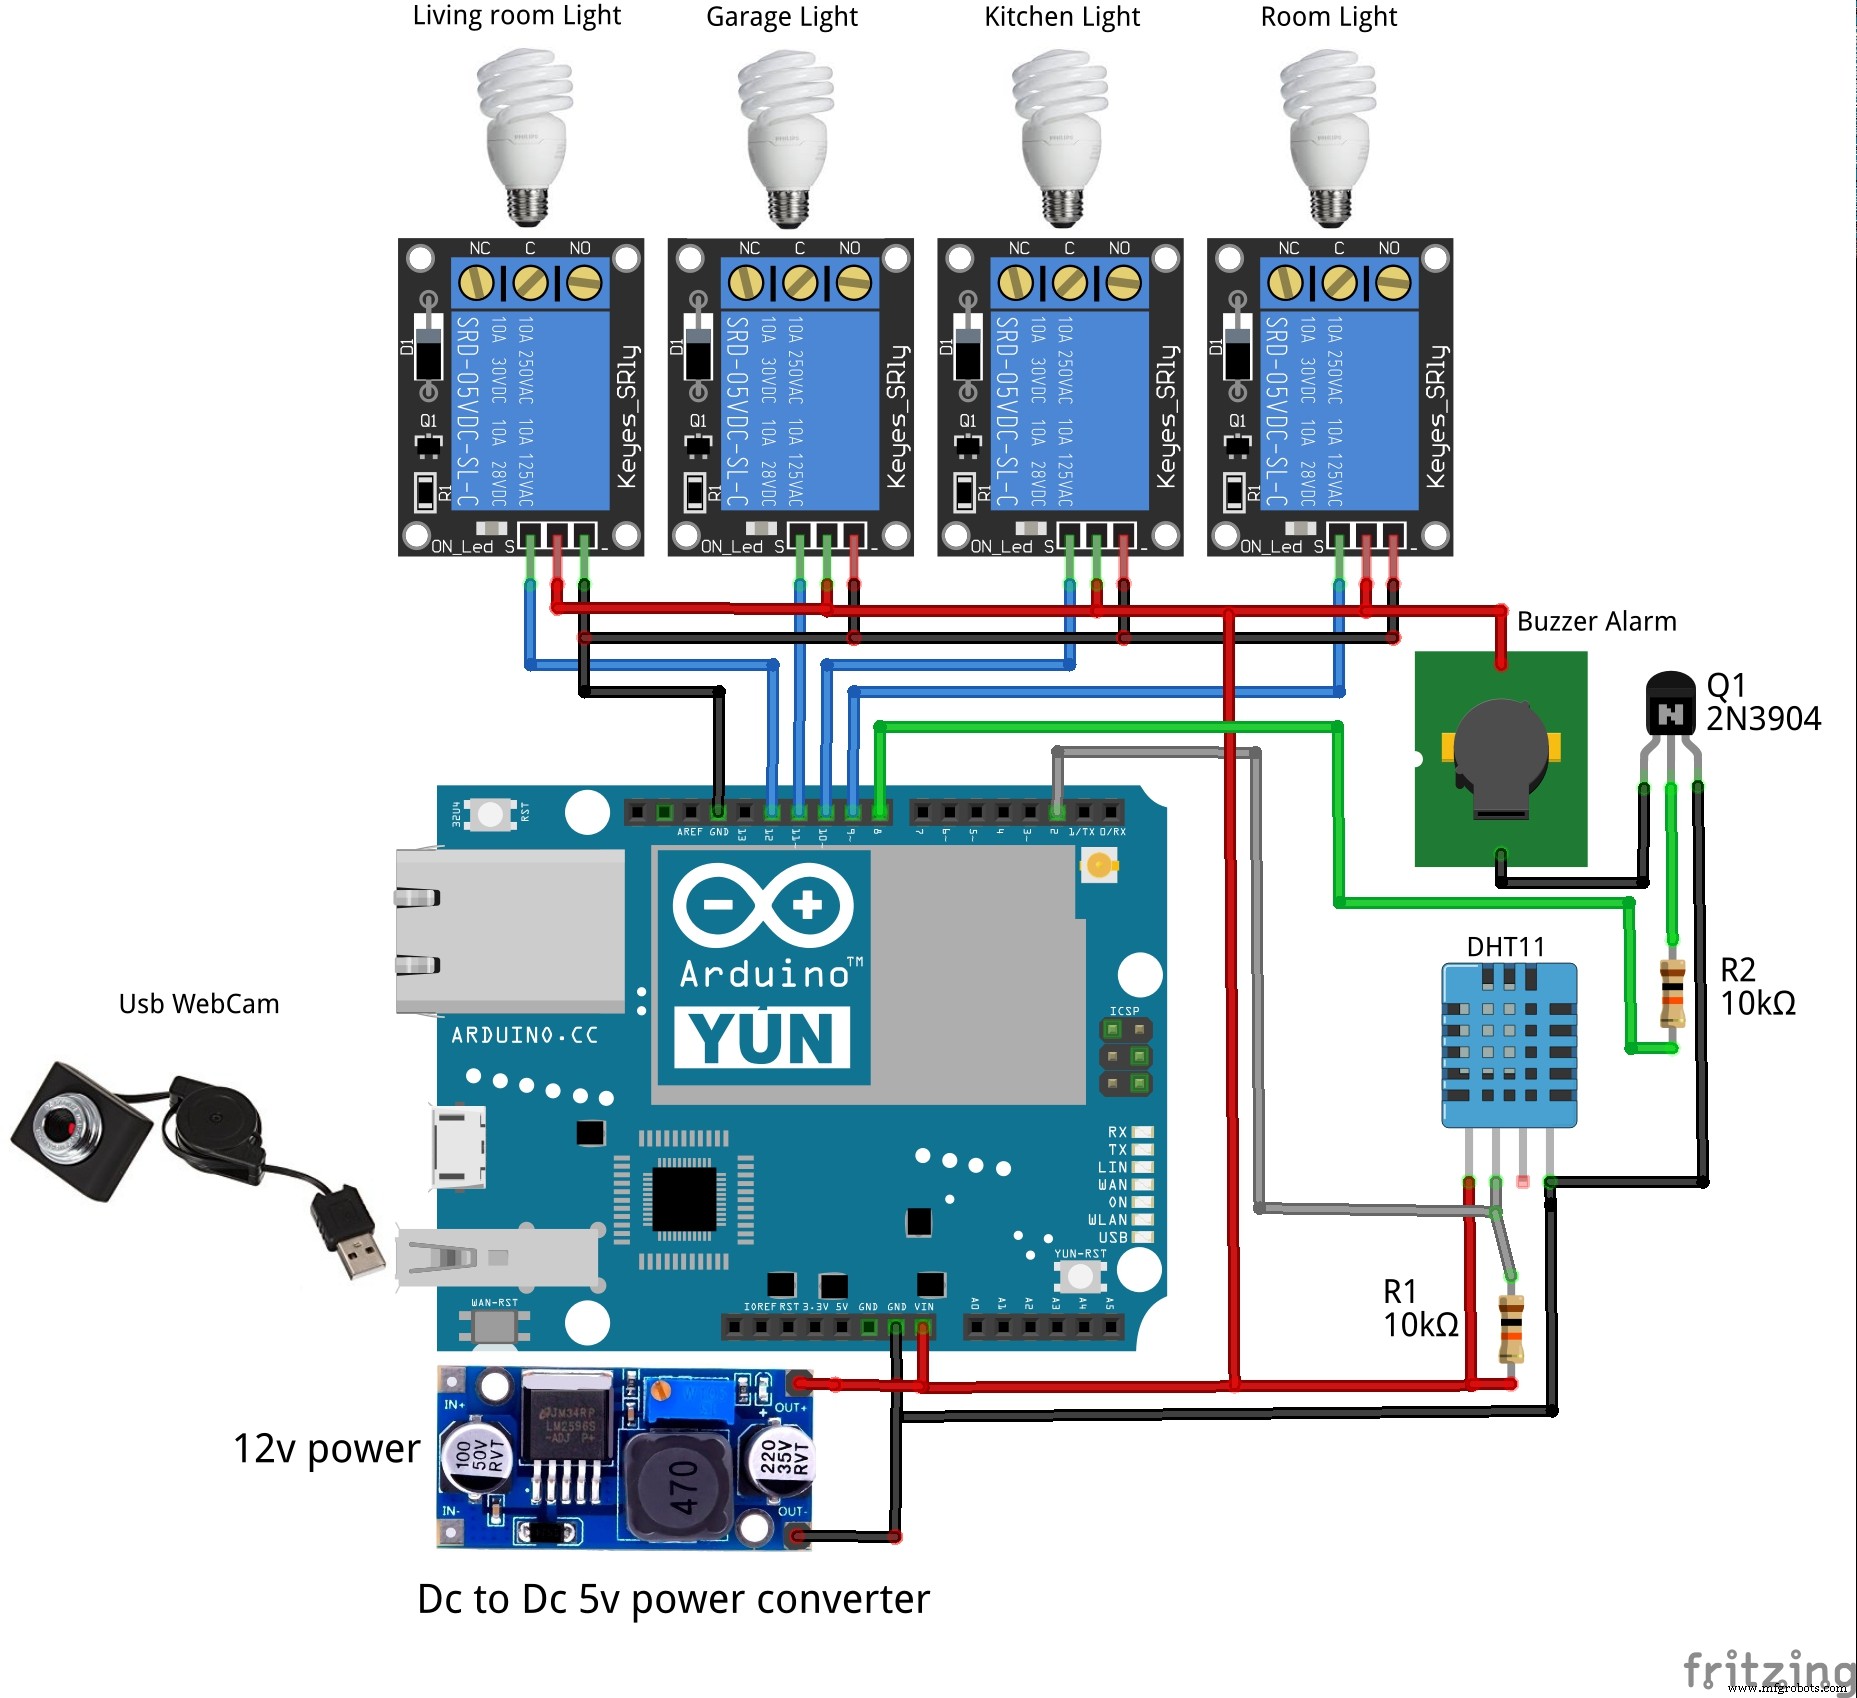
Conecte todos dispositivos ao Arduino Yun
Baseado no esquemático, conecte todos, especialmente DHT11 (temperatura/umidade) e buzzer (alarme).
Instale o sketch ArduinoHomeMQTT.ino
Criei libraries.zip com todas bibliotecas necessárias — baixe do meu GitHub e descompacte no diretório libraries da Arduino IDE.
Bibliotecas no libraries.zip dentro de ArduinoHomeMQTT:
ArduinoJson— manipula JSONDHT_sensor_library— sensor DHTpubsubclient-master— conecta, publica e subscreve no PubNub
Arduino IDE 1.6.x → Tools → Board: "Arduino Yun".
Carregue ArduinoHomeMQTT.ino → modifique linha 16 com seu email Amazon (usado ao vincular conta no app Alexa skill).

Altere linha 50 com seu UUID para identificar controlador no PubNub — gere em uuidgenerator.net.

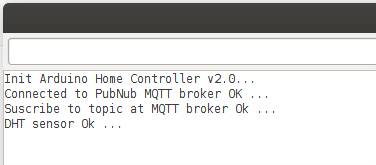
Salve e faça upload. No Monitor Serial, verá Yun conectado ao broker PubNub e sensor inicializado.
Teste Todos Comandos no Alexa Echo Dot
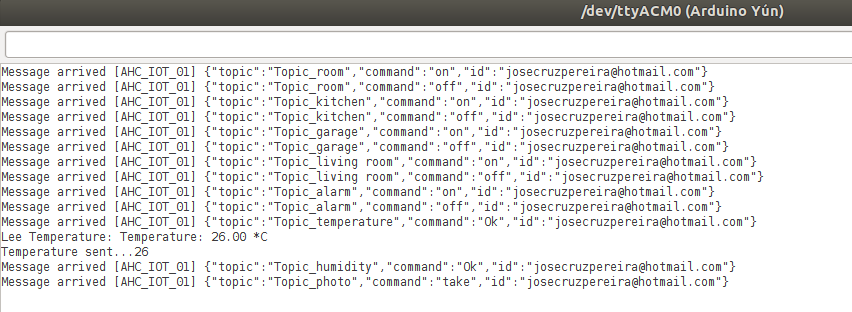
A skill "Arduino Home Controller" trata estes utterances (veja na descrição da skill no app Alexa). Teste todos e veja mensagens no Monitor Serial.
Controle de Luzes:
"Alexa, ask arduino home to turn room light on"
"Alexa, ask arduino home to turn room light off"
"Alexa, ask arduino home to turn kitchen light on"
"Alexa, ask arduino home to turn kitchen light off"
"Alexa, ask arduino home to turn garage light on"
"Alexa, ask arduino home to turn garage light off"
"Alexa, ask arduino home to turn living room light on"
"Alexa, ask arduino home to turn living room light off"
Controle de Alarme:
"Alexa, ask arduino home to turn alarm on"
"Alexa, ask arduino home to turn alarm off"
Temperatura e Umidade:
"Alexa, ask arduino home to read temperature"
"Alexa, ask arduino home to read humidity"
Foto de Segurança:
"Alexa, ask arduino home to take a photo"
Sobre e Ajuda:
"Alexa, ask arduino home about"
"Alexa, ask arduino home help"
Detalhes de Software
Baixe todos arquivos do meu GitHub.
Pastas:
- ArduinoHomeMQTT → ino e libraries para Arduino Yun
- lambda → função Lambda Node.js para AWS, inclui node_modules (opção 2)
- python → arquivo Python para envio de email com foto
- schematic → arquivo esquemático Fritzing
Fluxo de Trabalho do Arduino Home Controller
- Echo Dot envia comando voz → skill Arduino Home Controller
- Skill chama Lambda
index.js - Lambda (Node.js, node_modules, hospedada na AWS) interpreta intents → converte em mensagem MQTT JSON → envia ao broker PubNub. Formato:
{ "topic": "Topic_xxxx", "command": "on or off", "id": "email address" }
Topics Topic_xxxx:
Topic_room       -> liga/desliga luz quarto
Topic_livingroom -> liga/desliga luz sala
Topic_kitchen    -> liga/desliga luz cozinha
Topic_garage     -> liga/desliga luz garagem
Topic_alarm      -> liga/desliga alarme
Topic_temperature-> lê temperatura
Topic_humidity   -> lê umidade
Topic_photo      -> tira e envia foto por email
Command: on ou off.
Mensagem enviada via canal AHC_IOT_01. Canal AHC_IOT_02 recebe valores de temperatura/umidade.
- Sketch
ArduinoHomeMQTT.inoconecta ao broker, subscreve/publica nos canais, recebe/envia mensagens. - Via bridge, sketch comunica com Linux OpenWRT para conexão WAN/LAN e executa comandos.
- Se precisa enviar email, usa
AHC_SendEmail.py; se foto, chamafswebcamno Linux OpenWRT.
Detalhes de Hardware
Coração do hardware: Arduino Yun.
Pinos digitais usados:
Pino 2  : DHT11 sensor
Pino 8  : Buzzer alarme (com transistor NPN)
Pino 9  : Luz quarto
Pino 10 : Luz cozinha
Pino 11 : Luz garagem
Pino 12 : Luz sala
Webcam na porta USB.
Alimentação: 12V DC convertido a 5V via conversor DC-DC.
Fiz shield Arduino usando Proto Shield com conectores e eletrônica de interface para sensor, buzzer e fonte. Tem espaço para novos sensores.
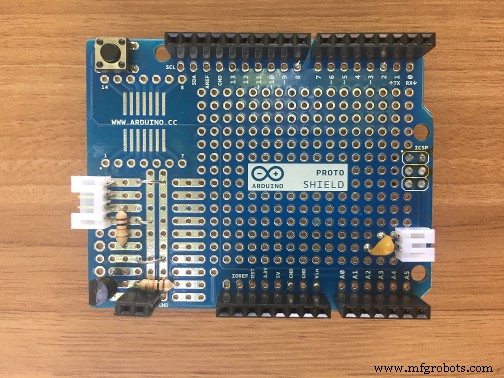
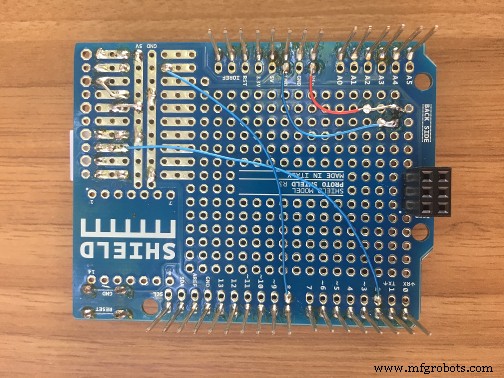
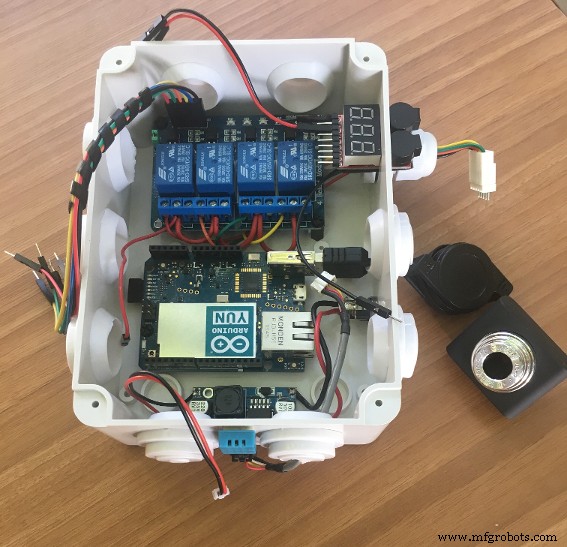
Coloque Yun, Proto shield, Relés e regulador em caixa plástica com alarme, webcam e sensor fora. Conexões conforme esquemático.
Para demo, usei quatro LEDs em protoboard simulando lâmpadas.

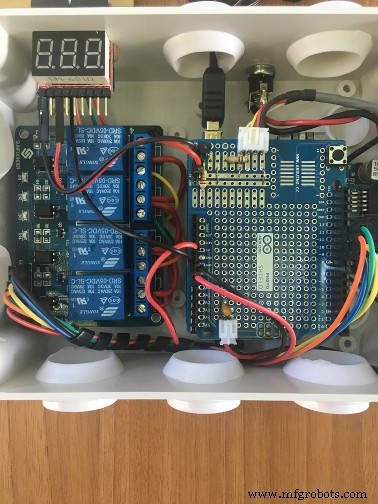
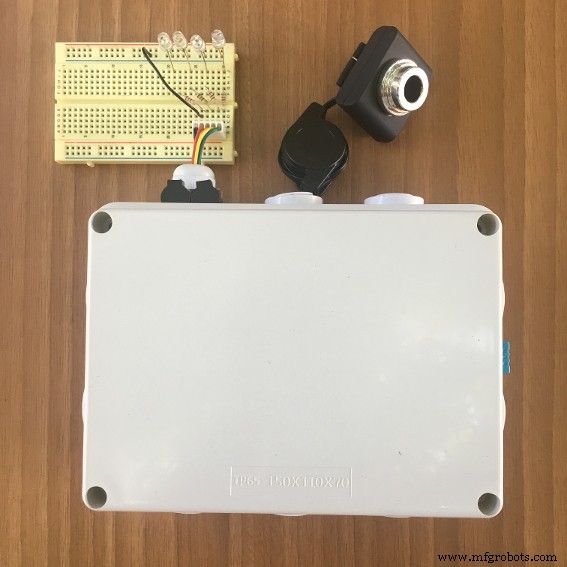
Obrigado por ler, aprecio seu tempo. Sugestões? Entre em contato.
Fiz este projeto em memória do meu pai, que faleceu no ano passado. Descanse em paz, pai.
Código
ArduinoHomeMQTT.ino Arduino
Software Arduino Yun para Home Controller
// ArduinoHomeMQTT v2.1
// Copyright (C)2018 Jose Cruz. All right reserved
// web: https://sites.google.com/view/raeiot/home
#include
#include
#include
#include
#include

// Seu email Amazon vinculado na skill Alexa
#define MyID "YOUR AMAZON EMAIL LINKED IN ALEXA APP"
// Pino de dados DHT11
#define DHTPIN 2
// Tipo DHT 11
#define DHTTYPE DHT11
DHT dht(DHTPIN, DHTTYPE);

// Pino controle alarme
#define alarm 8
// Pinos controle luzes
#define room_light 9
#define kitchen_light 10
#define garage_light 11
#define livingroom_light 12

// PubNub MQTT Server
int mqtt_server_port = 1883;
const char* mqtt_server = "mqtt.pndsn.com";
// Tópico subscribe
const char* topic = "AHC_IOT_01";
// Tópico publish
const char* topic2 = "AHC_IOT_02";

// PubNub IDs
const char* clientId = "pub-c-e93def7f-95aa-475a-aa60-cc3cd32ee8a7/sub-c-ec04dbbc-0893-11e8-8e75-cea83f8405bb/YOUR UUID GENERATED";

YunClient ethClient;
PubSubClient client(ethClient);
Process picture;
String filename;
String path = "/mnt/sda1/";

void TakePhoto() {
  filename = "";
  picture.runShellCommand("date +%s");
  while (picture.running());
  while (picture.available() > 0) {
    char c = picture.read();
    filename += c;
  }
  filename.trim();
  filename += ".jpg";
  picture.runShellCommand("/usr/bin/fswebcam -i 0 --jpeg 95 --no-banner --fps 1 -S 1 -r 352x288 --save " + path + filename);
  while (picture.running());
  picture.runShellCommand("python /mnt/sda1/AHC_SendEmail.py " + path + " " + filename);
  while (picture.running());
}

void SendTemperature() {
  char cstr[16];
  float t = dht.readTemperature();
  client.publish(topic2, itoa(t, cstr, 10));
}

void SendHumidity() {
  char cstr[16];
  float h = dht.readHumidity();
  client.publish(topic2, itoa(h, cstr, 10));
}

void callback(char* topic, byte* payload, unsigned int length) {
  Serial.print("Message arrived [");
  Serial.print(topic);
  Serial.print("] ");
  for (int i = 0; i < length; i++) {
    Serial.print((char)payload[i]);
  }
  Serial.println();
  StaticJsonBuffer<200> jsonBuffer;
  JsonObject& root = jsonBuffer.parseObject((char[])payload);
  String alexa_topic = root["topic"];
  String alexa_command = root["command"];
  String alexa_id = root["id"];
  if (alexa_id.equals(MyID)) {
    if (alexa_topic.endsWith("Topic_room")) {
      digitalWrite(room_light, (alexa_command.endsWith("on") ? LOW : HIGH));
    } else if (alexa_topic.endsWith("Topic_kitchen")) {
      digitalWrite(kitchen_light, (alexa_command.endsWith("on") ? LOW : HIGH));
    } else if (alexa_topic.endsWith("Topic_garage")) {
      digitalWrite(garage_light, (alexa_command.endsWith("on") ? LOW : HIGH));
    } else if (alexa_topic.endsWith("Topic_living room")) {
      digitalWrite(livingroom_light, (alexa_command.endsWith("on") ? LOW : HIGH));
    } else if (alexa_topic.endsWith("Topic_temperature")) {
      SendTemperature();
    } else if (alexa_topic.endsWith("Topic_humidity")) {
      SendHumidity();
    } else if (alexa_topic.endsWith("Topic_alarm")) {
      digitalWrite(alarm, (alexa_command.endsWith("on") ? HIGH : LOW));
    } else if (alexa_topic.endsWith("Topic_photo")) {
      TakePhoto();
    }
  }
}

void reconnect() {
  while (!client.connected()) {
    Serial.print("Attempting MQTT connection...");
    if (client.connect(clientId)) {
      Serial.println("MQTT broker connected");
      client.subscribe(topic);
    } else {
      Serial.print("Failed, rc = ");
      Serial.print(client.state());
      Serial.println(" try again in 5 seconds");
      delay(5000);
    }
  }
}

void setup() {
  Bridge.begin();
  delay(2000);
  Serial.begin(115200);
  Serial.println("Init Arduino Home Controller v2.1...");
  pinMode(alarm, OUTPUT);
  pinMode(room_light, OUTPUT);
  pinMode(kitchen_light, OUTPUT);
  pinMode(garage_light, OUTPUT);
  pinMode(livingroom_light, OUTPUT);
  digitalWrite(room_light, HIGH);
  digitalWrite(kitchen_light, HIGH);
  digitalWrite(garage_light, HIGH);
  digitalWrite(livingroom_light, HIGH);
  client.setServer(mqtt_server, mqtt_server_port);
  client.setCallback(callback);
  client.connect(clientId);
  Serial.println("Connected to PubNub MQTT broker OK ...");
  client.subscribe(topic);
  Serial.println("Suscribe to topic at MQTT broker Ok ...");
  dht.begin();
  delay(4000);
  Serial.println("DHT sensor Ok ...");
}

void loop() {
  if (!client.connected()) {
    reconnect();
  }
  client.loop();
}
AHC_SendEmail.py Python
Arquivo para instalar no Linux OpenWRT do Arduino Yun para enviar email com foto anexa
import smtplib
import sys
import time
from email.MIMEMultipart import MIMEMultipart
from email.MIMEText import MIMEText
from email.MIMEBase import MIMEBase
from email import encoders

fromaddr = "joseacruzp@gmail.com"
toaddr = "joseacruzp@gmail.com"
emailpassword = "YOUR PASSWORD"
subject = "Arduino Home Controller by Alexa Skill"
body = "Photo taken in " + time.strftime('%a, %d %b %Y %H:%M:%S %Z(%z)')
filedir = sys.argv[1]
filename = sys.argv[2]

msg = MIMEMultipart()
msg['From'] = fromaddr
msg['To'] = toaddr
msg['Subject'] = subject
msg.attach(MIMEText(body, 'plain'))

attachment = open(filedir + filename, "rb")
part = MIMEBase('application', 'octet-stream')
part.set_payload((attachment).read())
encoders.encode_base64(part)
part.add_header('Content-Disposition', "attachment; filename= %s" % filename)
msg.attach(part)

server = smtplib.SMTP('smtp.gmail.com', 587)
server.starttls()
server.login(fromaddr, emailpassword)
text = msg.as_string()
server.sendmail(fromaddr, toaddr, text)
server.quit()
index.js JavaScript
AWS Lambda Function se você escolher opção 2, criar sua própria skill
// Alexa SDK for Arduino Home Controller
// Copyright (c) 2014-2015 Amazon.com, Inc. or its affiliates. All Rights Reserved.
// Jose Cruz https://sites.google.com/view/jriot

var PubNub = require("pubnub");
var pubnub = new PubNub({
  ssl: true,
  publish_key: "pub-c-e93def7f-95aa-475a-aa60-cc3cd32ee8a7",
  subscribe_key: "sub-c-ec04dbbc-0893-11e8-8e75-cea83f8405bb",
  uuid: "YOUR UUID"
});

var channel = 'AHC_IOT_01';
var channel2 = 'AHC_IOT_02';
var slotStates = ['on', 'off'];
var APP_ID = 'YOUR APP ID FOR THE SKILL';

var AlexaSkill = require('./AlexaSkill');
var ArduinoHomeSkill = function() {
  AlexaSkill.call(this, APP_ID);
};

var mqttListener;
var access_token;
var url;
var https = require("https");

function SendMessage(topicname, commandvalue, speechOutput, iresponse) {
  https.get(url, res => {
    res.setEncoding("utf8");
    let body = "";
    res.on("data", data => { body += data; });
    res.on("end", () => {
      pubnub.publish({
        channel: channel,
        message: {
          "topic": topicname,
          "command": commandvalue,
          "id": JSON.parse(body).email
        }
      }).then((response) => {
        console.log("message Published w/ timetoken", response.timetoken);
        if (speechOutput) iresponse.tell(speechOutput);
      }).catch((error) => {
        console.log("publishing failed w/ status: ", error);
        iresponse.ask("Sorry, I didn't catch what you said");
      });
    });
  });
}

ArduinoHomeSkill.prototype = Object.create(AlexaSkill.prototype);
ArduinoHomeSkill.prototype.constructor = ArduinoHomeSkill;

ArduinoHomeSkill.prototype.eventHandlers.onSessionStarted = function(sessionStartedRequest, session) {
  console.log("ArduinoHomeSkill onSessionStarted requestId: " + sessionStartedRequest.requestId + ", sessionId: " + session.sessionId);
  pubnub.removeListener(mqttListener);
  pubnub.unsubscribeAll();
};

ArduinoHomeSkill.prototype.eventHandlers.onLaunch = function(launchRequest, session, response) {
  console.log("ArduinoHomeSkill onLaunch requestId: " + launchRequest.requestId + ", sessionId: " + session.sessionId);
  if (session.user.accessToken == undefined) {
    response.tellWithCardLink('To start using this skill, please use the companion app to authenticate on Amazon.');
    return;
  }
  var speechOutput = "Welcome to Arduino Home Controller. What would you like to do?";
  var repromptText = "I am ready";
  response.ask(speechOutput, repromptText);
};

ArduinoHomeSkill.prototype.eventHandlers.onSessionEnded = function(sessionEndedRequest, session) {
  console.log("ArduinoHomeSkill onSessionEnded requestId: " + sessionEndedRequest.requestId + ", sessionId: " + session.sessionId);
  console.log("End...");
};

ArduinoHomeSkill.prototype.intentHandlers = {
  "AboutIntent": function(intent, session, response) {
    var myText = "Arduino Home Controller skill let you control internet connected devices. It controls Lights at room, kitchen, garage or living room), read a temperature sensor to scan home temperature, read Humidity sensor to scan home humidity, uses webcam to take a home security photo and sent it by email and activate an alarm to alert some events. It uses PubNub site to manipulate all messages send by Alexa with Lambda function. Please check information at skill page for more details. What would you like to do?";
    response.ask(myText);
  },
  "LightIntent": function(intent, session, response) {
    var slotHabRooms = ['room', 'kitchen', 'garage', 'living room'];
    var lightSlot = intent.slots.light;
    var lightSlotValue = lightSlot ? lightSlot.value : "";
    var whichSlot = intent.slots.which;
    var whichSlotValue = whichSlot ? whichSlot.value : "";
    if (lightSlotValue && whichSlotValue && slotStates.indexOf(lightSlotValue.toLowerCase()) > -1 && slotHabRooms.indexOf(whichSlotValue.toLowerCase()) > -1) {
      SendMessage('Topic_' + whichSlotValue, lightSlotValue, "The light is now " + lightSlotValue, response);
    } else {
      response.ask("Sorry, I didn't catch what you said");
    }
  },
  "AlarmIntent": function(intent, session, response) {
    var alarmSlot = intent.slots.alarm;
    var alarmSlotValue = alarmSlot ? alarmSlot.value : "";
    if (alarmSlotValue && slotStates.indexOf(alarmSlotValue.toLowerCase()) > -1) {
      SendMessage('Topic_alarm', alarmSlotValue, "The alarm is now " + alarmSlotValue, response);
    } else {
      response.ask("Sorry, I didn't catch what you said");
    }
  },
  "TakePhotoIntent": function(intent, session, response) {
    SendMessage('Topic_photo', 'take', "Taken home photo ", response);
  },
  "GetTemperatureIntent": function(intent, session, response) {
    mqttListener = {
      status: function(statusEvent) {},
      message: function(message) {
        console.log("Receive=", message);
        var myText = "Inside Temperature is " + message.message + " degrees C";
        response.tell(myText);
      },
      presence: function(presenceEvent) {}
    };
    pubnub.addListener(mqttListener);
    pubnub.subscribe({ channels: [channel2] });
    SendMessage('Topic_temperature', 'Ok', null, response)
  },
  "GetHumidityIntent": function(intent, session, response) {
    mqttListener = {
      status: function(statusEvent) {},
      message: function(message) {
        console.log("Receive=", message);
        var myText = "Inside Humidity is " + message.message + " %";
        response.tell(myText);
      },
      presence: function(presenceEvent) {}
    };
    pubnub.addListener(mqttListener);
    pubnub.subscribe({ channels: [channel2] });
    SendMessage('Topic_humidity', 'Ok', null, response)
  },
  "AMAZON.HelpIntent": function(intent, session, response) {
    response.ask("With Arduino Home Controller skill and Alexa you can control internet connected devices using an Arduino Yun or Arduino with Ethernet Shield. Please check information at skill page for more details. What would you like to do?");
  },
  "AMAZON.StopIntent": function(intent, session, response) {
    response.tell("Thanks for using Arduino Home Controller. Bye see you later");
  },
  "AMAZON.CancelIntent": function(intent, session, response) {
    response.tell("Thanks for using Arduino Home Controller. Bye see you later");
  },
  default: function(intent, session, response) {
    response.ask("Try again");
  },
};

exports.handler = function(event, context) {
  try {
    access_token = event['context']['System']['user']['accessToken'];
    url = 'https://api.amazon.com/user/profile?access_token=' + access_token;
  } catch (error) {
    console.log(error);
  }
  var ArduinoHomeControl = new ArduinoHomeSkill();
  ArduinoHomeControl.execute(event, context);
};
GitHub
https://github.com/jcruzp/ArduinoHomeController
Esquemáticos
Placa principal com relés, sensor temperatura/umidade, buzzer alarme e webcam.
Processo de manufatura
- Sistema de Iluminação DMX Controlado via Web – Controlador Mestre Arduino
- Dados Digital com Arduino: Gere Números Aleatórios 1-6 em LCD 16x2
- Controle USB para Jogos DIY com Arduino – Construa Seu Próprio Gamepad de Alto Desempenho
- Pixel Chaser: Jogo LED Interativo de Um Toque com Arduino Nano
- Sistema Inteligente de Rega de Plantas com Arduino Nano
- Levitação Magnética Repulsiva com Arduino: Circuito Simples e Guia DIY
- Kit Controlador de Display Fluorescente a Vácuo (VFD) Baseado em Arduino
- Robô Assistente Doméstico Autônomo: Lista Completa de Peças e Guia de Configuração
- Jogo Pong Neon em Matriz NeoPixel com Arduino Nano
- Controlador Testador Arduino DMX-512 – Kit Completo de Peças para Controle de Iluminação Confiável