



Construa um Jogo Interativo LCD com Arduino UNO
Componentes e Materiais
| Componente | Quantidade |
|---|---|
| Arduino UNO | 1 |
| LCD RGB Backlight Adafruit 16x2 | 1 |
| Protoboard (genérica) | 1 |
| Resistor 220 ohm | 1 |
| Chave Pushbutton 12mm SparkFun | 1 |
| Jumpers (genéricos) | 1 |
| Cabo USB-A para B | 1 |
Aplicativos e Serviços Online
- Arduino IDE
Sobre o Projeto
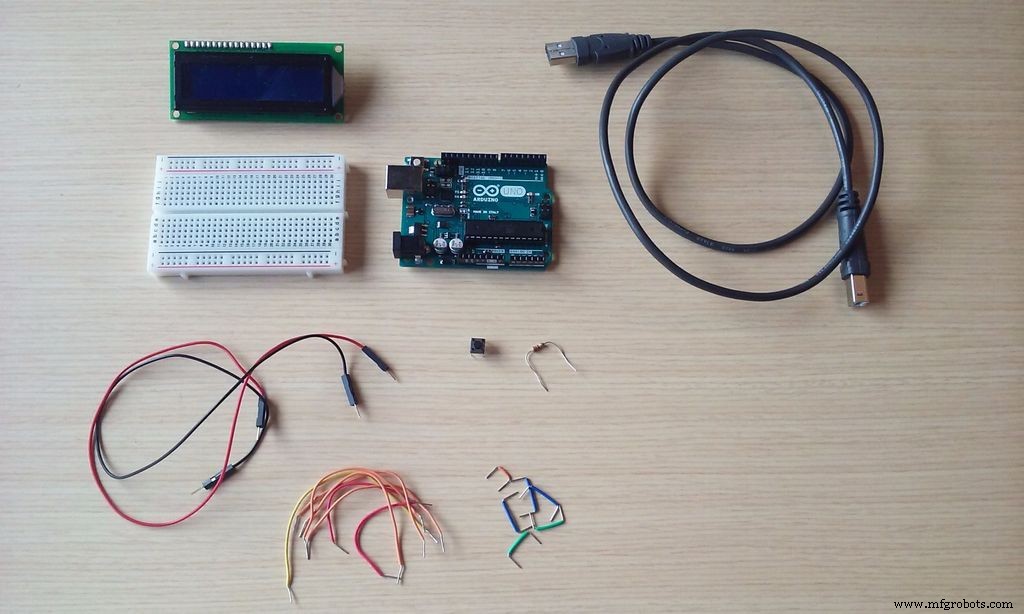
As peças necessárias estão mostradas na imagem acima. Comece com o Arduino desligado. NÃO conecte o cabo USB ainda. Isso acontecerá em uma etapa posterior quando for hora de programar e testar o jogo.
Conexões
Use um fio longo para conectar o sinal 5V do Arduino à extremidade esquerda da fileira vermelha no topo da protoboard.
Use um fio longo para conectar o sinal GND à extremidade esquerda da fileira preta (ou azul em algumas protoboards) no topo da protoboard.
O módulo LCD (Display de Cristal Líquido) tem um header macho de 16 pinos na parte inferior. Encaixe-o na protoboard conforme mostrado na imagem. Todos os sinais eletrônicos que alimentam e controlam o LCD passam por este header.
Estes pinos são (da esquerda para a direita):
- GND - sinal de terra
- VCC - sinal de alimentação positivo
- V0 - ajuste de contraste
- RS - seleção de registrador
- R/W - seleção leitura/escrita
- E - sinal de habilitação de operação
- DB0 a DB3 - bits de dados 0-3 (não usados aqui)
- DB4 a DB7 - bits de dados 4-7
- LED+ - backlight LED positivo
- LED- - backlight LED negativo
Usando fios curtos, conecte GND e LED- (pinos 1 e 16) à fileira preta no topo.
Da mesma forma, conecte VCC (pino 2) à fileira vermelha no topo com um fio curto.
Dobre os terminais do resistor de 220 Ω (faixas vermelho-vermelho-marrom) e conecte-o entre LED+ e a fileira vermelha no topo da protoboard.
Use fios mais longos para o restante das conexões:
- DB7 → Arduino pino 3
- DB6 → Arduino pino 4
- DB5 → Arduino pino 5
- DB4 → Arduino pino 6
- E → Arduino pino 9
- R/W → Arduino pino 10 (ou fileira preta no topo)
- RS → Arduino pino 11
- V0 → Arduino pino 12 (ou fileira preta no topo)
Encaixe o push button à esquerda do LCD, atravessando o canal central da protoboard (veja imagem). Conecte um dos dois pinos superiores do botão à fileira preta no topo usando fio curto. Conecte o outro pino superior do botão ao pino 2 do Arduino.
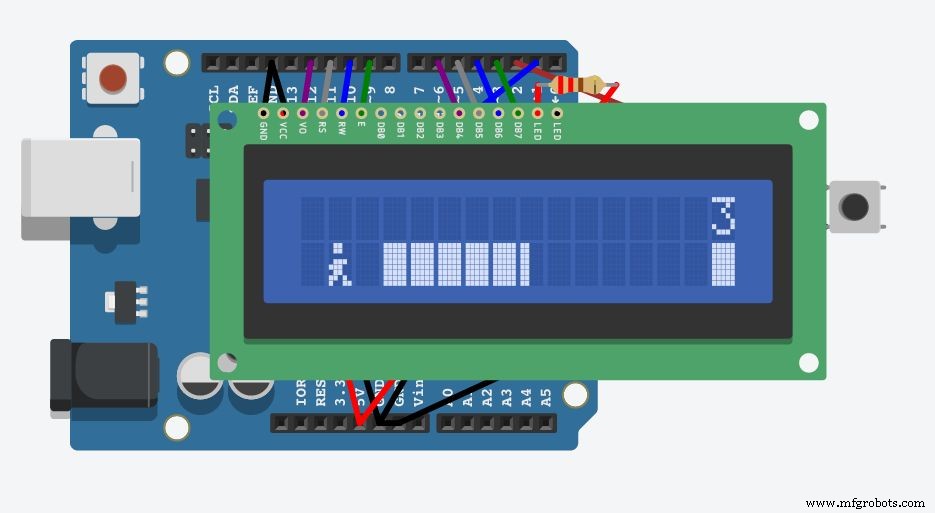
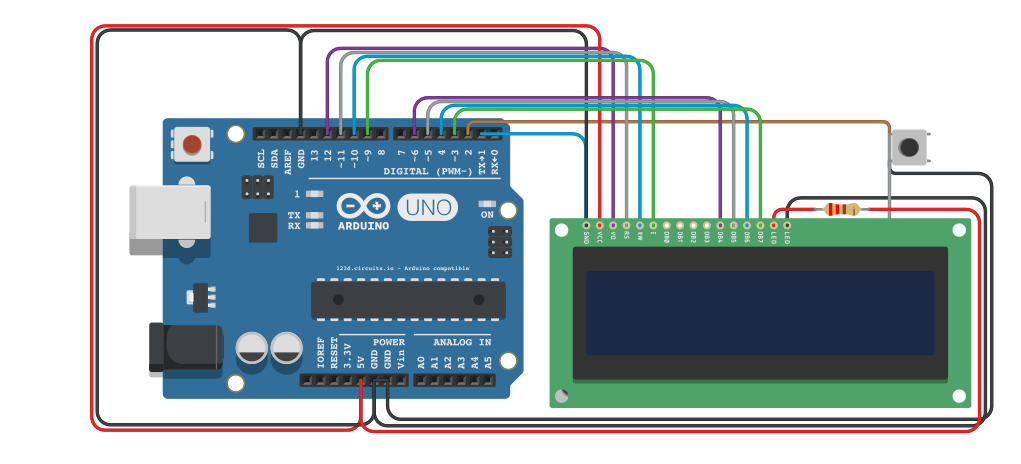
Código
LCD_Game.ino
#include <LiquidCrystal.h>
#define PIN_BUTTON 2
#define PIN_AUTOPLAY 1
#define PIN_READWRITE 10
#define PIN_CONTRAST 12
#define SPRITE_RUN1 1
#define SPRITE_RUN2 2
#define SPRITE_JUMP 3
#define SPRITE_JUMP_UPPER '.' // Use o caractere '.' para a cabeça
#define SPRITE_JUMP_LOWER 4
#define SPRITE_TERRAIN_EMPTY ' ' // Use o caractere ' '
#define SPRITE_TERRAIN_SOLID 5
#define SPRITE_TERRAIN_SOLID_RIGHT 6
#define SPRITE_TERRAIN_SOLID_LEFT 7
#define HERO_HORIZONTAL_POSITION 1
#define TERRAIN_WIDTH 16
#define TERRAIN_EMPTY 0
#define TERRAIN_LOWER_BLOCK 1
#define TERRAIN_UPPER_BLOCK 2
#define HERO_POSITION_OFF 0
#define HERO_POSITION_RUN_LOWER_1 1
#define HERO_POSITION_RUN_LOWER_2 2
#define HERO_POSITION_JUMP_1 3
#define HERO_POSITION_JUMP_2 4
#define HERO_POSITION_JUMP_3 5
#define HERO_POSITION_JUMP_4 6
#define HERO_POSITION_JUMP_5 7
#define HERO_POSITION_JUMP_6 8
#define HERO_POSITION_JUMP_7 9
#define HERO_POSITION_JUMP_8 10
#define HERO_POSITION_RUN_UPPER_1 11
#define HERO_POSITION_RUN_UPPER_2 12

LiquidCrystal lcd(11, 9, 6, 5, 4, 3);
static char terrainUpper[TERRAIN_WIDTH + 1];
static char terrainLower[TERRAIN_WIDTH + 1];
static bool buttonPushed = false;

void initializeGraphics() {
  static byte graphics[] = {
    // Posição corrida 1
    B01100, B01100, B00000, B01110, B11100, B01100, B11010, B10011,
    // Posição corrida 2
    B01100, B01100, B00000, B01100, B01100, B01100, B01100, B01110,
    // Pulo
    B01100, B01100, B00000, B11110, B01101, B11111, B10000, B00000,
    // Pulo inferior
    B11110, B01101, B11111, B10000, B00000, B00000, B00000, B00000,
    // Chão
    B11111, B11111, B11111, B11111, B11111, B11111, B11111, B11111,
    // Chão direita
    B00011, B00011, B00011, B00011, B00011, B00011, B00011, B00011,
    // Chão esquerda
    B11000, B11000, B11000, B11000, B11000, B11000, B11000, B11000,
  };
  for (int i = 0; i < 7; ++i) {
    lcd.createChar(i + 1, &graphics[i * 8]);
  }
  for (int i = 0; i < TERRAIN_WIDTH; ++i) {
    terrainUpper[i] = SPRITE_TERRAIN_EMPTY;
    terrainLower[i] = SPRITE_TERRAIN_EMPTY;
  }
}

// Desliza o terreno para a esquerda em incrementos de meio caractere
void advanceTerrain(char* terrain, byte newTerrain) {
  for (int i = 0; i < TERRAIN_WIDTH; ++i) {
    char current = terrain[i];
    char next = (i == TERRAIN_WIDTH-1) ? newTerrain : terrain[i+1];
    switch (current) {
      case SPRITE_TERRAIN_EMPTY:
        terrain[i] = (next == SPRITE_TERRAIN_SOLID) ? SPRITE_TERRAIN_SOLID_RIGHT : SPRITE_TERRAIN_EMPTY;
        break;
      case SPRITE_TERRAIN_SOLID:
        terrain[i] = (next == SPRITE_TERRAIN_EMPTY) ? SPRITE_TERRAIN_SOLID_LEFT : SPRITE_TERRAIN_SOLID;
        break;
      case SPRITE_TERRAIN_SOLID_RIGHT:
        terrain[i] = SPRITE_TERRAIN_SOLID;
        break;
      case SPRITE_TERRAIN_SOLID_LEFT:
        terrain[i] = SPRITE_TERRAIN_EMPTY;
        break;
    }
  }
}

bool drawHero(byte position, char* terrainUpper, char* terrainLower, unsigned int score) {
  bool collide = false;
  char upperSave = terrainUpper[HERO_HORIZONTAL_POSITION];
  char lowerSave = terrainLower[HERO_HORIZONTAL_POSITION];
  byte upper, lower;

  switch (position) {
    case HERO_POSITION_OFF: upper = lower = SPRITE_TERRAIN_EMPTY; break;
    case HERO_POSITION_RUN_LOWER_1: upper = SPRITE_TERRAIN_EMPTY; lower = SPRITE_RUN1; break;
    case HERO_POSITION_RUN_LOWER_2: upper = SPRITE_TERRAIN_EMPTY; lower = SPRITE_RUN2; break;
    case HERO_POSITION_JUMP_1: case HERO_POSITION_JUMP_8: upper = SPRITE_TERRAIN_EMPTY; lower = SPRITE_JUMP; break;
    case HERO_POSITION_JUMP_2: case HERO_POSITION_JUMP_7: upper = SPRITE_JUMP_UPPER; lower = SPRITE_JUMP_LOWER; break;
    case HERO_POSITION_JUMP_3: case HERO_POSITION_JUMP_4: case HERO_POSITION_JUMP_5: case HERO_POSITION_JUMP_6: upper = SPRITE_JUMP; lower = SPRITE_TERRAIN_EMPTY; break;
    case HERO_POSITION_RUN_UPPER_1: upper = SPRITE_RUN1; lower = SPRITE_TERRAIN_EMPTY; break;
    case HERO_POSITION_RUN_UPPER_2: upper = SPRITE_RUN2; lower = SPRITE_TERRAIN_EMPTY; break;
  }

  if (upper != ' ') {
    terrainUpper[HERO_HORIZONTAL_POSITION] = upper;
    collide = (upperSave == SPRITE_TERRAIN_EMPTY) ? false : true;
  }
  if (lower != ' ') {
    terrainLower[HERO_HORIZONTAL_POSITION] = lower;
    collide |= (lowerSave == SPRITE_TERRAIN_EMPTY) ? false : true;
  }

  byte digits = (score > 9999) ? 5 : (score > 999) ? 4 : (score > 99) ? 3 : (score > 9) ? 2 : 1;
  terrainUpper[TERRAIN_WIDTH] = '\0';
  terrainLower[TERRAIN_WIDTH] = '\0';
  char temp = terrainUpper[16-digits];
  terrainUpper[16-digits] = '\0';
  lcd.setCursor(0,0);
  lcd.print(terrainUpper);
  terrainUpper[16-digits] = temp;
  lcd.setCursor(0,1);
  lcd.print(terrainLower);
  lcd.setCursor(16 - digits,0);
  lcd.print(score);
  terrainUpper[HERO_HORIZONTAL_POSITION] = upperSave;
  terrainLower[HERO_HORIZONTAL_POSITION] = lowerSave;
  return collide;
}

void buttonPush() {
  buttonPushed = true;
}

void setup() {
  pinMode(PIN_READWRITE, OUTPUT);
  digitalWrite(PIN_READWRITE, LOW);
  pinMode(PIN_CONTRAST, OUTPUT);
  digitalWrite(PIN_CONTRAST, LOW);
  pinMode(PIN_BUTTON, INPUT);
  digitalWrite(PIN_BUTTON, HIGH);
  pinMode(PIN_AUTOPLAY, OUTPUT);
  digitalWrite(PIN_AUTOPLAY, HIGH);
  attachInterrupt(0, buttonPush, FALLING);
  initializeGraphics();
  lcd.begin(16, 2);
}

void loop() {
  static byte heroPos = HERO_POSITION_RUN_LOWER_1;
  static byte newTerrainType = TERRAIN_EMPTY;
  static byte newTerrainDuration = 1;
  static bool playing = false;
  static bool blink = false;
  static unsigned int distance = 0;

  if (!playing) {
    drawHero((blink) ? HERO_POSITION_OFF : heroPos, terrainUpper, terrainLower, distance >> 3);
    if (blink) {
      lcd.setCursor(0,0);
      lcd.print("Press Start");
    }
    delay(250);
    blink = !blink;
    if (buttonPushed) {
      initializeGraphics();
      heroPos = HERO_POSITION_RUN_LOWER_1;
      playing = true;
      buttonPushed = false;
      distance = 0;
    }
    return;
  }

  advanceTerrain(terrainLower, newTerrainType == TERRAIN_LOWER_BLOCK ? SPRITE_TERRAIN_SOLID : SPRITE_TERRAIN_EMPTY);
  advanceTerrain(terrainUpper, newTerrainType == TERRAIN_UPPER_BLOCK ? SPRITE_TERRAIN_SOLID : SPRITE_TERRAIN_EMPTY);

  if (--newTerrainDuration == 0) {
    if (newTerrainType == TERRAIN_EMPTY) {
      newTerrainType = (random(3) == 0) ? TERRAIN_UPPER_BLOCK : TERRAIN_LOWER_BLOCK;
      newTerrainDuration = 2 + random(10);
    } else {
      newTerrainType = TERRAIN_EMPTY;
      newTerrainDuration = 10 + random(10);
    }
  }

  if (buttonPushed) {
    if (heroPos <= HERO_POSITION_RUN_LOWER_2) heroPos = HERO_POSITION_JUMP_1;
    buttonPushed = false;
  }

  if (drawHero(heroPos, terrainUpper, terrainLower, distance >> 3)) {
    playing = false;
  } else {
    if (heroPos == HERO_POSITION_RUN_LOWER_2 || heroPos == HERO_POSITION_JUMP_8) {
      heroPos = HERO_POSITION_RUN_LOWER_1;
    } else if ((heroPos >= HERO_POSITION_JUMP_3 && heroPos <= HERO_POSITION_JUMP_5) && terrainLower[HERO_HORIZONTAL_POSITION] != SPRITE_TERRAIN_EMPTY) {
      heroPos = HERO_POSITION_RUN_UPPER_1;
    } else if (heroPos >= HERO_POSITION_RUN_UPPER_1 && terrainLower[HERO_HORIZONTAL_POSITION] == SPRITE_TERRAIN_EMPTY) {
      heroPos = HERO_POSITION_JUMP_5;
    } else if (heroPos == HERO_POSITION_RUN_UPPER_2) {
      heroPos = HERO_POSITION_RUN_UPPER_1;
    } else {
      ++heroPos;
    }
    ++distance;
    digitalWrite(PIN_AUTOPLAY, terrainLower[HERO_HORIZONTAL_POSITION + 2] == SPRITE_TERRAIN_EMPTY ? HIGH : LOW);
  }
  delay(100);
}
Esquemáticos
Nenhum documento.
Processo de manufatura
- Detector de Idiomas TinyML com Edge Impulse no Arduino Nano 33 BLE Sense
- Construa um Jogo em Tempo Real com Giroscópio: Arduino Nano + Sensor MPU-6050
- Dados Digital com Arduino: Gere Números Aleatórios 1-6 em LCD 16x2
- Construa Seu Próprio Jogo de Roleta com 37 LEDs e Arduino Nano
- Controle USB para Jogos DIY com Arduino – Construa Seu Próprio Gamepad de Alto Desempenho
- Jogo Interativo com Joystick e Arduino – Feedback com LEDs
- Find Me: Localizador Inteligente de Objetos com Arduino e Bluetooth
- Pixel Chaser: Jogo LED Interativo de Um Toque com Arduino Nano
- Osciloscópio DIY com Arduino Nano (10 Hz–50 kHz) e LCD 128×64
- Lâmpada de Mesa Reativa a Áudio com Arduino Nano