



Configuração Dual-Arduino para o Tema de Giorno (Il Vento Doro) – Precisão de Tom e Tempo
Componentes e Materiais
| Componente | Quantidade |
|---|---|
| Arduino UNO | 2 |
| Transistor MOSFET (chaveamento) | 2 |
| Alto-falante: 3W, 4 ohms | 4 |
| Resistor 1k ohm (0.25W) | 2 |
| Fonte para Protoboard SparkFun 5V/3.3V | 1 |
| Jumpers (genéricos) | 1 conjunto |
Ferramentas Necessárias
- Ferro de solda (genérico)
Software e Serviços Online
- Arduino IDE
Sobre o Projeto
Visão Geral
Este projeto demonstra como reproduzir o tema de Giorno (Il Vento Doro, de JoJo's Bizarre Adventure) utilizando duas placas Arduino para sobreposição precisa de notas. Aproveitando a função nativa tone() e um handshake digital simples, o sistema sincroniza ambas as unidades para tocar notas sobrepostas em tempo real.
A placa principal emite um pulso de gatilho no pino 2, que a placa secundária recebe via pino 3. Cada placa executa um array de forma de onda dedicado, garantindo que notas de oitava mais alta sejam tocadas no segundo Arduino para evitar clipping de frequência.
Código
Parte 1 do Tema de Giorno (Arduino Primário)
#include "Color.h"
int S[] = {
  Pink1, 0, Pink1, 0, Pink1, Blue1, 0, Pink1, 0, Orange2, 0, Pink1, 0, Green1, Blue1, 0,
  Pink1, 0, Pink1, 0, Pink1, Blue1, 0, Pink1, 0, LGreen2, 0, Yellow2, 0, Orange2, Blue1, 0,
  Pink1, 0, Pink1, 0, Pink1, Blue1, 0, Pink1, 0, Orange2, 0, Pink1, 0, Green1, Blue1, 0,
  Pink1, 0, Pink1, 0, Pink1, Blue1, Pink1, Orange2, 0, LGreen2, 0, Yellow2, 0, Orange2, Blue1, 0,
  Pink1, 0, Pink1, 0, Pink1, Blue1, 0, Pink1, 0, Orange2, 0, Pink1, 0, Green1, Blue1, 0,
  Pink1, 0, Pink1, 0, Pink1, Blue1, 0, Pink1, 0, LGreen2, 0, Yellow2, 0, Orange2, Blue1, 0,
  Pink1, 0, Pink1, 0, Pink1, Blue1, 0, Pink1, 0, Orange2, 0, Pink1, 0, Green1, Blue1, 0,
  Pink1, 0, Pink1, 0, Pink1, 0, Blue1, Pink1, 0, 0, 0, 0, Pink1, 0, Orange2, 0, Yellow2,
  LGreen2, 0, Green2, 0, Blue2, 0, Green2, 0, Blue2, Purple2, 0, Pink2, 0, Purple2, 0,
  Blue2, Green2, 0, Yellow2, 0, Orange2, LBlue1, 0, Blue1, 0, Purple1, 0, Pink1, 0,
  Orange2, 0, Yellow2, LGreen2, 0, Green2, 0, Blue2, 0, Green2, 0, Blue2, Purple2, 0,
  Pink2, 0, Purple2, 0, Blue2, Green2, 0, Yellow2, 0, Orange2, LBlue1, 0, Blue1, 0,
  Purple1, 0, Pink1, 0, Orange2, 0, Yellow2, LGreen2, 0, Green2, 0, Blue2, 0, Green2, 0,
  Blue2, Purple2, 0, Pink2, 0, Blue2, Pink2, Blue2, 0, Purple2, Pink2, 0, LBlue1, 0,
  LBlue1, Blue1, Blue1, Purple1, 0, Orange2, DOrange2, Pink1, 0, Blue1, 0, 0, Pink1, 0,
  0, Pink1, 0, 0, 0, Green1, 0, Blue1, 0, Pink1, 0, DOrange2, 0, 0, Blue1, 0, 0,
  Pink1, 0, 0, 0, 0, 0, Orange2, DOrange2, Pink1, 0, Blue1, 0, 0, Pink1, 0, 0,
  Pink1, 0, 0, Green1, 0, 0, DOrange2, 0, Orange2, 0, DOrange2, 0, 0, Blue1, 0,
  DOrange1, Yellow1, Green1, DOrange1, Green1, LBlue1, Pink1, Orange2, DOrange2, Pink1, 0,
  Blue1, 0, 0, Pink1, 0, 0, Pink1, 0, 0, 0, Green1, 0, Blue1, 0, Pink1, 0, DOrange2, 0,
  0, Blue1, 0, 0, Pink1, 0, 0, 0, 0, 0, Orange2, DOrange2, Pink1, 0, Blue1, Orange2, 0,
  Green2, Yellow2, Orange2, Pink1, 0, Blue2, LBlue2, 0, Green2, Orange2, DOrange2, 0,
  Pink1, Blue1, Pink1, 0, Blue1, Pink1, 0, Blue1, Pink1, 0, Blue1, Pink1, 0, Blue1,
  Pink1, 0, Blue1, Pink1, Orange2, 0, Green2, 0, 0, 0, 0, 0, Orange2, 0, 0, 0, 0,
  0, 0, Orange2, Yellow2, LGreen2, 0, 0, Yellow2, 0, 0, Orange2, 0, DOrange2, 0,
  0, Orange2, 0, 0, Yellow2, 0, Green2, 0, 0, 0, 0, 0, Pink2, 0, 0, 0, 0, 0,
  Pink1, 0, DOrange2, 0, Orange2, 0, 0, Yellow2, 0, 0, Orange2, 0, DOrange2, 0,
  0, Blue2, 0, 0, DGreen2, 0, Green2, 0, 0, 0, 0, 0, Orange2, 0, 0, 0, 0, 0,
  0, Orange2, Yellow2, LGreen2, 0, 0, Yellow2, 0, 0, Orange2, 0, DOrange2, 0,
  0, Orange2, 0, 0, Yellow2, 0, Green2, 0, 0, 0, 0, 0, Pink2, 0, 0, 0, 0, 0,
  Green2, 0, Purple2, 0, Pink2, 0, 0, DGreen2, 0, 0, Green2, 0, LGreen2, 0,
  0, Pink2, 0, 0, Green2, 0, Green2
};
int L = sizeof(S);
int nds = 10;

void setup() {
  Serial.begin(115200);
  pinMode(2, OUTPUT);
  L = L / 2;
  Serial.println(L);
  Tone();
}

void loop() {}

void Tone() {
  digitalWrite(2, HIGH);
  for (int n = 0; n < L; n++) {
    int nd = 1000 / nds;
    tone(6, S[n], nd);
    int d = nd * 1.2;
    delay(d);
    noTone(6);
  }
}
Parte 2 do Tema de Giorno (Arduino Secundário)
#include "Color.h"
int S[] = {
  0, 0, 0, 0, 0, 0, 0, 0, 0, 0, 0, 0, 0, 0, 0, 0, 0, 0, 0, 0, 0, 0, 0, 0, 0, 0, 0, 0, 0, 0,
  0, 0, 0, 0, 0, 0, 0, 0, 0, 0, 0, 0, 0, 0, 0, 0, 0, 0, 0, 0, 0, 0, 0, 0, 0, 0, 0, 0, 0, 0,
  Pink2, 0, Pink2, 0, Pink2, Blue2, 0, Pink2, 0, Orange3, 0, Pink2, 0, Green2, Blue2, 0,
  Pink2, 0, Pink2, 0, Pink2, Blue2, 0, Pink2, 0, LGreen3, 0, Yellow3, 0, Orange3, Blue2, 0,
  Pink2, 0, Pink2, 0, Pink2, Blue2, 0, Pink2, 0, Orange3, 0, Pink2, 0, Green2, Blue2, 0,
  Pink2, 0, Pink2, 0, Pink2, 0, Blue2, Pink2, 0, 0, 0, 0, 0, 0, 0, 0, 0, 0, 0, 0, 0, 0, 0,
  0, 0, 0, 0, 0, 0, 0, 0, 0, 0, 0, 0, 0, 0, 0, 0, 0, 0, 0, 0, 0, 0, 0, 0, 0, 0, 0, 0, 0,
  0, 0, 0, 0, 0, 0, 0, 0, 0, 0, 0, 0, 0, 0, 0, 0, 0, 0, 0, 0, 0, 0, 0, 0, 0, 0, 0, 0, 0,
  0, 0, 0, 0, 0, 0, 0, 0, 0, 0, 0, 0, 0, 0, 0, 0, 0, 0, 0, 0, 0, 0, 0, 0, 0, 0, 0, 0, 0,
  Orange3, DOrange3, Pink2, 0, Blue2, 0, 0, Pink2, 0, 0, Pink2, 0, 0, 0, Green2, 0, Blue2, 0,
  Pink2, 0, DOrange3, 0, 0, Blue2, 0, 0, Pink2, 0, 0, 0, 0, 0, Orange3, DOrange3, Pink2, 0,
  Blue2, 0, 0, Pink2, 0, 0, Pink2, 0, 0, Green2, 0, 0, DOrange3, 0, Orange3, 0, DOrange3, 0,
  0, Blue2, 0, DOrange2, Yellow2, Green2, DOrange2, Green2, LBlue2, Pink2, Orange3, DOrange3,
  Pink2, 0, Blue2, 0, 0, Pink2, 0, 0, Pink2, 0, 0, 0, Green2, 0, Blue2, 0, Pink2, 0, DOrange3,
  0, 0, Blue2, 0, 0, Pink2, 0, 0, 0, 0, 0, Orange3, DOrange3, Pink2, 0, Blue2, Orange3, 0,
  Green3, Yellow3, Orange3, Pink2, 0, Blue3, LBlue3, 0, Green3, Orange3, DOrange3, 0,
  Pink2, Blue2, Pink2, 0, Blue2, Pink2, 0, Blue2, Pink2, 0, Blue2, Pink2, 0, Blue2, Pink2,
  Orange3, 0, Green2, 0, 0, 0, 0, 0, Orange2, 0, 0, 0, 0, 0, 0, Orange2, Yellow2, LGreen2,
  0, 0, Yellow2, 0, 0, Orange2, 0, DOrange2, 0, 0, Orange2, 0, 0, Yellow2, 0, Green2, 0,
  0, 0, 0, 0, Pink2, 0, 0, 0, 0, 0, Pink1, 0, DOrange2, 0, Orange2, 0, 0, Yellow2, 0,
  0, Orange2, 0, DOrange2, 0, 0, Blue2, 0, 0, DGreen2, 0, Green2, 0, 0, 0, 0, 0, Orange2,
  0, 0, 0, 0, 0, 0, Orange2, Yellow2, LGreen2, 0, 0, Yellow2, 0, 0, Orange2, 0, DOrange2,
  0, 0, Orange2, 0, 0, Yellow2, 0, Green2, 0, 0, 0, 0, 0, Pink2, 0, 0, 0, 0, 0, Pink2, 0,
  DOrange3, 0, Orange3, 0, 0, DGreen3, 0, 0, Green3, 0, LGreen3, 0, 0, Orange3, 0, 0,
  Purple2, 0, Pink2
};
int L = sizeof(S);
int nds = 10;

void setup() {
  Serial.begin(115200);
  pinMode(3, INPUT_PULLUP);
  L = L / 2;
  Serial.println(L);
}

void loop() {
  if (!digitalRead(3)) {
    Tone();
  }
}

void Tone() {
  for (int n = 0; n < L; n++) {
    int nd = 1000 / nds;
    tone(6, S[n], nd);
    int d = nd * 1.2;
    delay(d);
    noTone(6);
  }
}
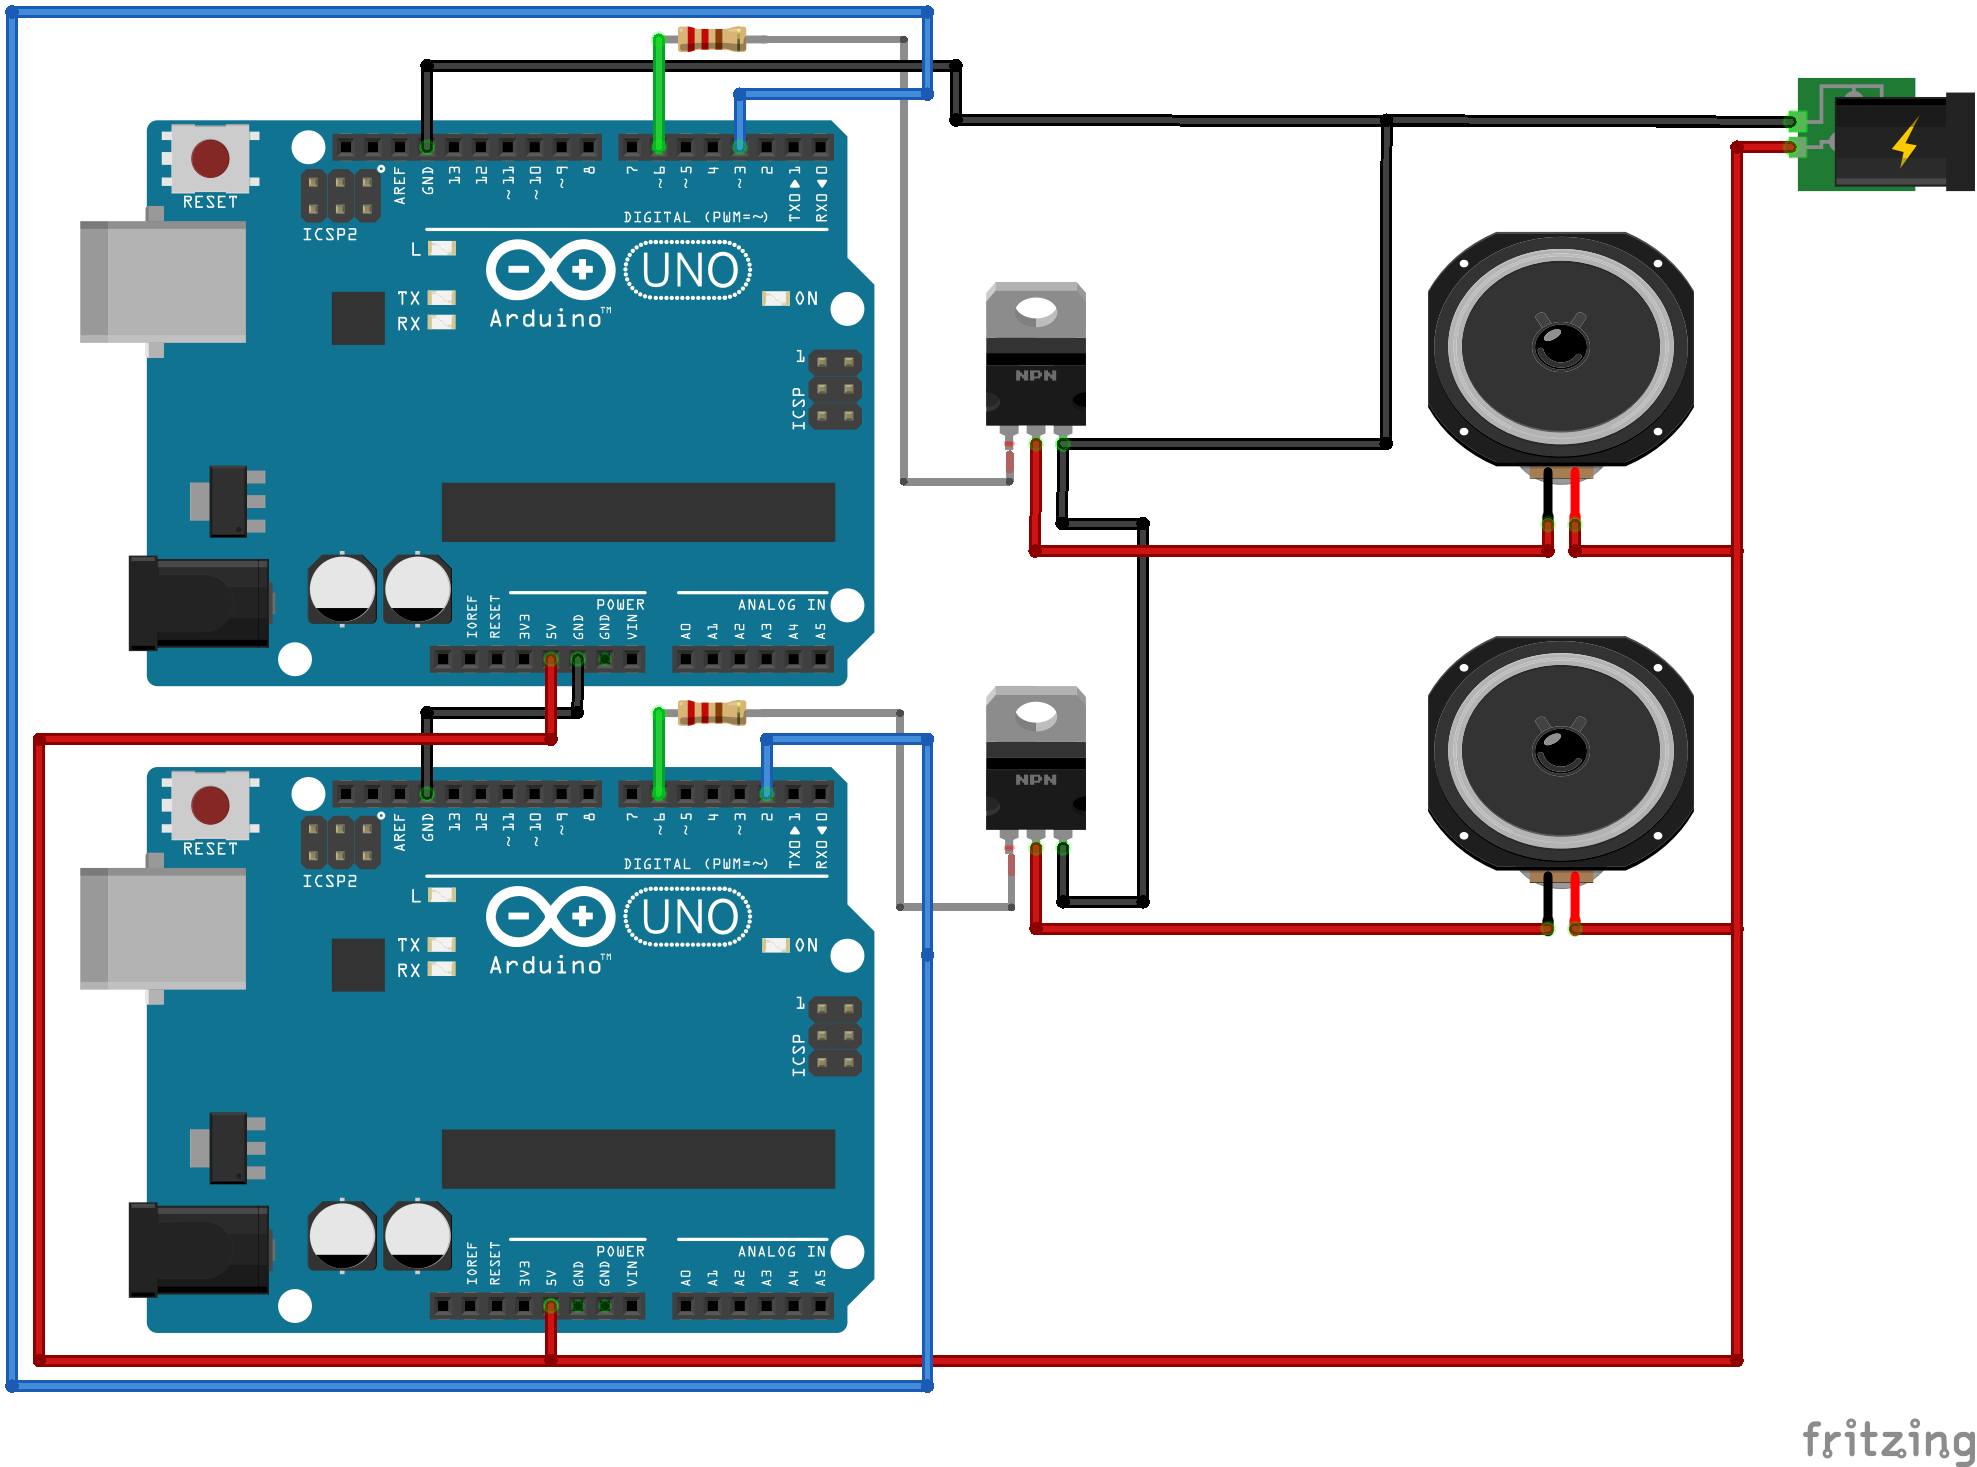
Esquemático
O diagrama de ligação mostra a conexão dos alto-falantes via transistores MOSFET aos pinos 6 de cada Arduino, com o pino 2 do Arduino primário conectado ao pino 3 do secundário para sincronização. A alimentação dos alto-falantes é feita pela fonte de protoboard (5V).
Processo de manufatura
- Detector de Idiomas TinyML com Edge Impulse no Arduino Nano 33 BLE Sense
- Construa um Jogo em Tempo Real com Giroscópio: Arduino Nano + Sensor MPU-6050
- Dados Digital com Arduino: Gere Números Aleatórios 1-6 em LCD 16x2
- Construa Seu Próprio Jogo de Roleta com 37 LEDs e Arduino Nano
- ATtiny85 Mini Arcade: Snake – Construa um Console Portátil de Jogos OLED
- Detector de Alcance Portátil – Kit DIY Arduino Nano com HC-SR04, Bateria 18650 e Gabinete 3D
- Lâmpada de Mesa Reativa a Áudio com Arduino Nano
- Carro Robô Autônomo de Rastreamento Facial com Arduino Nano e OpenCV
- Projeto de Galvanoplastia de Cobre: Construa um Sistema Inteligente com Arduino UNO
- Jogo Pong Neon em Matriz NeoPixel com Arduino Nano